|
25 December, 2015
Merry Christmas!
22 December, 2015 This is probably our last activity for 2015 with Christmas just a couple of days away followed by some time in Baja for New Years'..... I'll be off the first couple of weeks in January though, so hopefully I'll have some progress to report. Today, I picked up our motor from Jason at Paradise Motor Sports after our normal post-race "freshening" then dropped it off at our shop and spent a little time "body-working" the windshield frame repair. I have just a little more sanding and filling to do before it's time for primer/paint. I forgot about the DZUS mount tabs that we still need to weld on to the new front cage tubes to attach the sheet metal - I can't really do that until the front bumper is installed so I guess I'll have to get on that next.....
07 December, 2015 Easy solution to Trevor's daily driver lug bolt problem - take the car to the VW dealer he bought it from and have them pull the keyed bolts and replace them with standard bolts - 30 minutes and $23 for the new bolts. Now he can move forward on his body kit and more importantly, he'll be able change a tire if he gets a flat on the road!
06 December, 2015 Trevor and I spent about half the day at the shop - he ran into some problems with his body kit that forced a pause..... Nothing major; he just discovered that the wheels on his new daily driver have keyed lug bolts and he doesn't have the key..... We thought we could get them off without the key but the design of these particular bolts precludes the usual method. He needs the wheels off the car to go any further so he'll be researching the solution to the problem tomorrow. Since he came to a stopping point, we decided to call it a day. While Trevor was working on his car, I was finishing up the structural repair of the race car windshield frame. Aside from the actual frame head repair, this was the area that most concerned me - there was a significant amount of windshield frame damage as a result of the broken front suspension and we had a fair sized gap to fill..... It all worked out fine though, I just bent some steel inserts to fill the gap and welded them in place. It's now all re-connected and I've begun the "body-work" stage to blend the repair so that it's not visible. I have all the welds ground down to below flush with the surroundings and have applied the first layer of filler to smooth the area. Next time, I'll sand and fill until the area is ready for primer, then paint.
05 December, 2015 Full day at the shop today - Trevor worked on his daily driver body kit and I worked on the race car (and a couple of other things). No major progress to report - I worked on restoring the windshield frame that we cut to facilitate repair of the front cage. The co-driver's side was easy - no gaps. The driver's side took a little more effort because it had broken during the 2014 Baja 1000 and the two ends "worked" against each other for a few hundred miles. I cut back the damaged areas to find good metal, then inserted backing material to fill the gap and welded it all together. It's structurally complete; I just need to make it pretty now....
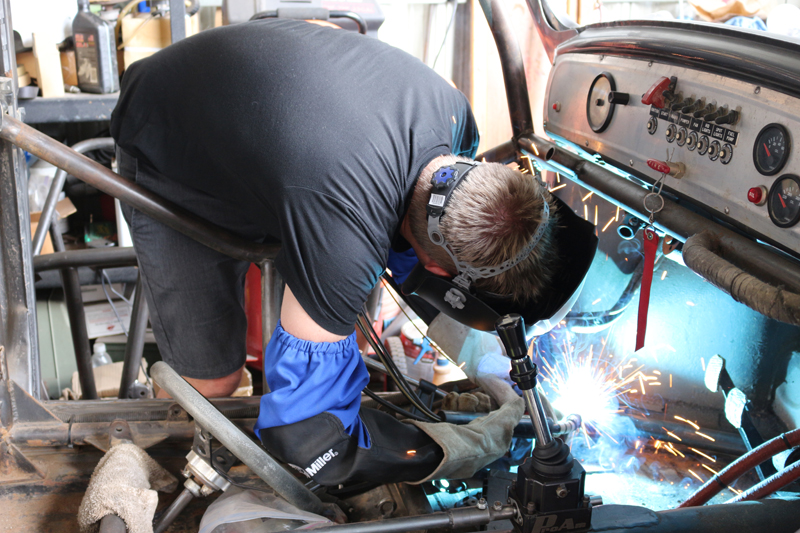
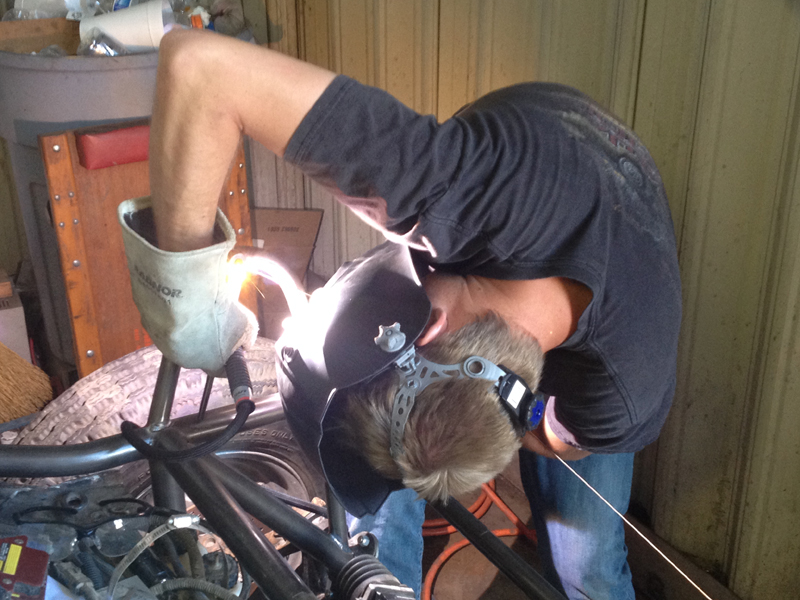
29 November, 2015 I haven't really had time to work on the car over the last few days; I had to fly a trip for work and then celebrated Thanksgiving so nothing much done on the car for a bit. Today, I spent a couple of hours working on our MIG welder; it's an ancient Millermatic 35 on loan from my brother at Custom Aircraft Parts that has been in the family since 1976 or so. It's still a great machine but I've been wanting to restore it to "like new" performance, if not appearance. The machine is so old that replacement parts are virtually unavailable, so we're having to improvise a bit..... Fortunately, none of the electrical parts need replacing, just a good cleaning. The "mig-gun" and cable(s) are another matter though. The gun is worn to near uselessness and replacement parts are not available. I can buy a conversion kit that uses a modern gun for which replacement parts are available but I don't know if I want to spend 1/3 the cost of a new welder on just the conversion kit (for a 40 year old welder)...... So, the next best thing was to do a little repair/restoration of the existing parts. Following a thorough cleaning and inspection of the power unit and wire feed mechanism, I spent some time re-fitting the mig-gun parts to eliminate all the slop that had accumulated over the years. A new contact tip and shimming the nozzle seem to have transformed the welder! This welder is one known for wire feed problems, that's my primary reason for the overhaul. With all the cleaning, inside and out, the welder seems to perform like new. No wire feed problems and it produces excellent welds again. Should have done this before building the car..... With the welder all tuned up, I had to try it out. There were a couple of places on the car where I could do a little welding; I was pleased with the results. I think it'll be a pleasant surprise to Trevor next time he uses it - there is still a little welding to do before the car is done.
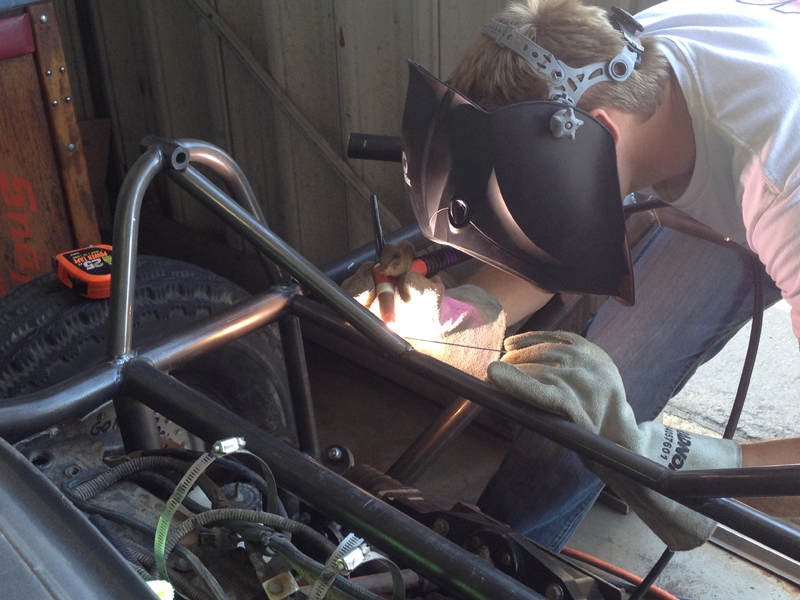
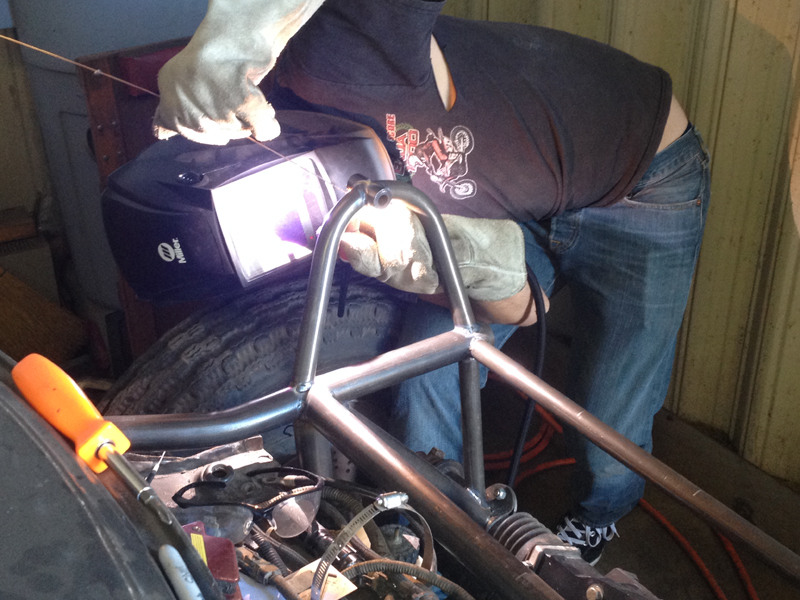
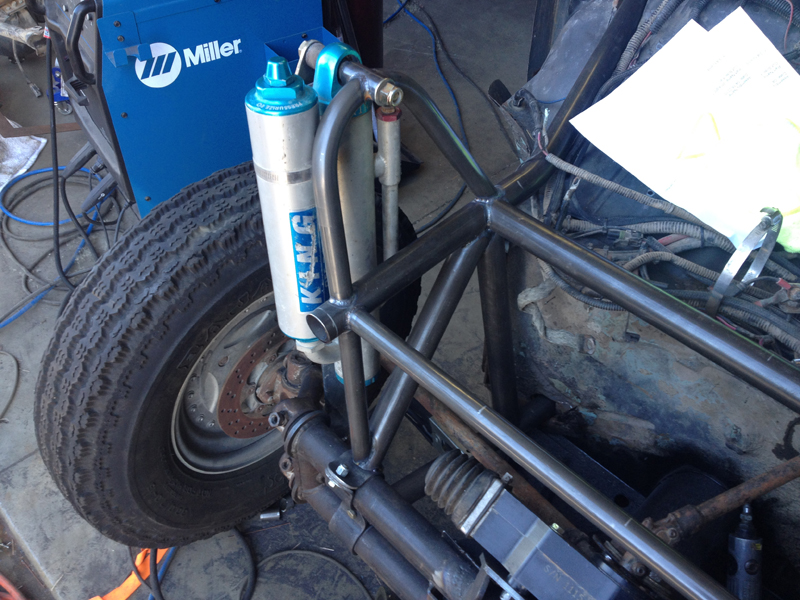
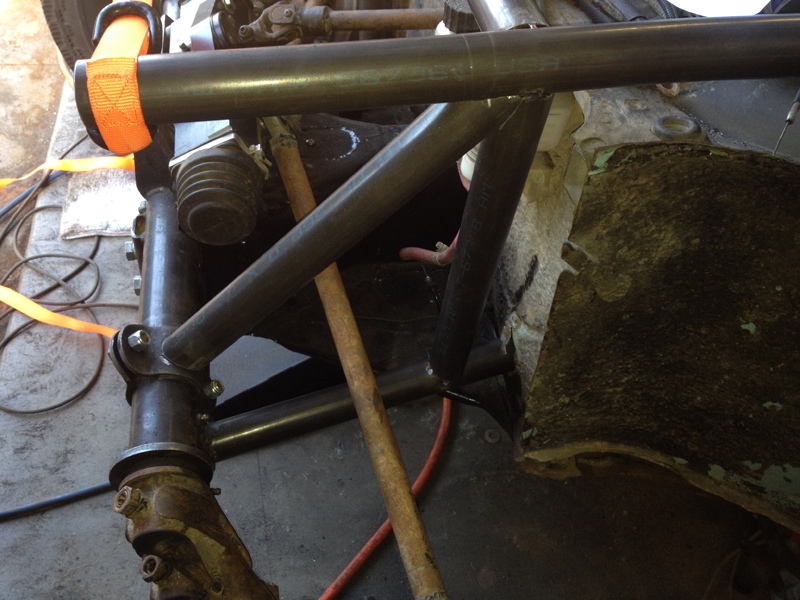
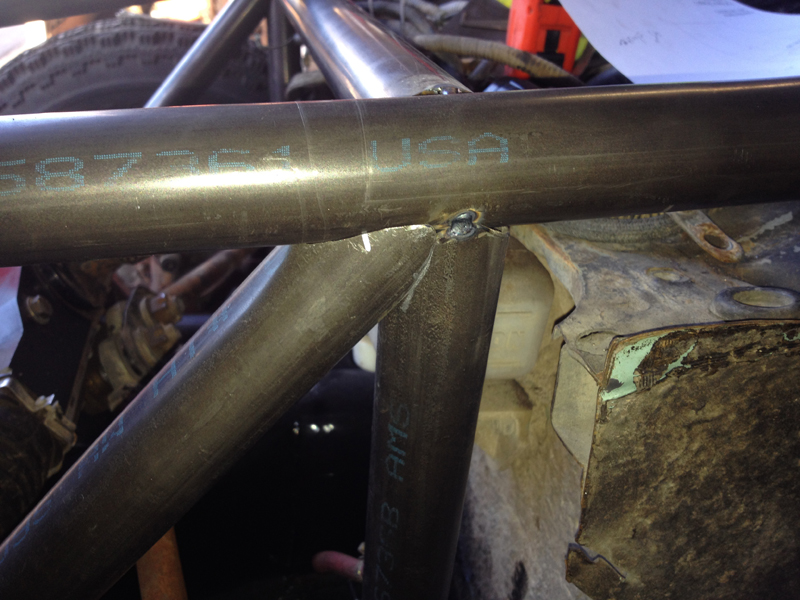
22 November, 2015 Trevor and I had another productive day at the shop; he continued making progress on his daily driver project and I made progress on the race car. Trevor finished welding in the new gussets; our front cage repair is now structurally complete. There is a small amount of additional welding to be done - DZUS receptacles for the front end sheet metal and final welding of the front bumper lower beam mounts. While Trevor was working on his daily driver, I cleaned and inspected the interior cage structure. Following that, I removed the exhaust system and cleaned the engine for delivery to Jason at Paradise Motor Sports for service. Finally, I installed the front shocks - it's starting to look like a race car again!
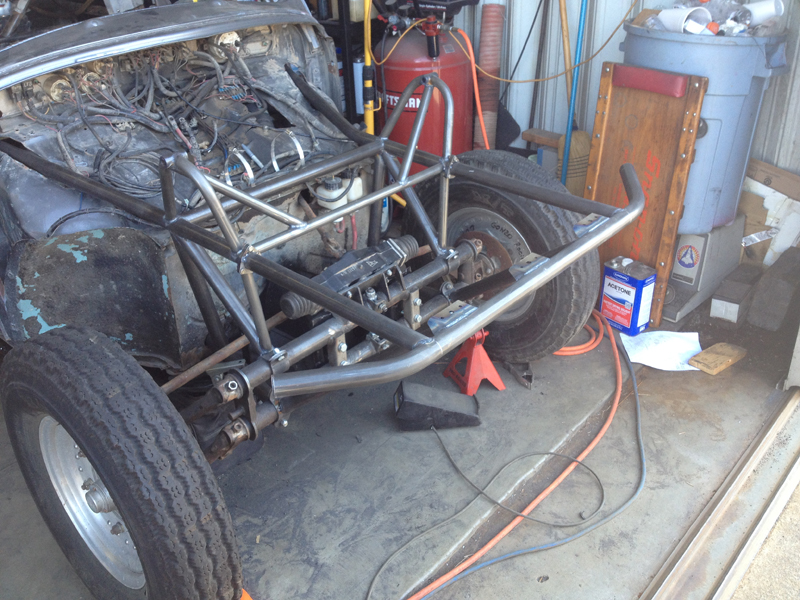
21 November, 2015 Trevor and I spent the entire day at the shop today, working on both the race car and his daily driver. Trevor welded the steering spindle and several of the remaining cage repair gussets - there are a few left to do tomorrow. With the spindle repaired, I was able to complete the reassembly of the front suspension. Afterwards, I finished up the installation of the rear "micro-stub"/"stub-axle" assemblies. The bearings in one of the micro-stub assemblies needed to be serviced; I had to disassemble the unit to access the bearings which cost a little time but it was time well spent. With both the front and rear axle assemblies complete, I was able to get the car back on it's wheels and off the jack-stands today. We plan to spend tomorrow at the shop again, hopefully another productive day.
17 November, 2015 I did just a couple of things today; I went to "Custom Aircraft Parts" to cut out all the remaining gussets we need to complete the structural repairs of the front cage assembly, then headed to the shop to fine tune the fit of each. All the gussets are now ready to weld into position - Trevor is going to be busy welding this weekend! I had a few more minutes available afterwards so I cleaned, inspected and installed the rear brake calipers. Not much progress but some is better than none..... Not having all the tools we need at our shop really slows things down. I expect to make significant progress this weekend though - now that Trevor can get all the welding done, I should be able to get the car back on the wheels and start final assembly (I plan to "wring out" the electrical system as part of final assembly).
16 November, 2015 I rounded up all the hardware needed to finish reassembly of the car today. With that done, I was able to install the rear trailing arms and micro-stub assemblies. As always there were a few things that needed attention along the way, slowing the assembly process..... Nothing major, just little things that I wanted to make "right". To complete the rear suspension, I just need to torque and pin the stub axle nuts and install the shocks - about an hours' work. Trevor and I are hoping to spend most of next weekend at the shop; he wants to modify some body "kit" parts for his daily driver and I hope to have all the welding on the race car ready for him to finish......
14 November, 2015 Short day at the shop today, just worked on a couple of things. I spent most of my time working on the brakes, getting the entire system from the reservoirs to the calipers cleaned, inspected, adjusted and re-connected. Following that, I carefully bled all the air out of the new master cylinder and the brake lines - ending with functional brakes and a firm brake pedal. Always nice to have everything go as expected. After the brakes, I returned to the rear suspension where I completed the installation of the spring plate caps - we're now ready to install the trailing arms. While securing the driver's side cap, I noted that the part of the torsion housing end casting that connects to the floor pan "jack point" was broken. I spent a few minutes welding it back together; it should be good for another few years...... I had hoped to install the rear trailing arms but found that we don't have all the new hardware we need; we don't re-use stuff in the high stress areas. Everything is ready to go back together after a trip to "Ababa Bolt" on Monday.
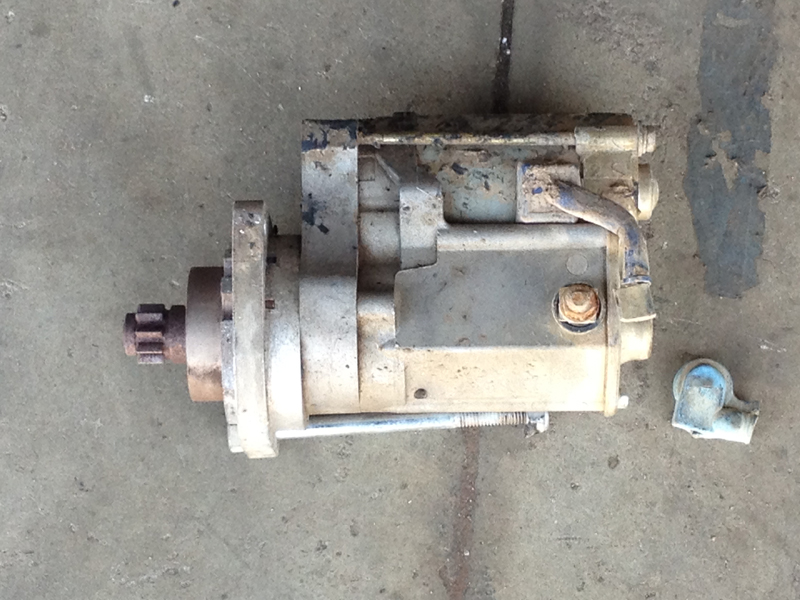
12 November, 2015 I spent some time at Industrial Metal Supply today; I needed to get some steel to make a few gussets and some copper sheet to repair our failed starter solenoid connector. I know that pre-cut gussets are available but only for right-angle joints (none of our joints are right angles in the area we're working on). Afterwards, I went by the shop to pick up the starter and my gusset templates to work at home tonight. Once home, I fabricated and installed a new terminal end for the failed starter cable terminal then tested the repair; the starter works perfectly now but we'll keep it as our "spare" and use the new unit that had previously been our spare. I laid out all the gusset outlines on the steel stock, now I just need to spend some time with a band saw and grinder..... I'd like to have all the gussets fitted and ready to weld so that Trevor can do it all in one session. We don't have a band saw at our shop so I'll have to make a run out to Custom Aircraft Parts to use theirs (or, I could spend twice as much time cutting them out with a hack saw.....).
11 November, 2015 I was supposed to work this week; I had 3 trips to fly but I was "bumped" from all 3! The company wanted to use my trips to do some new pilot training so they paid me to stay home - I'm sure I'll end up paying for it somehow..... Anyway, it was great to be able to spend another couple of days working on the car. I concentrated on the rear suspension today - I spent hours cleaning, inspecting and re-"blacking" the trailing arms, then inspected the rear torsion housing for problems. Once I was sure that the torsion housing was in good shape I began the reassembly process. I had already cleaned and inspected the torsion bars, spring plates and adjuster "fingers" so I was able to build the rear suspension to "ready for trailing arms" condition. I installed new spring plate grommets while assembling the torsion bars and spring plates into the housing and new trailing arm inner pivot bushings as well. I need to secure the spring plate caps, then I can install the trailing arms, micro stub assemblies and shocks to complete the rear suspension. I'm waiting on Trevor to weld one of the front spindle steering arms, then I can finish up the front suspension as well; the car could be back on the wheels soon! I need to get the engine over to Jason at Paradise Motor Sports for a check-up; otherwise, the car will be done but we'll be waiting on the engine..... Closing out the day, I made some templates for roll cage gussets that we want to add when Trevor has time to weld. Hopefully, I can get the welding projects organized for him and get it all done in one session.
09 November, 2015 Another day at the shop - I spent the day working on the pedal cluster, brakes and electrical system. We are required by SCORE's Class 5/1600 rules to keep a stock VW pedal cluster in our car; no high tech. hardware there - we still have a cable actuated clutch and throttle. This is an area that we check carefully after every race - there's a lot going on there and all of it is critical..... The stock pedal cluster combines the clutch, brake and throttle pedals in one assembly; a failure in any one could cost us a win or finish - so we inspect and replace parts before they show signs of distress. I cleaned, inspected and lubed the pedal assembly, paying particular attention to the clutch "hook" (the portion that pulls on the clutch cable when you push on the clutch pedal). I replaced the clutch cable, even though it looked fine - it's cheap insurance. Replacing a clutch cable during a race is a nightmare...... I cleaned, inspected, lubed and reinstalled the heavy duty throttle cable (easy to replace compared to the clutch cable). At this point, I'm confident that the risk of problems with our clutch and throttle pedals/cables is very low. Following the pedal assembly work, I began restoring the brake system. We had removed the brake master cylinder and all the associated "hard lines" to facilitate our repairs to the front end. Rather than re-use the old master cylinder, I elected to install a new one - more cheap insurance. I need to buy some new hose to connect to the brake fluid reservoirs to finish up. Finally, I spent a little time on the electrical system; I replaced the battery disconnect switch (a previous problem area so we replace it after every race - even more cheap insurance!) and began sorting out the front end wiring harness. It looks like I'll need to do a little repair work there - a few of the connectors are showing evidence of corrosion problems.
06 November, 2015 Trevor has been in Las Vegas covering the SEMA show all week for "Power Automedia", an on-line automotive magazine and his employer. He's recently joined their video productions group as an on-screen presenter in addition to his editorial duties. Here's a link to his first on-screen appearance at the SEMA show: https://www.youtube.com/watch?v=kUOu1Bo7CeE
04 November, 2015 A little progress made on the car today; I prepped our front spindle assemblies and final installed the front trailing arms. Installing the trailing arms is a bit of a wrestling match - the torsion packs don't want to lay perfectly flat with the ends aligned so that they seat into the trailing arms correctly..... A little masking tape helps keep everything lined up but it's still a challenge to put it together. After about an hour, I finally got everything installed to my satisfaction (I may be a little obsessive about getting things exactly right.....). Afterwards, I spent the remainder of my time "overhauling" our spindle assemblies - cleaning and re-greasing the bearings and installing new link pin bushings. The left side is ready to go but the right side needs a little bit of welding on the steering arm before it's ready. Hopefully Trevor can find some time to weld it this weekend.
02 November, 2015 I've been in Baja for the last week, doing our normal "post summer" check-up on our house there. The summer heat is hard on stuff so we try to check on the house as soon as the daytime temps. fall into a survivable range.... Anyway, no work on the car over the last week as a result. While we were in Baja, Rick St. John of "Power Box" emailed me to let me know that our transaxle and suspension parts were all inspected and ready to be picked up so I went by this morning and collected everything. No problems with the transaxle, just the normal overhaul items - bearings, seals, etc.. No major issues with the suspension parts either - one small crack to be welded on one of the front steering spindles. Hopefully I can get Trevor to weld it up next weekend (he's at the SEMA show in Las Vegas for the week), then I can begin reassembly of the front end.
24 October, 2015 I hadn't intended to go to the shop today but Trevor wanted to do some things there so I tagged along and got a few things done on the car. I spent a fair bit of time working on the steering and front suspension; the Char-Lynn unit and steering linkages are final installed, the trailing arm bushings are all cleaned, inspected and greased and the new front torsion packs are installed. We're ready for the trailing arms and spindles once they come back from inspection. I've begun inspecting/testing the electrical system to try to isolate where the problems we encountered at the 2014 Baja 1000 are located. I found one obvious problem and one possible problem today; the starter solenoid to starter motor cable connector is broken, hence the inability to crank the motor even with a known good battery. Also, the alternator may have an internal short circuit (the excitation circuit seems to draw way more current than I thought it should - checking another alternator to make certain). These two issues may explain all of the electrical problems we encountered but we'll keep looking....
23 October, 2015 I was able to get a few things done at the shop today. I worked almost entirely on the rear section of the car - the fuel cell and "shelf" area, followed by the torsion housing and frame horn (engine cradle) areas. Inside the car I cleaned, inspected and applied a rust preventative to all the roll cage tubing from the "B" pillar back, cleaned and inspected the fuel cell, cleaned and tested the oil cooler fans, reinstalled the engine air filter and replaced the fuel filter. I also renovated our power steering fluid reservoir/filter unit and replaced the filter. Outside the car, I began the cleaning and inspection process for the rear torsion housing and frame horns. At the front of the car, I replaced the trailing arm bushing that I removed in order to get the torsion adjuster out for service. Next time, I need to clear away all the parts that I've stored under the car so I can get an up-close look at the torsion housing.
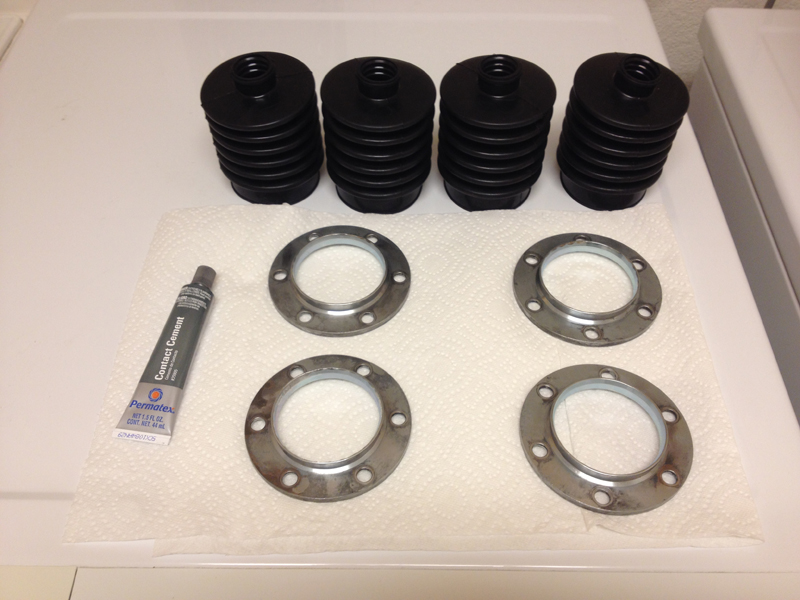
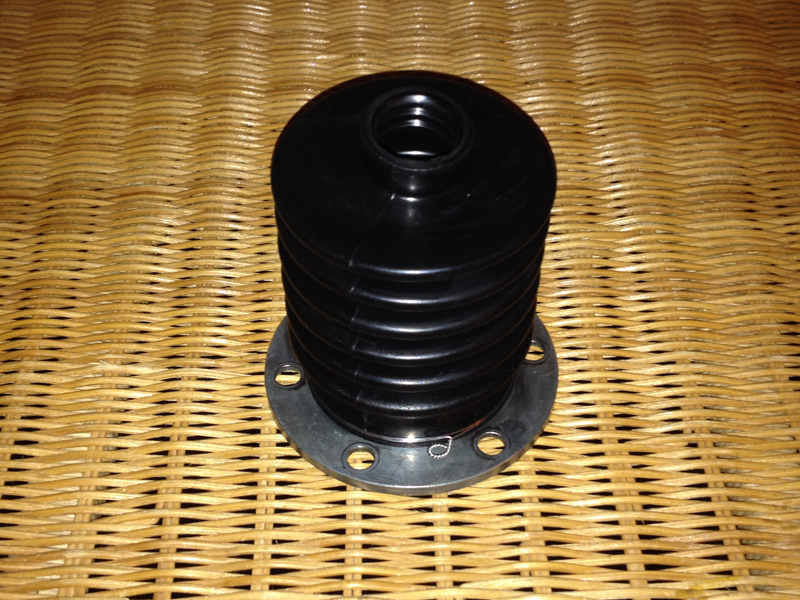
21 October, 2015 I had sent our radio and intercom to PCI Race Radios for evaluation and repair last week, happy to have received them back on Monday morning. Our intercom problems were traced to a couple of electrical connectors that we'd had installed but never used: an "IRITRACK" audio cable and an "audio out" cable to connect to an in-car video system. We had PCI remove both cables and thoroughly test the intercom afterwards with good results. Hopefully we'll actually be able to communicate with each other again. The radio tested fine, no problems. I spent a little time at home today finishing up the installation of new CV boots on the "CV boot flanges". I had cemented them in place a couple of days ago and wanted to give the glue plenty of time to "set up" before wrapping the joints with safety wire. Now that I've completed the safety wire step and the new boots are securely attached to the boot flanges, they are ready to re-install on the axles.
17 October, 2015 I spent a couple of hours at the shop today - I really only intended to drop off the parts we picked up at McKenzie's yesterday but ended up working on a couple of small projects. I'm replacing all the CV boots this time around - they're starting to get stiff so it's time. Before I could install the new boots, I had to remove the old ones and thoroughly clean the "CV Boot Flanges" in preparation for bonding the new boots in place. We contact cement the boots in place, wait 24 hours, then wrap the boot/flange with safety wire to ensure a water tight seal that remains secure under race conditions. Following that, I spent a little time working on the front beam torsion adjusters. We purchased new hardware to rebuild the adjusters to new condition; when I attempted to install the new hardware on the upper adjuster, I found that it needed more than just new hardware - nothing serious but I had to remove it from the beam to re-work it some. All better now. Removal of the internal portion of the adjuster requires removal of one of the plastic "trailing arm bushings" from the beam - that means I'll have to install a new bushing and ream it to size later. It's never just ONE thing.......
16 October, 2015 Trevor and I spent the morning on a "McKenzie's run" - we get most of our "race parts" there (McKenzie's Performance Products in Anaheim - www.mckenzies.com); they have a huge selection of parts and an outstanding staff. Today, we were just getting normal prep. stuff - new front torsion packs, new c.v. boots, link pin bushings, filters, etc.. At this point, I think we've crossed everything off our shopping list and we have everything we need to begin reassembly once we complete the cleaning/inspection process. We stopped by "Power Box" on our way home to check on our transaxle service; Rick and Adam tell us that they have it apart and everything looks good but they still need to do the Magnaflux check. Perfect time for me to bring them all the other suspension and drive-train parts to be "mag-checked"..... Once we get all that stuff back, we can begin the reassembly process. We haven't delivered our engine to Jason at Paradise Motorsports for service yet; I'm holding on to it until I finish looking into our electrical problems. I have not ruled out the possibility that our alternator was the source of our electrical problems at the Baja 1000; once we evaluate that possibility, we'll remove the exhaust system then deliver the engine to Jason.
14 October, 2015 It's been a hot and humid week here in San Diego and I've stayed away from the shop as a result..... I did, however, get there today. Rather than spend the entire day in our hot, enclosed shop, I chose to head out to my brother's machine shop to work on our shocks; it was hot there too but at least he has some airflow through his shop. After each race, we find that some of the shock end spherical bearings are in need of replacement - usually the bearings on the lower attach ends (the lower ends are subjected to much more abuse in the way of dust, dirt ,water, rocks, etc.). Replacing them isn't a big deal but it does require a hydraulic press - I don't have one at our shop but my brother does at his (Custom Aircraft Parts), so off I went. I spent more time socializing with him than working but it had been a while since we'd seen each other. Anyway, all the upper bearings were good for at least one more race and I replaced all the lower end bearings. Once I got back to our shop, I cleaned and inspected each shock then set them aside to await reassembly of the suspension. I had a little daylight remaining so I started cleaning and inspecting the rear trailing arms. They'll need a bit more work before I can start crack checking them next time....
08 October, 2015 I had hoped to work on the car the last couple of days but my nice 1-day trip this week was extended a couple of days and I didn't get home until today. Tomorrow is booked with family stuff so maybe I can find some time this weekend..... I am trying to get all the suspension stuff done - the shocks need some clean-up and new spherical bearings installed. I have all the bearings I need so I just need to do the clean up then head to Custom Aircraft Parts to use their hydraulic press for the bearings.
02 October, 2015 I spent the morning cleaning up our intercom and radio - I'll be sending them to "PCI Race Radios" for service and didn't want them to look like junk..... Our intercom has been giving us trouble off and on; now that I've removed it from the car, I can hear something loose inside the case - that's probably a hint that something's broken..... I'm sure PCI can make it like new again, so off it goes. I'm also sending our race radio along for a check up; I want to make sure it's still transmitting with its full rated power - we've broken off a couple of antennas during races in the past and that's usually bad for the transmitter. The afternoon was spent at the shop working on the suspension and drive train components. Our axles usually come back from a race with some rust on them; I spent a fair amount of time cleaning and polishing them to eliminate any trace of corrosion damage (rust usually leaves some surface pitting behind). It's important to polish out any potential "stress risers" to minimize the chance of failure. I did the same for the torsion bars; they live in a fairly protected environment so they didn't need much polishing. All the other suspension parts were solvent washed, dried and cleaned of corrosion in preparation for magna-flux inspection. Everything looks good visually but we'll look a bit deeper with magna-flux. I just need to coordinate the timing with the shop that does it for us. Finally, I spent a little time cleaning and inspecting the front wheel/brake assemblies; the brake discs always come home from a race covered with a thin coating of rust. After cleaning the assemblies, they both look to be in good shape so I put them aside until we start the re-assembly process.
01 October, 2015 I spent a little time at the shop today, mostly working up a "shopping list" of the things I need to round up for the reassembly process - things like torsion packs, rod end bearings, bushings, bolts, etc.. Once home, I placed orders for most of the things I didn't have on hand. There are a few things that'll require a visit to McKenzie's though, maybe I can find some time next week. It would be nice to be able to begin reassembly as soon as the major components come back from being inspected.
28 September, 2015 I spent the entire day at the shop today; both the front and rear suspension systems are completely disassembled and ready for cleaning and inspection. As always, getting the micro-stubs off the rear trailing arms was a hassle - a little corrosion and a "slip-fit" becomes a "press-fit"......... Once removed, I cleaned and inspected them, re-packed the bearings with grease and set them aside for the reassembly phase. The spring plates, torsion bar "fingers", stub-axles and a few other high stress parts were removed, cleaned and readied for "magna-flux" inspection. I still need to clean up the front suspension parts so I can do a visual inspection before sending them out with the other high-stress parts for more detailed inspection. It's pointless to try to inspect the torsion bars and axles with the magna-flux process: we'll just do a detailed visual inspection and re-use them if possible. We'll replace the front torsion packs with new ones - we abuse them too much to re-use. I have to fly to Memphis and back tomorrow; hopefully have another full day at the shop before the weekend.
19 September, 2015 I spent the day working on what I consider to be the least enjoyable aspect of post race cleanup/inspection - cleaning and inspecting the CV's, it's just a really messy job..... We replaced an axle and CV assembly during the Baja 1000 as a result of a torn "dust boot" - that particular CV shows some signs of distress but the other 3 look fine. We'll have a closer look at the problem CV and certainly we'll replace all the balls but hopefully the cage, star and housing are all usable. After servicing the CV's, I got the car up on stands and began disassembly of the front and rear suspension. I discovered that the tool we use to remove the rear axle nuts was not at the shop so that ended my progress for the day. Next time, I'll get the entire rear (and maybe the front as well) suspension off the car so we can clean and inspect it. Once all the suspension parts are out of the way, I'll also be able to get a close look at the torsion housing and frame horns for signs of damage.
17 September, 2015 I'm home for a few days again, hopefully I can get a few things done on the car. Between work, taking care of family business and really hot and humid weather, I haven't been able to spend much time at the shop recently. I'm hoping to spend all day on Saturday at the shop, continuing the normal "post race inspection and repair" process. There is plenty to do; just the normal prep. stuff will keep me busy but I still need to wring out the electrical system to figure out why we killed 5 batteries at the Baja 1000...... It's not as simple as the alternator not charging, it was; we had multiple short circuits as a result of the structural problems we encountered. Most of those "shorts" were discovered and repaired during the race but not all of them. I've spent a little time looking at the wiring but haven't found anything obvious yet. It may be time to hook up a battery and start looking for current flow where there shouldn't be any.....
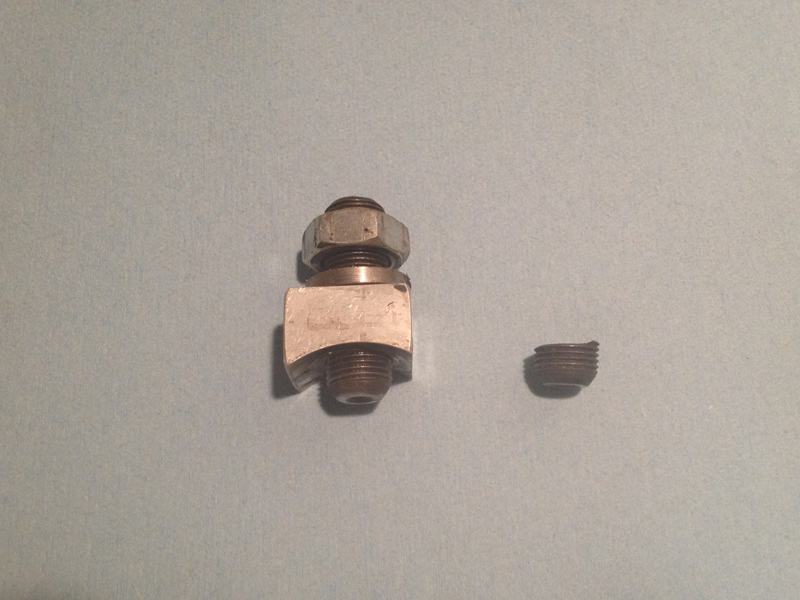
04 September, 2015 Dangerously close to getting nothing done today..... I had intended to work on the car all day but spent most of the day helping a family member get discharged from the hospital and then get settled at home. That's life. Anyway, I was able to get a little work done this evening; I finished up the hood hardware replacement project - new DZUS fastners and mounting hardware along with new "pin mount" bushings and hardware. I still need to open up the shock relief holes in the hood a little bit; the upper shock mount locations changed just a bit and I want to be sure they don't rub. Afterwards, I inspected and cleaned the oil filter ("System 1" - a cleanable 45 micron SS screen filter) and breather box filters then reassembled them. Another casualty of the front end problems we had at the 2014 Baja 1000 were the power steering unit hydraulic lines; the Char-Lynn unit mount broke and it began thrashing around with steering inputs, eventually loosening and disconnecting the pressure hose fitting. I spent some time making sure the hose and fitting were okay and clean, then re-connected everything with a slightly different routing of the hoses that keeps them safe and eliminates a couple of problem areas. Unfortunately, we will not know if the pump or the Char-Lynn itself were damaged until we hook it all back up and run the engine (the pump was running dry for probably 10 miles - it may be junk now).
03 September, 2015 Spent the day disassembling and removing the axles and CV's so that I could get the transaxle out. Dealing with the CV's is my least favorite part of the prep. process - it's incredibly messy with grease getting everywhere (and I haven't even begun the CV prep. process......). Following that, I drained the gear oil from the transaxle and removed it from the car. I now have the two "long lead time" components out and ready to be delivered to Paradise Motorsports and Power Box for service - one of tomorrow's projects. I also spent some time working on the front hood - the DZUS fasteners were in bad shape or outright missing by the time we crossed the finish line at the 2014 Baja 1000. I installed all new hardware on both sides of the hood, hopefully it'll last a few races.... I'm hoping to get a fair bit more prep. done before heading out on my next trip - if I can fit it in between family emergencies!
31 August, 2015 I spent a few hours at the shop today, between dealing with home "I.T." issues over the phone and a family member's emergency room visit (not my immediate family)...... Interesting day. I was able to get the front end cage cleaned and rust protected, then turned the car around in the shop so that I had access to the engine and transaxle. What a mess; all the rear bumper cage tubing is rusted - I don't know what it is about the water in Baja but it really makes a mess of 4130 tubing! I'll wire brush it clean as always, then re-apply the rust preventative coating (yeah, I know, if it actually prevented rust I wouldn't be doing this again.....). After removing the bumper cage, I drained the oil from the engine, disconnected all the plumbing and electrical, then pulled it for overhaul. The engine ran great throughout the last race but we'll go through it anyway. Next, I'll pull the axles and CV's followed by the transaxle. Once that's all done, I'll put the car on stands so I can remove the suspension components. With all that stuff out of the way, we'll have unobstructed access to the basic structure and can start looking for and repairing problems. The suspension components will undergo their normal post-race inspection/pre-race prep.
30 August, 2015 I'm finally home for a few days and hope to spend a least a couple of them working on the car.... At this point it's almost all normal prep. so there really aren't any big projects. The only further repair work to be done is to the foot well area sheet metal - it took a beating when the front end came apart. I need to make and install a few "doublers" to stiffen it up some and I need to reconnect the windshield frames where I cut them. There'll be some minor body work/paint as a result of that but nothing serious. For this week though, I'll probably just stick to clean-up and prep..
14 August, 2015 I just got back from 3 days of playing "you bet your job" - recurrent ground school and simulator training for the Boeing 757. That's always a great way to spend the only time off for the month that I'd otherwise have...... So, no progress to report on the car and probably none for the next couple of weeks as I'll be flying actual trips for the remainder of the month. Hopefully, the first week of September will be free of work issues and I can get some stuff done!
01 August, 2015 Trevor finished all the structural welding on the front end repair this morning; with that done, we can now turn the car around to access the engine and transaxle. Next time I'm home for a few days (may be a couple of weeks), I'll remove the engine and transaxle so we can get them serviced while I prep. the remainder of the car. Surprisingly, there really isn't that much basic prep. to do at this point - just remove/inspect/repair all the suspension components in addition to a thorough cleaning of the basic structure, then we can start building the car back into race ready form. We have a little sheet metal repair to do; all the movement related to the failure of the frame head/front cage generated some cracks in the foot-well area. Also, we cut the windshield frame to facilitate access to the upper front cage to front hoop weld; we'll need to weld it back together and then "body work" the area so we can paint it to match.
28 July, 2015 I was able to spend most of the day working on "normal prep." today; removal, cleaning and inspection of the rear shocks, the engine air filter, the "Race Air" pumper assembly and portions of the electrical system. We'll have the car disassembled down to the last bolt eventually; that gives us unrestricted access to the entire car and allows us to clean and inspect everything closely before the next race. Rather than take it all apart and then clean/inspect/repair, I try to do each part as I remove it from the car. Aside from the long lead time parts (engine and transaxle), once the car is completely apart, all the subcomponents will be ready to go and we can begin the reassembly process without delay. Trevor and I are planning to finish the remaining front end repair welding this coming week end.
17 July, 2015 I finally got some work done on the car today! I spent several hours working on the battery mount and "normal prep.". We mount our battery in front of the foot well area, behind the suspension beam. We removed the battery mount to facilitate repair of the damaged frame head and front cage; we obviously now have to re-create the mount..... It's not as simple as just building a box; space is limited in the area where it's mounted and we needed to be careful to not create any conflicts with the steering shaft or tie rods. I was careful to cycle the steering and front suspension through the full range of travel to be sure I hadn't built in any problems. It's now ready to final weld and install in place. It's a bit unusual for a 5/1600 car to have the battery up front but we chose to do so for balance and access considerations. The only other place it could go would be under our fuel cell; I'm not a huge fan of that idea for a couple of reasons - the battery would be essentially inaccessible there and the idea of an electrical fire under our fuel cell doesn't appeal to me...... The "normal prep." I did involved removal and refurbishment of the gear shifter and the shaft that connects it to the transmission. They're now cleaned, inspected, re-"blacked" and lubed - ready for re-installation. Next item on the list is roll cage rust removal, re-"blacking" and application of a rust preventative coating (nothing seems to last long in that role though, the "sand blasting" that happens during a race removes everything we've tried). Following that, we'll do a general interior inspection and cleaning. I'd like to get all the suspension components off the car for inspection/overhaul but that immobilizes the car until everything is ready to go back together. Until Trevor finishes the final welding up front, I don't want to do that. Once he does finish welding, we'll turn the car around to gain access to the rear end, remove the engine and transaxle for service, put the car on jack stands and start removal of the suspension components.
16 July, 2015 I spent a few hours at the shop today but didn't spend a minute working on the car...... Sometimes, I just feel the need to spend a little time cleaning up the disaster area that is our shop so that I can find things (notching all that tubing for the front end repair with an angle grinder makes an amazing mess)! Today was one of those days; I hope to get back to work on the car tomorrow. Since Trevor is working full time during the week, I'll probably just continue working the "normal race prep." issues until he finds time to finish the front end repair welding. I've been in touch via e-mail with Rob Harris, a 5/1600 racer from the 1970's; he's in town this week and came by the shop so we could finally meet in person after a couple years of e-mails. We have an amazing number of things in common and it was great to hear some of his stories from the early days of racing Baja and to see some of his photos from that period. Rob is another of the new friends we've made as a result of racing - one of the most rewarding parts of the adventure! Rob lives in Ohio but may move back to California when he retires; we'll definitely find a place for him at Gonzo Racing.
12 July, 2015 I'm home for the week - hope to get something done on the car while I'm here! Trevor starts a new job tomorrow, Assistant Editor of an on-line automotive magazine. Once again, I'll be waiting on him to be available to finish the remaining welding..... I can do it but he's much better at it..... Guess I'll continue working on the "normal prep." until he finds some time. There is no lack of things that need doing; I just like to finish one thing before moving on to the next. Hopefully, I'll have some progress to report later in the week.
27 June, 2015 I spent the afternoon at the shop today, mostly doing normal prep. stuff. I disassembled, inspected, overhauled, reassembled and final installed the steering rack. I also inspected, cleaned and reinstalled the tie rods - the steering system is ready to go! While I was working on the front end, I went ahead and did the normal rust removal and application of a rust inhibitor on all the tubing - it looks good again! I also replaced all the front hood attach hardware; the old hardware was looking pretty sad.... I plan to do a little sheet metal repair in the foot well area; there are a number of cracks as a result of the front cage failure at the Baja 1000. We have a bit more final welding to do before we can call the front end finished - mount the battery tray, add a couple more gussets, and final weld the new front cage to the interior structure. Those jobs will wait for Trevor to be available. I'm going to be busy with work for the next couple of weeks, probably no further progress until the middle of July.....
24 June, 2015 Trevor and I were able to spend a little time at the shop today; we made and installed all the gussets that reinforce the front cage structure and did much of the "final" welding. There is only a small amount of final welding remaining, probably have to wait until the next time Trevor has some free time.... Meanwhile, I hope to get started on some of the "normal prep." stuff - cleaning and inspecting the interior, removing the engine and transaxle for service, servicing the power steering system, inspecting and overhauling the steering rack, removing rust and figuring out why we had electrical problems at the 2014 Baja 1000....... That's enough to keep me busy until Trevor can find some free time!
I wasn't able to get out to
the shop this week - no progress made on the car. I just had too many other commitments this time
around. I should have have a couple of days available next time I'm home though.
Hopefully I can get Trevor to finish all the welding..... Once
that's done, we can move on to a normal "race prep." and start
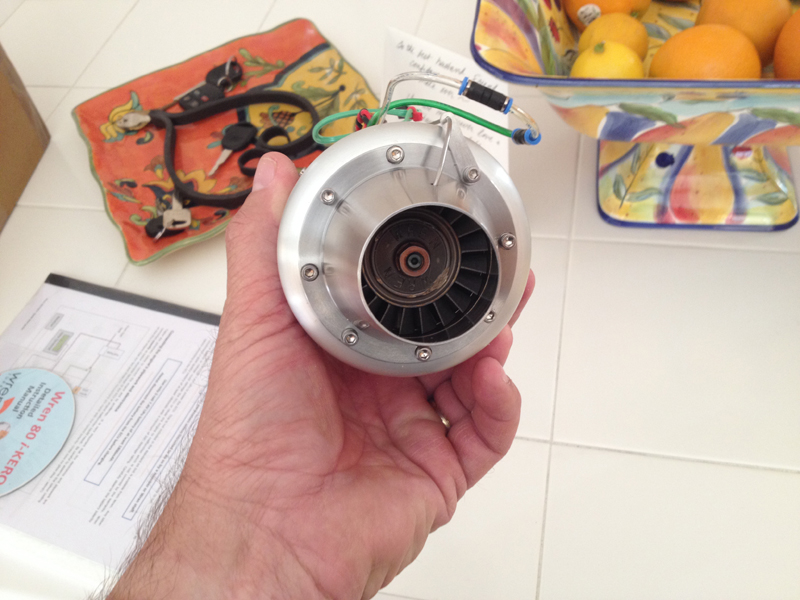
thinking about a test and tune! 08 June, 2015 Trevor and I made it out to the shop for a couple of hours today, we got some of the final welding done. The front hood supports are finished and the hood fits beautifully - perfect alignment all around and particularly at the rear DZUS fastners, so it should be easy to remove/install again! The light bar is partially welded; I need to relocate one of the vertical supports slightly before Trevor final welds it in place. It was really hot and humid at the shop today, we were only able to spend a little time. I'm off to Dallas tomorrow for a few days of work related training and then home for just a couple of days before I have to head out again for a regular trip. Not much time to get anything done on the car; hopefully I'll have a little time over the weekend. I ran my small jet engine for the first time this morning, it started right up and ran perfectly. Now, I just need to build an airplane for it and get my AMA "jet waiver"......
A little video of the first
run (copy and paste in a new window):
02 June, 2015 No progress to report, I've been busy with work and taking care of stuff around the house - probably will not have a chance to get anything done on the car for a couple more weeks...... Maybe I can get Trevor to do some welding while I'm away if he can find some time in his schedule......
23 May, 2015 I spent a few hours at the shop today - mostly completing the re-fitting of the hood. I moved the rear driver's side hood attachments to get a better fit of the rear portion of the hood where it meets the body. That also required a little modification of the front hood support tubes that I made last time..... Change one thing and it forces you to change 2 other things....... Fortunately, nothing was welded in place yet! I'm very happy with how the hood fits now, I think it's better than when the car was new. Not only that, but it's easier to secure on the car. I've been a little distracted the last couple of days and haven't spent much time on the car; I purchased a small turbojet engine for model aircraft and have been working towards getting it running on a test stand - lots of stuff to learn! I think I've got everything I need on the way now, I just need to wait for it to arrive so I can build the test stand.......
21 May, 2015 I spent several hours at the shop last night and today; I'm more productive during the evening hours (fewer distractions)..... I fabricated the last remaining pieces of the front cage structure - the forward hood mounts and the light bar support tubes. There was a fair amount of work involved in creating the front hood mounts; I had to build them in place with the hood supported in its final position. I also re-fit the hood a bit; after our two "roll-overs", it didn't fit as snugly as I'd like. That'll require relocating a couple of DZUS fasteners on the driver's side but that'll wait until the front supports are welded. I have all the final tubes fitted, just waiting on Trevor to be available to weld. Just a few more days of "repairs" I think, then it's on to a "normal" prep......
18 May, 2015 Trevor and I spent a little time at the shop today and got some things done; We "final" welded the spare tire support tube and the Power steering unit mount in place, then moved on to the front bumper "light bar hoop". First, we had to head over to "Competitive Metals" to purchase the tubing that we needed..... Once the tubing was on hand, I installed our HID lights on the bumper then bent and fit the hoop. Trevor tack welded it in place and I can start fitting the vertical and diagonal supports next time. Once that's done, I can move on to fabricating mount plates for our two small HID lights; they are installed near the ends of the front bumper tube. Those lights are aimed "out" a bit to illuminate the areas left and right of straight ahead (it's a big help) and none of the available pre-fabricated tabs work quite right for this (they end up in an area where the bumper tube has some bend)....... After those few things are done, we'll be nearly out of things to do to the front end. Essentially, we'll have a little "tabbing" to do for mounting the sheet metal, a few gussets to reinforce high stress areas, the front hood mounts, the battery mount and whatever additional cage support tubes we want to add. Light at the end of the tunnel! Trevor's going to be unavailable for the rest of the week so I'll be working on getting things ready for him to weld. Hopefully I'll have all the remaining parts fitted and ready to weld next time he's available.
17 May, 2015 Home for a few days again - hoping to get all the welding done this week. We still have a fair bit of "final" welding to do in addition to fabricating the light bar and some additional front cage support elements; I'm hoping to get the material we need for the light bar tomorrow so that we can bend and fit it on the bumper by the end of the day...... Hopefully, I can get Trevor to come to the shop with me so he can be welding while I'm fitting.....
09 May, 2015 We spent the week in Baja doing some "upkeep" on our beach house - all the exposed wood needed painting. Everything looks good again and more importantly, is protected from the elements. Hopefully we'll not have to paint again for a few years..... All that time in Baja left little time for the car though. I spent half the day at the shop today, tinkering mostly. I did get a few things done though; I fabricated the Char-Lynn power steering unit mount and removed the HID lights from the old bumper and cleaned them up. The power steering unit mount took a little time to fit, it sits diagonally between two of the front cage tubes. I'm really happy with how it worked out though. We're talking about whether to make it removable or to just weld it in place. There are pros and cons to both, it may just come down to how much effort we want to put into it..... That'll have to wait a week though, I leave for another week long work trip on Monday.
01 May, 2015 We only spent a couple of hours at the shop today but we did get a few things done. Trevor welded a few mounting tabs in place on the bumper and front cage, we fabricated and tacked in place the spare tire support structure and Trevor final welded all the main front bumper tubes. We had intended to fabricate and install the headlight cage structure but didn't have the right stock on hand and didn't want to substitute heavier material...... A job for another day; we've already made much more progress than I expected this week! All that remains for this repair is to fabricate and install the power steering mount structure and weld on the remaining mount tabs for the sheet metal. We're closing in on the end of the "repair phase", finally!
30 April, 2015 Excellent progress on the car today! Trevor and I were able to get the shock tower diagonal supports fabricated and installed, the new front bumper fabricated and tacked in place and a fair amount of "final" welding done. There is still more to do though - now we have to engineer a couple of improvements to the front cage design to make it a little stiffer and more resistant to damage..... We're thinking that we need to add a couple of diagonal tubes between the lower "beam support tubes" and the "tunnel" in order to stiffen that whole structure. We are also thinking about adding some cross-bracing between the upper support tubes as well; we don't want to add a huge amount of weight to the front end though, so we need to be careful not to over-do it!
Next time we'll fabricate and install the "light bar", the tube that wraps around the HID lights to protect them from roll-over damage. Then, it's time to begin adding all the little tabs that allow us to attach the skid plate, horns, lights, sheet metal, etc.. Very pleased with the progress so far.
28 April, 2015 Another productive day at the shop for Trevor and I; we fabricated and installed the new front shock "towers". Once again, the hydraulic conversion of our JD2 bender made the bending of the parts an easy and accurate process. We are using a 3" center line radius bending die with our 1" tubing; we had difficulty getting good bends during the original build when using the bender in a "manual" mode but no problems at all now! We were very careful to make sure we duplicated the geometry and dimensions of the original shock mounts; hopefully, we can re-use all the sheet metal as a result..... The shock towers are final welded in position and the addition of a diagonal support to each is all that remains to be done. After those are installed, we'll go back and final weld everything from the "A" pillar forward and then start on the front bumper. Once the front bumper is complete, we'll start the "tabbing" and "gusseting" process. We're taking tomorrow off but plan to hit it again on Thursday - we hope to have the bumper built by the end of the day. We're very happy with the progress and quality of the re-build.
27 April, 2015 Trevor and I spent a few hours at the shop today; he welded while I fit tubes. By mid afternoon, we had run out of argon for the welder so we called it a day at that point. Essentially, the front cage structure is done - we have a little more welding to do (we'll finish that up tomorrow) and then we can tackle all the stuff that attaches to it. The shock "towers" are the most significant additions to the front cage - hopefully we'll get them fabricated and at least tacked in place tomorrow. We'll then start thinking about the spare tire support/Char-Lynn mount, the hood supports and all the sheet metal attach tabs.....
26 April, 2015 I was able to spend a couple of hours at the shop this afternoon and got a few things done. First I needed to finish a repair on one of our motorcycles that had a carburetor problem - afterwards, I was able to spend the rest of the afternoon working on the car's front cage assembly. I fitted the two diagonal bars that connect the upper tube of the suspension beam to the cage assembly and then cut the remaining forward cage tubes to rough length. We'll need to notch the ends to fit but they are cut to length at least. Following that, I measured the old front bumper so that we can re-create it out of new tubing. I don't have a bend program "file" for the original; I think we just "eyeball engineered" it and now we have to "reverse engineer" it.....
To complete the front cage assembly, we still need to fit a few small tubes and re-create the shock mount hoops. Once that's done, we'll begin building a new bumper/light bar assembly. Hopefully, we'll have all that done this week.
19 April, 2015 No more progress on the car for a week or so, I'm heading out for another work trip tomorrow. I'm happy with the progress we made this week - we got done what I had hoped to get done and we actually had time to do other things! In the past, I've used a free tube bending program provided by the manufacturer of our bender (no longer available). I purchased "Bend Tech Pro" about a year ago and have just begun to learn how to use it; it's much more complicated than what we've been using but it's also much more powerful. One of the really nice features is the ability to input "assemblies" and then have the program output all the bend and cut instructions for every part along with templates that show exactly how to notch the tube ends to fit. We can essentially design our whole roll cage in the program and have it tell us how to fabricate every tube! The gaping hole in the process now is the need to notch each tube by hand..... We just don't do enough to justify any sort of tooling or automation.
17 April, 2015 Trevor and I finished fitting up the basic front cage structure this afternoon; it's tack welded in place and ready for final welding. Once that's complete, we'll fit all the other components that mount to the basic structure and then move on to building a new front bumper/light bar assembly. Once that's done, it's just a normal "race prep." from that point on......
16 April, 2015 Back to the shop today for about 1/2 day of work on the car - we're closing in on being ready to weld the new forward cage elements to the existing cage. We have most of the main tubes fitted and ready to tack in place; we have only one more "primary" tube to fit (an easy one), then we can begin tack welding everything in place. Tomorrow, we expect to have the basic structure complete and tacked in place. We will then begin adding all the little details like shock towers, the Char-Lynn unit mount, spare tire supports, and hood mount points......
14 April, 2015 No photos to show but we did make some progress today. We bought the necessary tubing from "Competitive Metals", carried it to the shop (1/2 mile or so) and spent the remainder of the day cutting, bending and fitting the main structural tubes. We have more work to do before we can say we're ready to weld but we got a good start. "Notching" tubing joints with hand tools is time consuming...... I upgraded our JD squared bender with an air/hydraulic ram a few months ago and this was our first project after the conversion; I can say without hesitation that it was worth every penny! What had previously been a good upper body workout is now a simple two finger "squeeze" of an air valve without all the wrestling to keep the bender from twisting around on the floor..... Perfect bends without all the hassle. Here's a link to our short, unedited, YouTube video if you're interested (copy and paste it in a new window): https://youtu.be/jVllt-mo-WM Tomorrow, we need to spend some time working on stuff at home so Thursday will probably be the next report.
13 April, 2015 I'm back home for a week or so, finally - though I did spend the first couple of days in bed. I think I had food poisoning (my crew meal on Saturday morning was VERY questionable and I didn't eat most of it as a result), but I guess it could have been a bit of the flu...... Anyway, Trevor and I spent most of today at the shop and were able to get a fair amount done on the car. It was a combination disassembly/repair day; we needed to get the seats out of the car as part of our normal prep. effort and it made access to the front roll cage "hoop" much easier. We vacuumed out all the sediment that the car accumulated at the 2014 Baja 1000 and found some "missing" parts. I spent a little time inspecting the wiring, hoping I'd see some obvious problem that would explain the electrical issues we had at the "Mil" (no luck, we'll tear it all out and look at it closely later). We completed the removal of the old front cage remnants from the front hoop; the front hoop is now ready to accept new front cage elements and we can move on to re-building the front cage. We need to purchase some tubing but then it's just a matter of bending and fitting the replacement parts one by one. We'll use the old parts as a model and make some minor modifications/improvements as we go. I'll try to get some photos as we progress.
09 April 2015 I haven't been to the shop for a few weeks, but Trevor has been busy rounding up all the tabs and brackets we need to build a new front cage and bumper. We are planning to buy some tubing next week when I'm home and hopefully get the front cage re-built, or at least get the basic structure built...... There's a lot of detail work to be done that must work with those parts that we aren't replacing; the basic structure shouldn't take too long to build but all the "details" will take some time. We'll try to post some pictures as work progresses.
15 March, 2015 Well, the best laid plans and all, not a minute spent at the shop this week..... Between family stuff, unseasonably hot weather and other car/truck maintenance needs, the race car didn't get any attention. I'm heading out for another work trip this afternoon - it'll be a month before I have another block of days off to work on the car......
11 March, 2015 No progress to report, unfortunately; I've been home for several days and was hoping to get some things done this week but a family emergency arose that has kept me busy elsewhere. Things seem to be returning to normal now and I hope to spend a little time at the shop tomorrow.
01 March, 2015 I only made it home for two days before heading back out for another trip this time, no chance to work on the car. Hopefully, I'll get a little work done next time I'm home; I'm planning to finish clearing away the last remnants of the old front suspension support structure and begin bending up new tubes. It would be really nice to have the basic structure complete before I head out again.
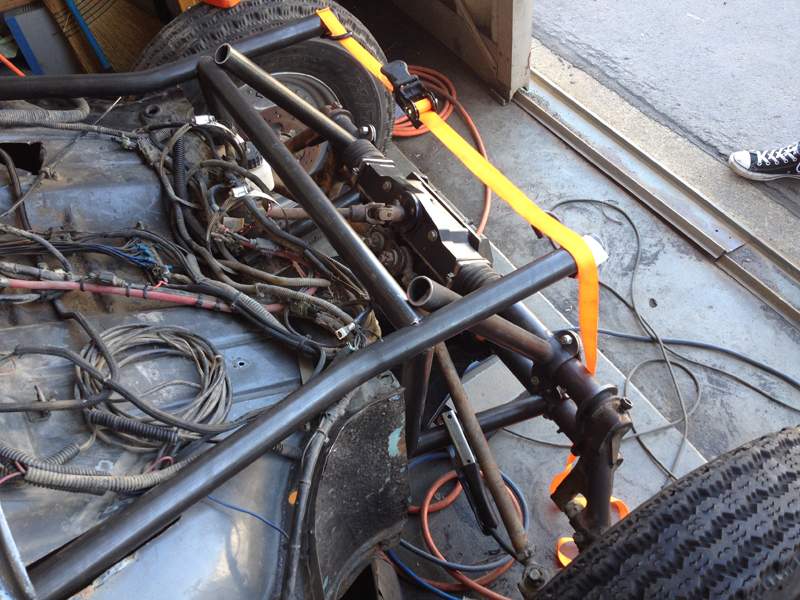
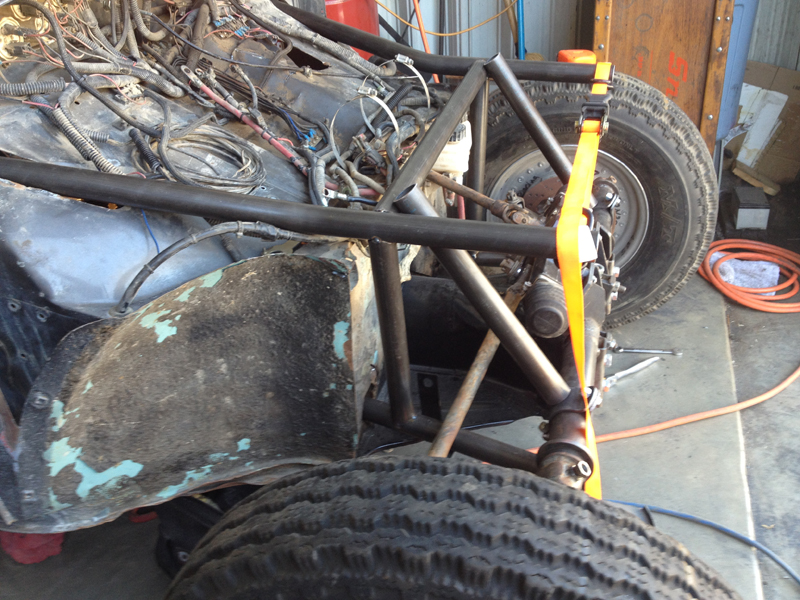
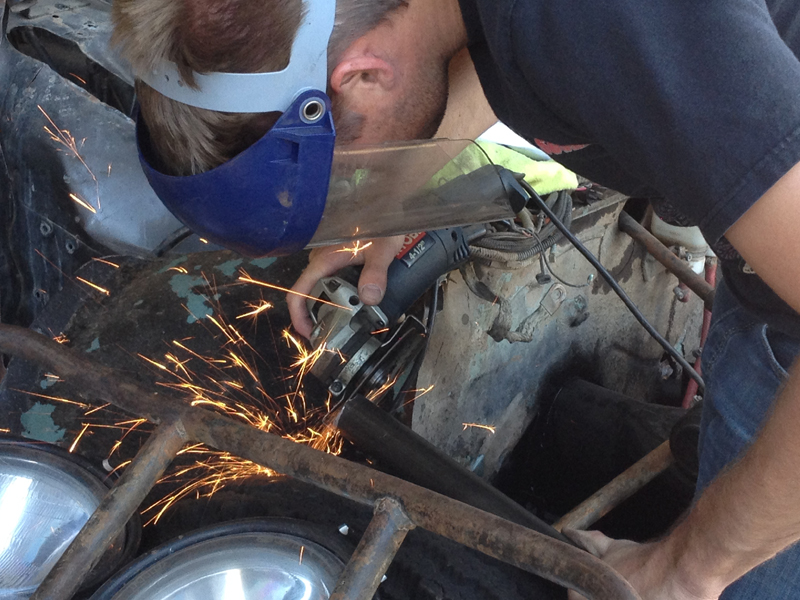
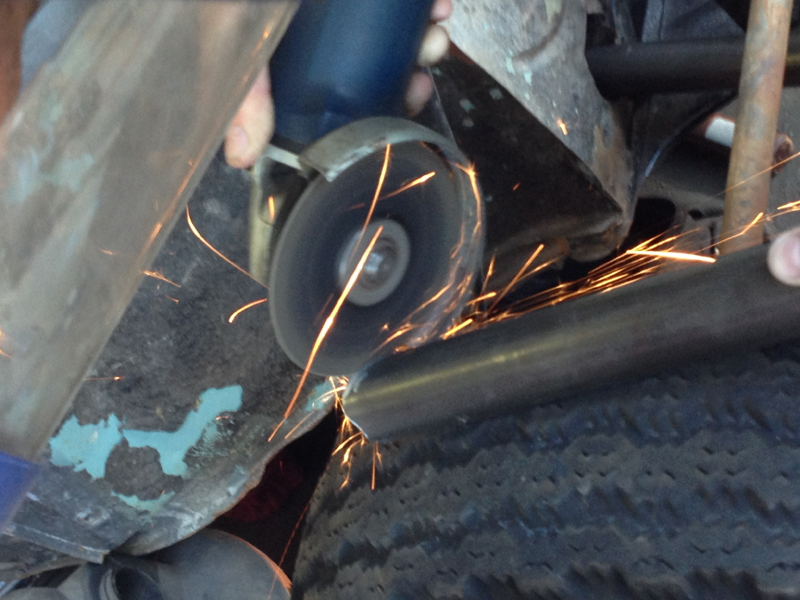
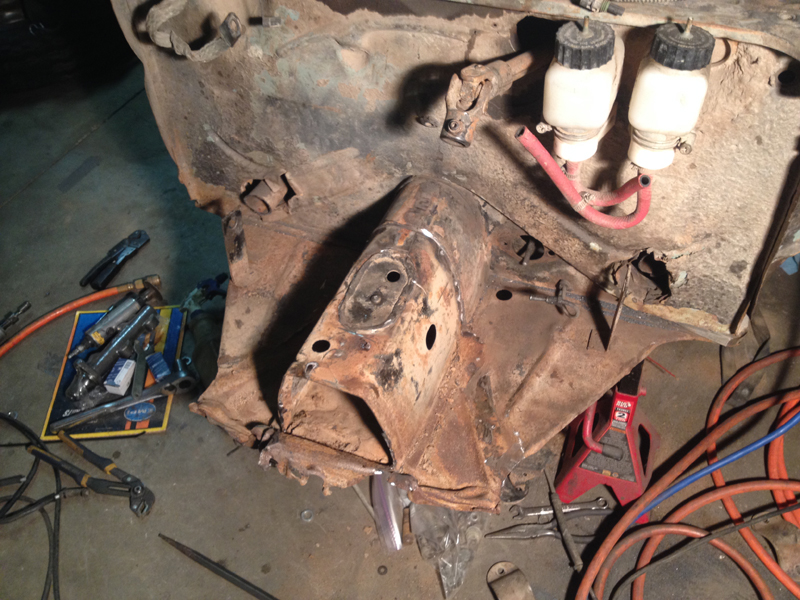
20 February, 2015 I've been busy with work for the last couple of weeks - a regular trip last week followed this week by one of my two annual simulator "you bet your job" events in Memphis. I had the added pleasure of traveling to and from my training in Memphis during one of their annual winter "Ice Storms"; when my flight arrived on Monday night, the crew stairs were frozen to the ground and wouldn't budge. We waited an hour for someone to come de-ice them, finally gave up on that idea and decided to climb down through the "Hell hole" in the nose of the aircraft to escape. It was either that or blow the slide and jump for it; given how icy it was outside we would have slid all the way across the ramp...... Never a dull moment. Anyway, I'm in town for a few days before heading out again. I was able to spend a few hours at the shop today, beginning stage 2 of our front end refurbishment project. Now that the frame head is repaired we can start the process of rebuilding the tubular front suspension support structure. That process begins with removal of the old support structure remnants from the passenger compartment, then preparing the remaining roll cage elements to receive the new structure. But, before being able to do any of that, I needed to remove our GPS, Radio and Intercom units to gain unrestricted access to the area. Then I removed the doors, repositioned some electrical cables and cut the body at the windshield so that I could push the instrument panel forward a bit for access. Having done all that, I was able to remove the majority of the old structure; I have only to clear away a few residual welds to make the area ready for the new tubes. Once the area is ready to receive the new tubes, we'll start bending and fitting them in place using the old structure as a model. That'll have to wait until I have a few more days at home.
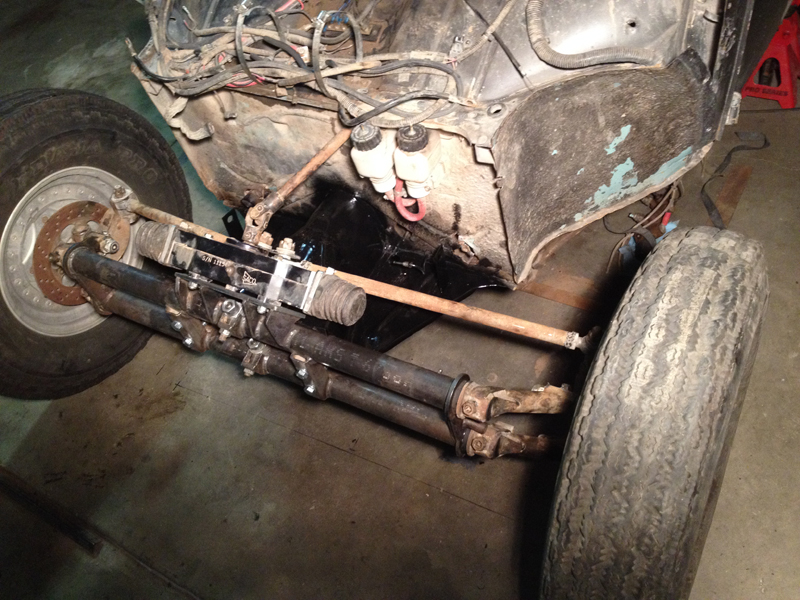
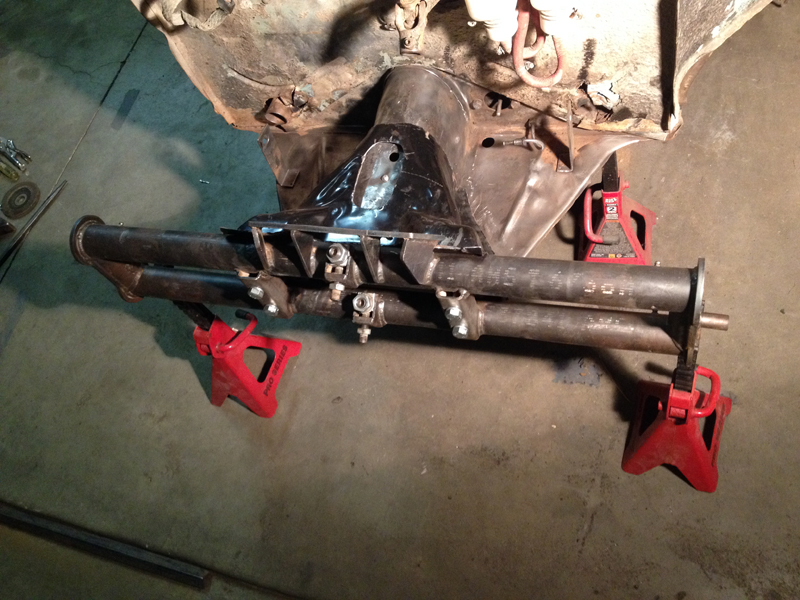
06 February, 2015 I spent the afternoon getting the front suspension back on the car - I wanted to be able to move the car around as necessary while we attend to the other things that need doing. I was pleased to see that the car sits exactly as it should; both sides show the same amount of suspension compression on level ground. That's to be expected with the measurements and care we took but it's still nice to see! Now, we can move ahead with the support structure repair - but that'll have to wait until I have some time off from work.....
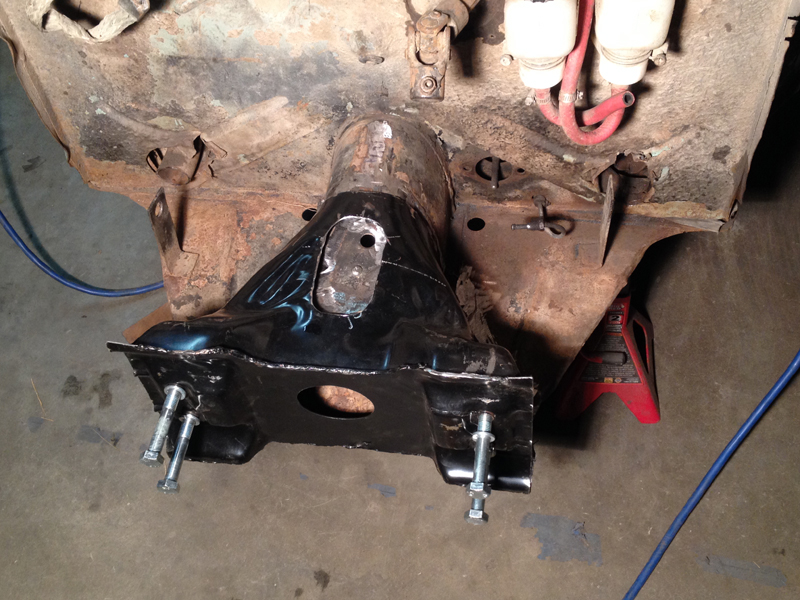
05 February, 2015 Phase one of the frame head repair project is complete! Trevor made time to do all the welding this afternoon so the actual frame head repair is complete at this point. I'm very pleased with how the alignment worked out - everything is well within what I consider reasonable tolerances (less than 1/16" and .1 degrees from "perfect" alignment). Phase two starts now; the
rebuilding of the front suspension support structure. We'll
begin by removing all the remnants of the old support structure;
next, we'll fabricate new cage tubes and begin fitting them into
place. That should go fairly quickly assuming we don't find
problems with the main cage structure that need attention...... 04 February, 2015 I was able to get Trevor down to the shop for a few minutes on Monday evening; we looked at the state of the frame head repair and discussed the merits of the different options we had for moving forward. Having agreed on a direction, today I was able to finish up the prep. work needed before final welding. At this point, we just have to spend an hour or so doing the actual welding; Trevor wants to TIG weld the entire assembly, otherwise I could just MIG weld it myself - my TIG skills are not up to the job. Hopefully, I can get him down to the shop again tomorrow or Friday evening to finish it up..... The next stage of the repair will be to remove the remains of the old "forward cage" structure where it joined the "main" cage structure inside the passenger compartment. Once that's done, we can move ahead with the re-building of that structure; we intend to make some improvements over our original design but will retain the basic form. I'll be back in my "normal" work schedule beginning next week, with the addition of a day of "you bet your job" in the flight simulator the following week. I'm hoping to have the car back on the wheels by the weekend - not much time to work on the car beyond then for a bit.
Today, I spent several hours measuring and fine tuning the alignment of the new frame head; it was very close but needed just a little adjusting to get it perfect. Following that, I adjusted the fit of the old/new floor plate joint and welded on some doubler plates that overlay the weld line. They essentially convert that joint from a "butt weld" into a "lap weld" situation; a lap weld is much easier to do without any "burn through" problems and will result in a much stronger joint. Now, I just need to get
Trevor down to the shop for a bit to consult on the progress before
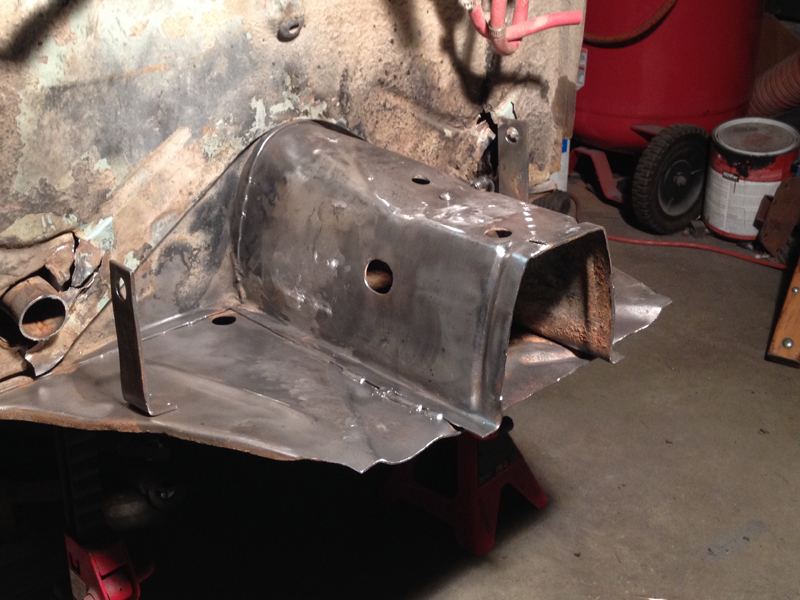
welding things together! 31 January, 2015 Another day at the shop working on the frame head. I removed all the surface rust in the area of the frame head and ran some short weld beads along the tunnel/floor pan joint - I think it will stiffen the whole area and it helps to keep everything aligned correctly for the installation of the new sheet metal. Jigging everything in place, I see now that the replacement part is slightly different than the original and may need a little "filler" piece installed between it and the tunnel. The aftermarket part is designed to go over the top of a "straight" tunnel, ours tapers from the top down just about 1/2" and that leaves a gap that we need to fill (in order to be able to weld the part fully)..... Shouldn't be a big deal.
I worked on the car for a few hours today; I got the remnants of the old frame head cleaned off the tunnel and began fitting up the new frame head. There was a little damage to the frame head floor plate that required some trimming and fitting to mate up with the new parts. I think that once everything is welded in place, it'll be very difficult to see the joints and they will be at least as strong as the original. Before I begin "final fitting" and welding, I need to get Trevor down to the shop for a few minutes to look at the progress and make any changes he thinks are needed.
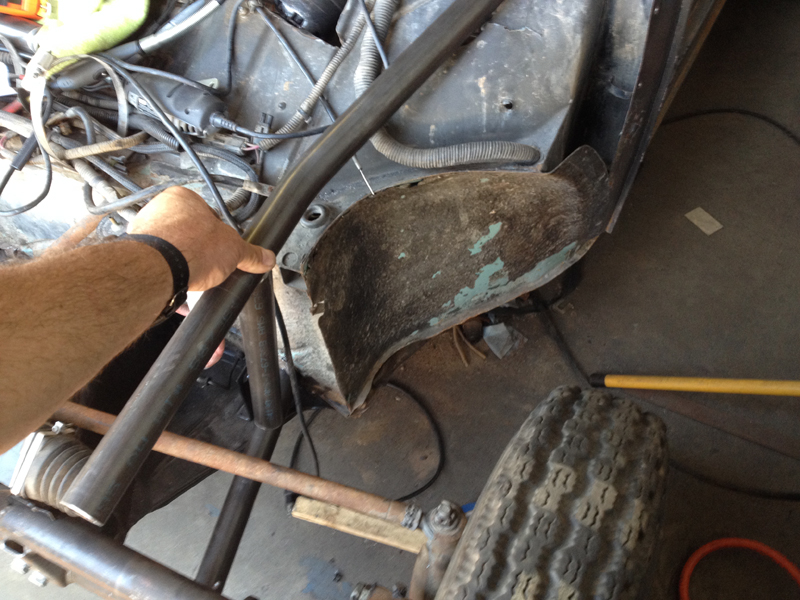
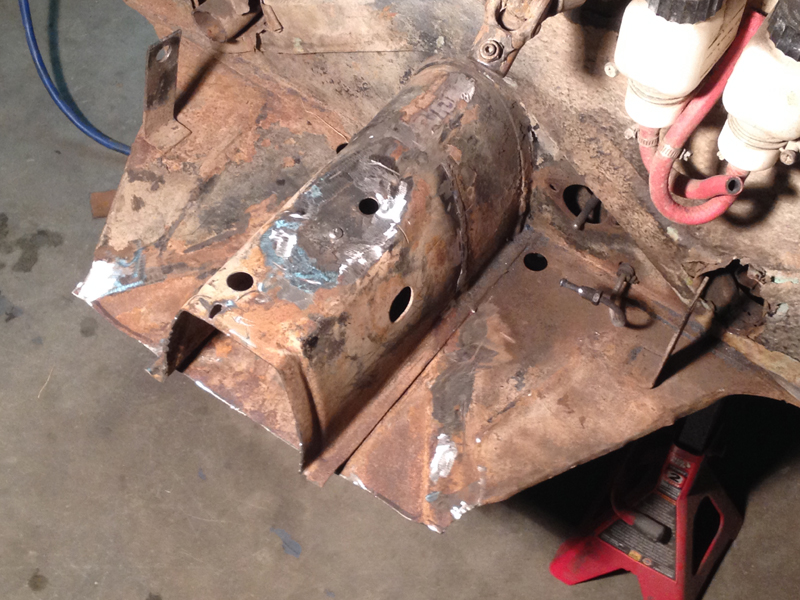
27 January, 2015 We're just back from San Felipe where we attended the "2015 SCORE San Felipe 250", got some work done on our beach house and "rescued" some people who's car had broken down somewhere out in the "dry" lake area behind our house (extreme high tides made it not so dry last week!). They had walked for miles before coming to our house; it was very dark by then and they weren't sure exactly where their car was at that point. We got them all in our truck and tried, unsuccessfully, to find their car - hoping that we would be able to get them going again, or at least tow it out to safety. After sliding around in the mud for a bit, I decided that getting stuck out there in the dark was a distinct possibility - we ended up driving them a few miles down the coast and dropping them at the house they were staying at. At least they were out of the cold and dark; it would be easier (and safer) to find the car the next morning in the daylight! I spent most of today working on the race car - removing the damaged frame head in preparation for installation of the new parts. VW really didn't want that thing to come off the car, they had spot welds everywhere..... I have it almost completely removed though and now it's just a matter of cleaning it up a bit and fitting the new parts. Once everything is fitting the way we want, we'll weld it in place then re-build the tubular support structure. I spent a fair bit of time looking at the front structures of the 5/1600 cars entered in the race while in San Felipe - we'll probably build ours similarly (and that means different than the way it was.....).
09 January, 2015 No physical progress today but Trevor and I spent a few minutes at the shop looking at and talking about the frame head replacement job. We've decided that we really don't need tooling to locate the new frame head, we really only need an accurate measurement to locate it the correct distance from the rear torsion housing. The design of the frame head itself limits our ability to weld it on incorrectly...... That being said, we will certainly make sure that everything is "straight" before final welding! We'll begin by "leveling" the car laterally (at the rear torsion housing) so that we can make sure the frame head supports the front beam level as well. Secondly, we'll "triangulate" the front suspension beam; measuring from the center point of the rear torsion housing, we should have exactly the same distance to both the left and right sides of the front beam. If we do, then it's "square" with the rear torsion housing and the car should track straight...... Again, the design of the frame head replacement encourages installation in a particular orientation, which limits our ability to adjust (or mess up, as the case may be) the alignment. We'll try to get some photos of the process - our next project is to remove the old frame head and prepare the remaining "tunnel" section to receive the new frame head. We don't want to damage the underlying structure, so we'll take it slow.
08 January, 2015 Another day at the shop; no major progress, just little things that needed doing..... I stopped by to see Carlos (Baja Pits) to collect some of our spare tires from the Baja 1000 - it takes a while for him to get everything back to all the different racers and I told him that there was no rush on our stuff. He still has a couple of our tires and a few dump cans, we'll get them next week. I spent most of the afternoon disassembling and checking the front suspension beam; I need a straight beam to use as tooling to help get the new frame head positioned correctly before welding it in place. I'm happy to report that our beam is "straight" and will serve perfectly in that role. Now, I need to build a structure to hold the beam in the correct location and orientation so that we can bolt the new frame head to it and complete the welding. It's important to install the new frame head in the "stock" location for at least a couple of reasons: the rules require that we do and we want it to "mate up" to all the other stuff that attaches to it.
07 January, 2015 I spent a couple of hours working on the frame head replacement today; I spent most of my time trimming the "donor" frame head back to just the portion we need. We purchased a frame head "assembly" - I couldn't find anything that exactly suited our needs and that forced us to do a bit of cutting and grinding..... Anyway, the new parts are ready to fit up once we remove the damaged portion of the frame head. Before we can do that, we need to measure and then make some tooling to help us position the new parts correctly for welding. I want to leave the old parts in place for reference while making the tooling - it's still somewhat useful in that role. I haven't yet decided whether to use our front suspension beam as part of the tooling; I need to verify that it isn't "tweaked" first! Using a bent beam to locate the new frame head wouldn't be the best choice..... I may have to make a "stand-in" for the actual beam that I know is straight. Checking the actual beam for straightness is my first job next time.
05 January, 2015 Happy New Year! We welcomed the arrival of the new year at our house in Bahia Santa Maria, south of San Felipe as we often have in the past. We got back on Saturday and this is my first chance to work on the car and post about it. I spent a couple of hours at the shop today; I removed the damaged front cage structure and cleared the frame head area of some other obstructions that would complicate our repair effort. We mount our battery in that area so I had to remove the battery mount to gain unrestricted access; I still need to remove the brake master cylinder and front brake lines to have complete access to the work area but once that's done I can start cutting away the damaged portion of the frame head. In the mean time, I've begun trimming the new frame head parts to fit in place of the damaged section once it's removed. The commercially available frame head replacements include much more than we plan to use, so I'm trimming away the unnecessary portions. I'll try to get some photos next time. |