|
12 September, 2106 Sorry that there haven't been any updates for a while; I haven't been home much and there isn't really anything to report..... Since the wedding, I've been away from home more than ever before - a mix of my normal work schedule plus one of my annual training events and working some overtime to help set the stage for retirement. Hoping to get the car out to the desert when it cools down a bit; we still need to do a test/tune. Following that we can start thinking about a "next race".
18 July, 2016 Trevor's wedding was a week ago on Saturday the 9th; it went beautifully and everyone I spoke with said it was the best wedding they had ever been to! I think it was the wedding that Trevor and Kristen hoped for and the guests loved it so what more could you ask? Teryl and I are enjoying a little "down time" - not having to worry about/prepare for the wedding in addition to having settled another family matter that was keeping us busy...... The car is waiting in the shop, ready for a test/tune day - Trevor and I have been so busy, we haven't had a chance to get it out! Still hoping to find time in our schedules.......
02 June, 2016 The car is collecting dust again - on the upside, I can actually get to my airplane now! I've cleaned it up and done the "annual inspection" so it's ready to fly again! Hopefully I can get it out in the next week or so. We've been busy with family stuff; Trevor is getting married in July and we've been consumed with those preparations. Also, Trevor and his fiancé bought a house about a month ago - they've been busy "making it their own". Haven't had time to test the race car..... Hopefully, things will settle in the next couple of months and we'll be able to resume racing soon.
08 May, 2016 Nothing new to report on the racing scene - The car is done and waiting for a test/tune but we've been busy elsewhere...... Trevor bought a house recently and we've been busy with that for weeks - in addition to all the other stuff life throws our way. Teryl and I just got back from a few days at our house in Baja; it was our annual "pay the rent" trip along with some house and vehicle repairs but I managed to fit in some fun stuff also..... Wish we could have stayed longer but I have a trip to fly this week so had to come home. I'm not sure when we'll find time to do the test/tune - Trevor is booked for the next several weekends - I think the Baja 500 is not an option for us this year.
15 April, 2016 I drove the car around the shop area a couple of times today - no leaks or issues of any kind to report. It drove just like I expected and everything worked perfectly. Prior to driving it, I let it warm up a bit then checked the timing to make sure it was where we want it (it didn't need any adjustment). After driving the car, I spent the next couple of hours cleaning up the disaster area that is our shop after a prep......... I can now actually see most of my airplane! It'll take another cleaning session and a visit to our storage unit before I can actually get the airplane out of the hangar though!
13 April, 2016 Easy day at the shop today; I spent some time using polishing compound on a couple of areas where the car had scuffs showing. We come back from every race with some "sagebrush pin striping" and sometimes a little more than that. This time, we had a couple of areas on the hood where the latch pin cables had scuffed the paint; I did my best to polish those areas up rather than re-painting - it looks much better now. Afterwards, I located our in-car tool kit and dumped it (and about 2 pounds of dirt) out to clean it all up. It was quite a mess and I had to remove lots of dirt and rust..... I think I need to find a better place to store the tools than under the seat. I was hoping to drive the car around the shop area a few times but didn't have any fuel - thought I had some...... Next time, I'll stop and get some fresh C12 on the way down so I can check the timing then drive it a little bit.
09 April, 2016 I finished up a week long trip this morning and was able to spend the afternoon at the shop crossing a few things off the list; I cleaned up and installed the oil cooler scoop and the "Race Air" (helmet air supply) hoses, installed new roll cage padding in the driver's compartment, cleaned up and installed the spare parts and driver/co-driver storage bags, adjusted the valves and safety wired the valve covers. I need to secure the helmet hoses still; I'll bring a helmet down to the shop and sit in the car to make sure I get the lengths of the "loose ends" correct - too little and it pulls on the helmet, too much and it gets in the way..... The only things left on the list are to check the timing and fill the fuel cell with fresh fuel!
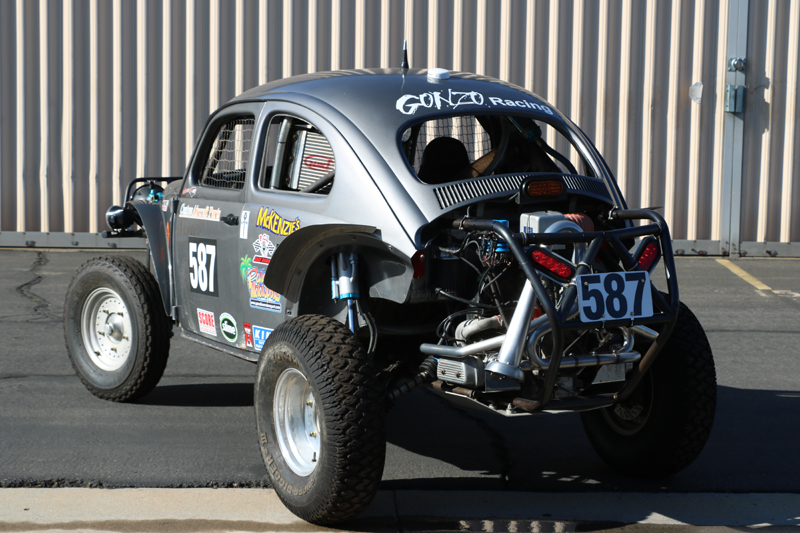
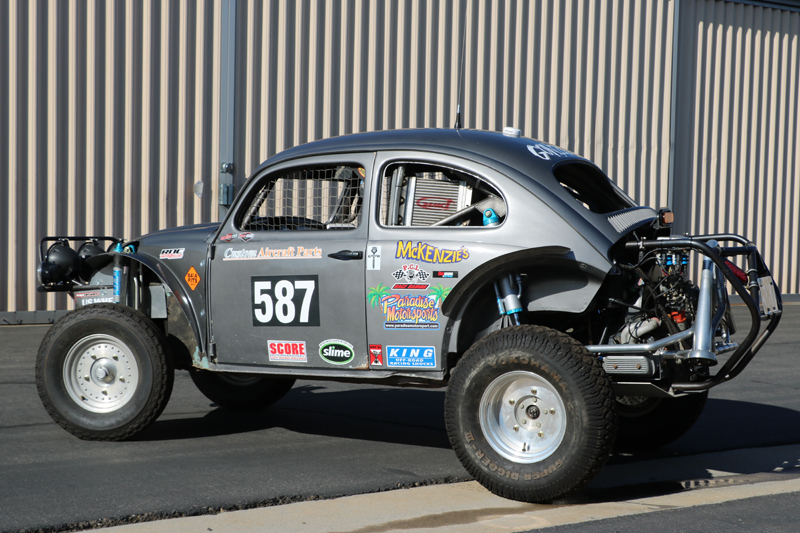
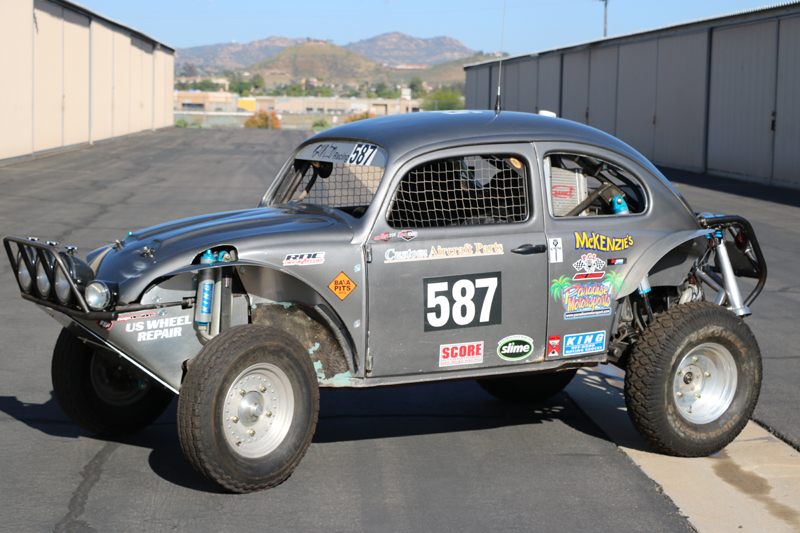
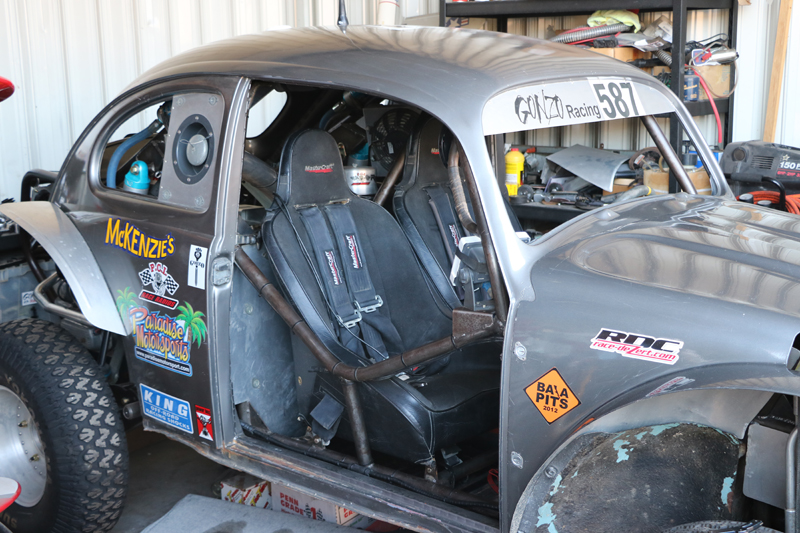
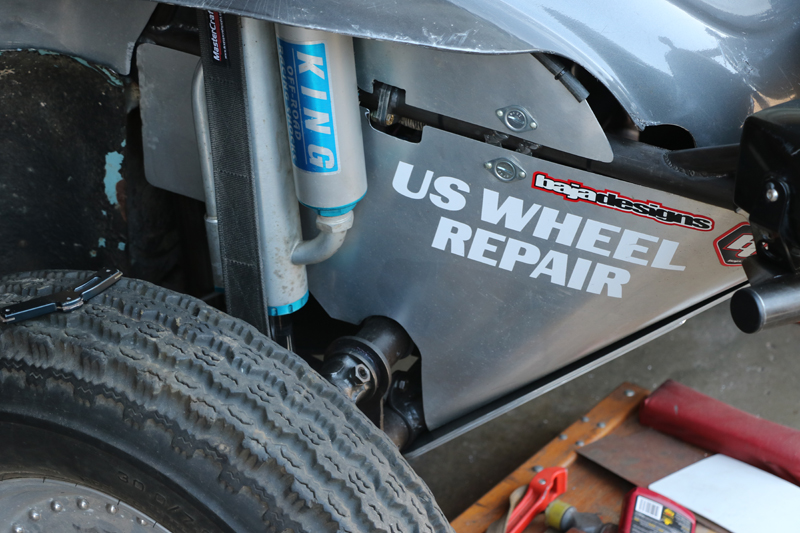
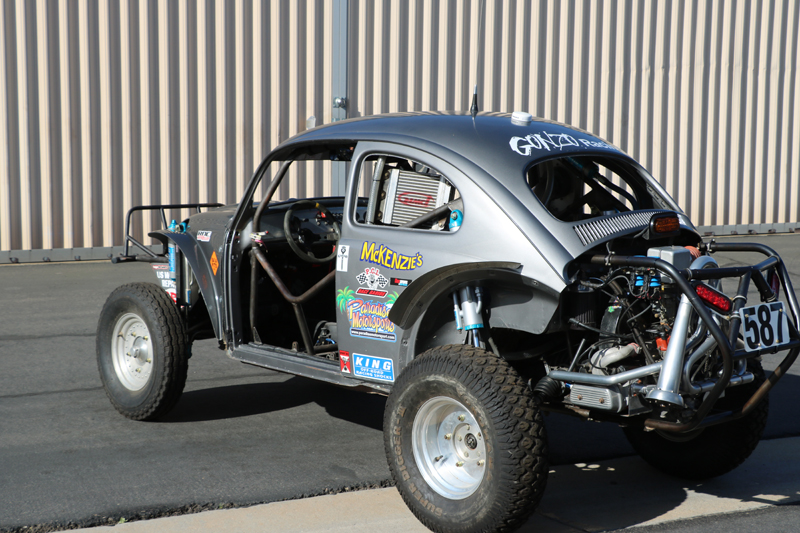
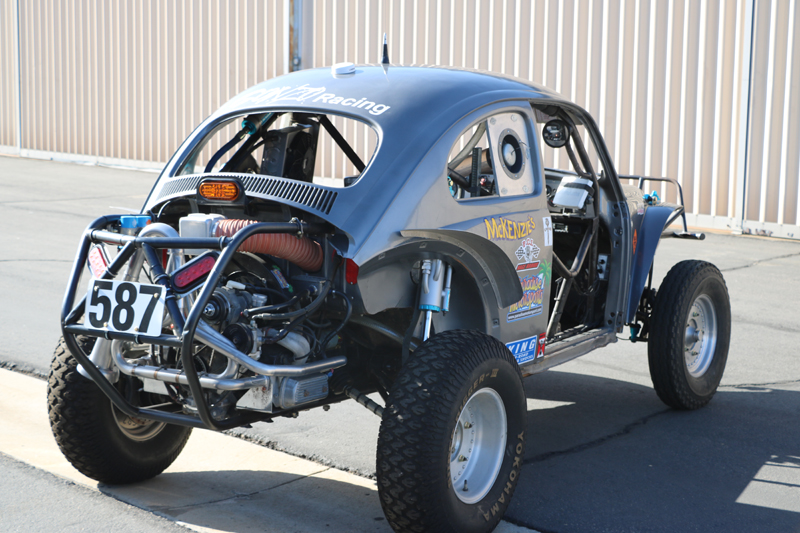
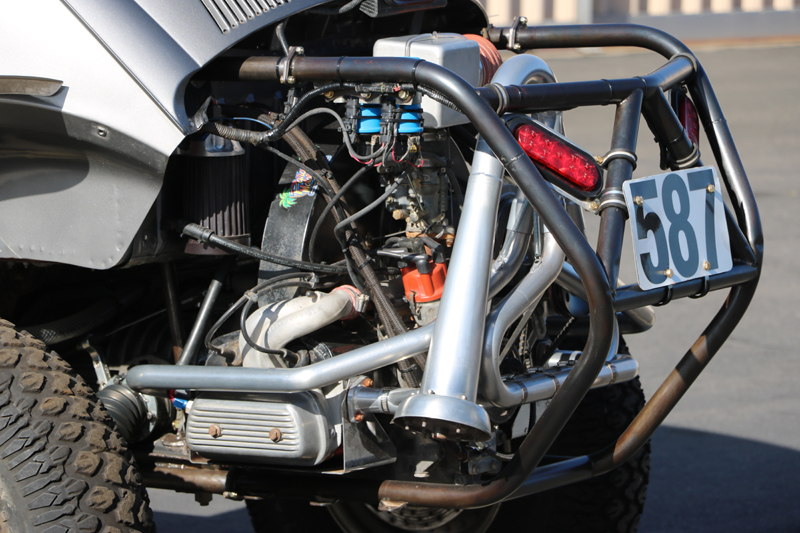
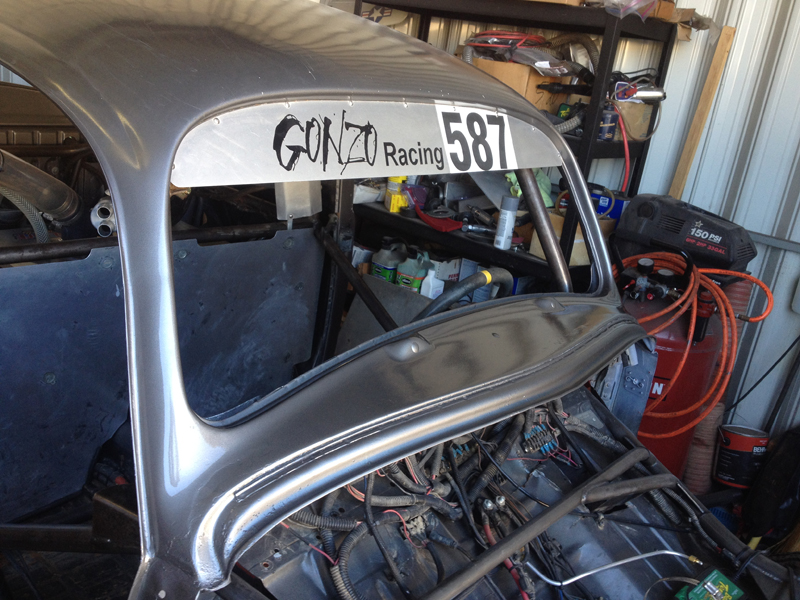
02 April, 2016 The car is essentially done at this point; I have some minor details to attend to but otherwise it's ready to run! I finished the installation of the seats and belts, then installed the doors and the rear skid plates. After, I rolled it out into the sun - fully assembled for the first time since November of 2014. Here are a few photos - we'll try to get some "glamour shots" of it when we do our test/tune:
01 April, 2016 I spent about half the day at the shop, hoping to finish up but fell short - I had unexpected visitors drop by...... Always happy to hang out with friends but I'm usually pretty focused on the car when I'm at the shop. No big deal, just got less done than I had hoped. I did cross a couple of things off my "to-do" list though; I finalized the initial front suspension torsion spring pre-load and secured the adjusters, installed some chafe strips on the front sheet metal, fabricated and installed a "cover plate" to close up a hole in the foot-well, secured the radio/intercom wiring in the Driver's compartment, installed the Co-Driver's seat and belts and began the installation of the Driver's seat. Remaining to be done is to finish the install of the Driver's seat and belts, hang the doors, pad the roll cage in the Driver's compartment, install the oil cooler scoop and install the rear skid plates. Not much left to do - maybe another full days' work (assuming I can find everything)!
30 March, 2016 I wrapped up the front end of the car today; HID lights installed and connected, all wiring routed and secured, front bumper and skid plate installed and the front sheet metal installed. Everything in front of, and behind the Driver's compartment is complete - only the Driver's compartment remains. I have a little sheet metal fabrication to do in order to close up a gap in the foot-well where the lower cage element passes through on the Co-Driver's side, then it's time to install the seats/belts, cage padding and then the doors. At that point, I think the repair/prep. will be done! I'll post pictures when it's all together.
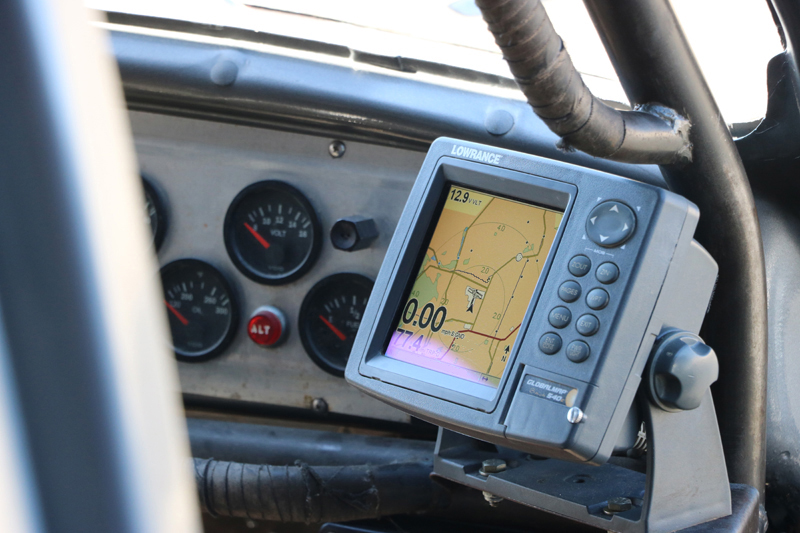
27 March, 2016 Happy Easter! I had a couple of hours free today so I spent them at the shop re-installing the electronics in the car. We had removed the radio, intercom and GPS while doing the structural repairs. While they were out of the car, we sent the radio and intercom to PCI Race Radios for testing and any needed tune-ups. PCI serviced both and returned them in under a week - they've been sitting on the "parts cart" for months waiting to be re-installed. I'm happy to report that everything powered up normally and seems to be working perfectly! It did take the GPS a couple of minutes to find itself though - the last time it saw satellite signals and had a location fix was in La Paz in 2014! Now that the electronics are installed I can route and secure all the wiring, then install the seats and doors. Following that I'll mount the headlights and install foam padding around the tubing in the Driver's compartment - that should wrap up the repair/prep. phase!
19 March, 2016 Trevor and I spent some time at the shop today; we were primarily working on his "project car" but I was able to finish up the sheet metal repairs on the race car. I welded the co-driver side "A" pillar, body worked it and painted it then "touched-up" the areas on the hood where I had opened the shock clearance holes. At this point, I think the repair phase is complete! Now, we can start the "final assembly" phase; hopefully only a few more days of work. Following that, we can start planning for a test/tune day.
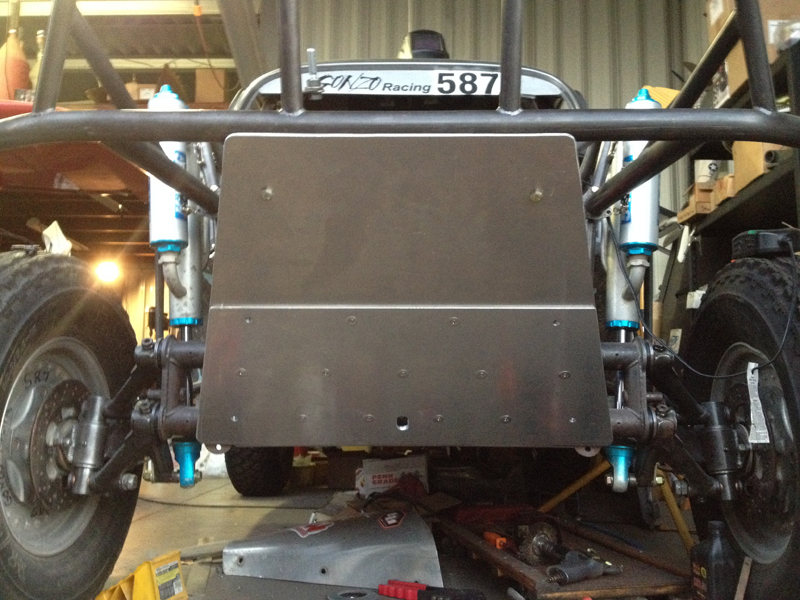
16 March, 2016 The front skid plate is done! You might think "what's the big deal, cut it out and drill a few holes" but it was more complicated than that..... We decided that we wanted a lighter version that provided better protection where it's needed - near the bottom and below the suspension beam. That required a two-piece design that took much more time than a simple, single "plate" design. We now have a skid plate that is thin at the top, thick at the bottom and wraps under the suspension beam to protect it as well. With the skid plate complete and installed, I was able to final fit the front sheet metal. I re-discovered another area where the sheet metal needs some attention - I had noted it previously but had forgotten about it. The Co-driver's door frame ("A" pillar) is cracked just like the Driver's side was - I'll give it the same treatment as the other side next time I go to the shop. It's a little thing but I want to get all the sheet metal back into a "stable" condition.
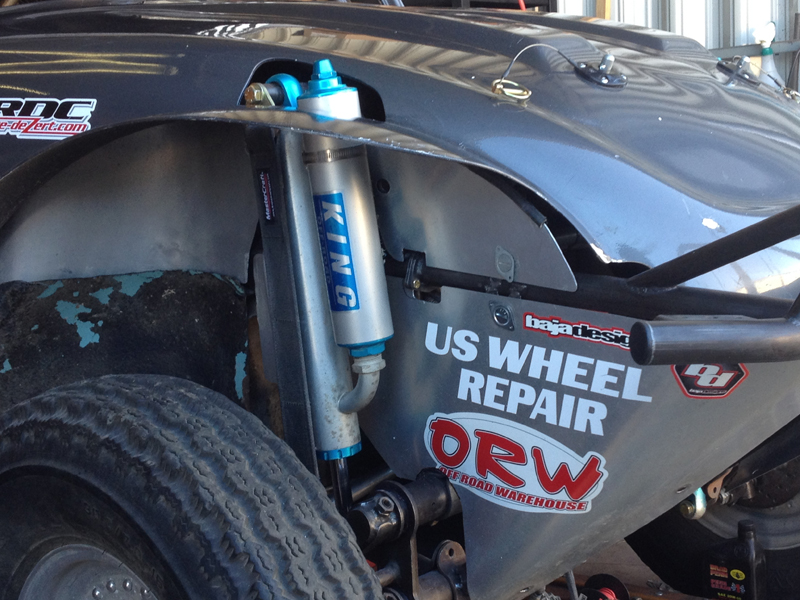
15 March, 2016 This is a "non-flying" week for me so I was able to spend several hours at the shop this afternoon/evening. I finished up the sheet metal repair of our foot-well/dash panel/door frame and painted them, then installed some leather strips where the hood overlaps the body in front of the windshield. Following that, I spent a little time adjusting the fit of the hood mount pins; they secure the front of the hood and needed a little tweaking - the hood is secure, yet easy to remove now. Finally, I opened up the shock clearance hole on the driver's side and it's now ready to paint. I'll mix up some paint and brush it on the edges where I had to remove material. I should just paint the whole hood but it shows some battle scars from past races that give it character....... Last week, I ordered and received the aluminum plate we needed to fabricate a new front skid plate; today I was able to cut it to shape and drill it for mounting to the front bumper. The main portion of the skid plate is complete and I have an additional part (doubler) ready to cut and final fit next time. The doubler requires a little bending to wrap under the beam for protection; I have a tentative plan on how to do that - hope to have it all done tomorrow. I believe that the front skid plate is the last "fabrication" item - once it's done, we're down to final assembly!
08 March, 2016 I'm flying into and out of San Diego all month so I'm home every day; I can't really make it out to the shop in the time I have available though. So, I'm doing the "logistics stuff" in my "off" time - ordering materials that we'd otherwise have to go out and purchase locally. We try to buy from the local "racer friendly" material suppliers (Competitive metals for example) but sometimes the internet has better deals or I just don't have the time to physically go shopping...... So, this is one of those times where the internet is a big help - we received our new front skid plate material on our door step today. Trevor and I have agreed on the new design so at this point I just need to cut the aluminum plate to shape and drill holes. He'll have a little welding to do.....
05 March, 2016 Trevor and I spent a little time at the shop this morning wrapping up a couple of loose ends; Trevor finished up all the welding on the front bumper and I riveted the foot-well doublers in place. I spent a little time grinding the weld on the driver's side door frame, I'll paint it next time. We brought the doors back from our storage unit; once the seats are installed, we'll hang the doors and the car will be drivable again!
02 March, 2016 Tonight I finished fitting all the sheet metal doublers and painted the areas I welded yesterday. I didn't have the correct rivets to install the doublers so they're just "clecoed" in place at this point; I'll get the rivets tomorrow. Even with the doublers installed only temporarily, the foot-well and dash panel are much more secure. I found a crack in the driver side door frame this evening - it was hard to detect but once I discovered it I found it to be fairly long, requiring repair. This was another area that I decided to weld rather than repair with a doubler. I didn't want a doubler in that area because I was concerned that it would interfere with the door.... It was late by the time I finished welding so I'll have to "dress" the weld and paint the area next time (it's not going to be visible with the door closed but will be with it open).
01 March, 2016 I found a couple of hours to spend at the shop in-between other demands on my time today - didn't get much done but some is better than none...... I decided to weld the more difficult crack areas in the foot-well rather than making doublers. There are several areas where the shape is too complex for me to make and install doublers that fit well so I went ahead and welded those places. I believe that doublers are a more desirable solution from a structural standpoint but they're not practical in some areas. I have only 2 more areas to attend to where doublers will be easy to fit and install. I'm hoping to wrap up this repair effort tomorrow evening so that I can begin reinstalling the electronics (we took the radio, intercom and GPS out for PCI to check while we were doing all the structural repairs; sensitive electronics and electric welding techniques aren't the best mix....). I have a little painting to do to protect the repairs, then it's final assembly time! Oops, forgot - I still need to make a new front skid plate.....
29 February, 2016 I spent a couple of hours at the shop today - no major progress but a couple of small victories; I got all the sheet metal DZUS fasteners riveted to the panels and the front skid plate mounting tabs tacked in place. I discovered that we need to make a new skid plate; the old one is pretty beat up and the new front bumper is slightly different than the original - we'd have to drill new mounting holes and it'd look bad. So, I'll be buying some aluminum plate soon I guess. I was hoping to avoid the skidplate re-design I mentioned previously but I guess now's the time to do it. Trevor and I will have to find some time to talk about what we want to do - otherwise I'm going to make a new one just like the old one. It worked for us for the last 8 years...... I'm hoping to get back to the shop tomorrow and start working on the foot-well crack repairs.
26 February, 2016 I've been hoping to get out to the shop this week but it just hasn't been possible; I'm flying nights this week and between trying to get some sleep in the mornings and dealing with a Ford service department that backed a car into my Mustang while it was in for service, I haven't had the time. Hopefully I can spend a couple of full days on the car next week, that should get it close to being race ready I think.
20 February, 2016 I finished up the "tabbing" of the front cage and final fitting of the sheet metal today - my welding skills aren't as good as Trevor's but it's hard to go too wrong with a MIG welder..... I'm sure he would have TIG welded the tabs in place - it makes a much nicer looking weld but isn't really necessary in this application. My next project is to repair the body cracks in the "footwell" area; the structural problems we had at our last race really made a mess of all the factory sheet metal under the hood. I want to install a few "doublers" to reinforce the problem areas; some of them may be difficult to fabricate due to the compound curves in some areas..... I suppose that I could harvest the entire footwell area from a junkyard car but I don't think that's necessary at this point. I'll do my best to return our footwell to a more stable condition with structural integrity comparable to before the damage was done.
It's finally coming together; just a couple more days of sheet metal repairs then final assembly! It looks like it's almost time to install the lights, seats and doors - the last things we do before we call it "done"!
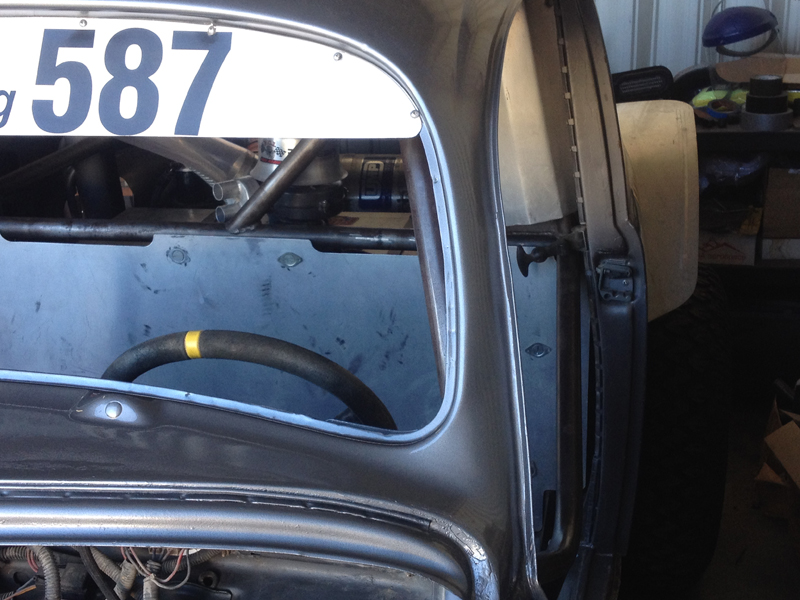
19 February, 2016 I was able to get to the shop for a few hours today; been busy (and away from home) with work for the last couple of weeks..... Finally, I have the windshield repair complete - it's painted and looks good! Glad to have that behind us so we can move forward with the mechanical stuff After painting the windshield frame I started fitting the front end sheet metal to the new front cage elements. As you might imagine, the fit required a little adjustment but nothing too serious. After fitting the parts, I began "tabbing" the structure for their attachment; the right side is all "tacked" in place, the left side will be next.
08 February, 2016 I spent just a couple of hours at the shop today - I have a trip to fly tonight and had to leave early. I finished the body work on the windshield frame then shot a coat of primer/sealer. I'll give it a couple of days, then wet sand it and paint it to match the rest of the car. After finishing that, I cleaned up the seats; they were dirty but otherwise in good shape and now they're ready to go back into the car. Finally, I reinstalled the front bumper temporarily so that we can start fitting the sheet metal and new skid plate. That's where I ended today, not sure if I'll be able to get back to it for a week or so......
07 February, 2016 I spent nearly the entire day working on the electrical system - as far as I am able to determine, the electrical system is in perfect order at this point...... I'm surprised that I never found an obvious problem given the severity of our electrical problems at the last race. At this point, I'm going with the theory that our starter was the source of the initial trouble and the structural problems we had later compounded our electrical problems. Aside from the starter itself not working, the broken cable may have been shorting to the case causing the entire electrical system to fail. Other than a few loose connections, the starter was the only electrical issue I found unrelated to the structural problems we had later in the race. I took extra care re-securing the wiring harness to the car; every point of contact is well insulated and then protected with a section of thick rubber tubing around the wiring. I paid extra attention to the areas where the wiring was damaged by our structural problems; while it's not possible to provide 100% protection from damage due to structural failures, I've done what I think is reasonable. Hopefully, when we do our test/tune we'll find that our electrical issues are behind us. It's really a very simple electrical system...... In addition to "wrapping up" the electrical system, I installed the rear shocks and driver compartment firewall. The rear half of the car from just behind the seats to the brake lights is now race ready. The forward portion of the car is where all the remaining work is found - we want to make a new front skid plate (same shape but different design - lighter), we need to "tab" the new front cage structure to create mounting points for the sheet metal, the hood needs to be clearanced for the slightly different front shock mount locations and I need to reinstall the seats, doors, GPS, intercom and radio. All that will follow after I paint the area we "body-worked" around the windshield frame. It's really not very much work left to do...... Hoping to do a test/tune soon - but, unfortunately, we're not going to make it to the San Felipe 250 this year - I'm going to be tied up at work for most of the remainder of the month and the weekend of the race.
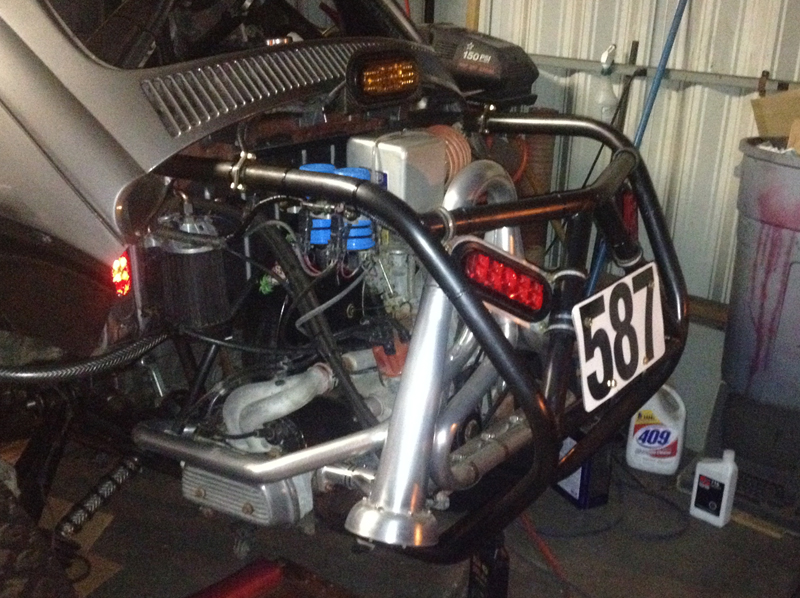
03 February, 2016 More progress on the car today; I spent most of the day working on the rear bumper. I find it amazing that it took me several hours to make the rear bumper look like a usable part...... There is something about Baja - it makes an unbelievable mess of all the steel parts on a car! I basically had to strip it down to bare metal, re-black it then apply an anti-corrosion coating. I guess it would have been easy if I had a blast cabinet big enough to do the job but I only had a wire wheel and Scotch-Brite..... All that effort paid off; it looks almost new again. Once I had it inspected and looking good, I reinstalled it on the car along with the tail lights and our number plate (once cleaned and inspected as well). Following the installation of the bumper and lights, I spent a little more time looking at the electrical system. Again, I haven't found anything major - just some connectors that needed to be re-crimped (I'm going to spend a day checking every connector - the car has seen 7 years of hard racing and things work loose....).
Now that the rear bumper is installed and all the lights are working, the rear half of the car is done (with the exception of the installation of the rear shocks)! Next, I'll continue inspecting, repairing and securing the wiring in the passenger area. Once that's done, we'll be ready to install the seats - it'll be drivable again!
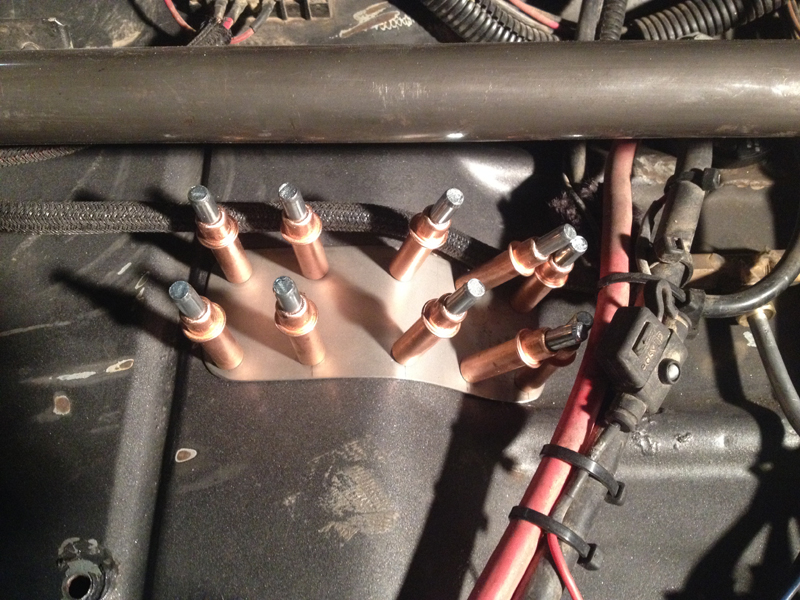
01 February, 2016 Another good day at the shop today. I spent most of the day working on the electrical system - repairing some of the brake light wiring, reconnecting the battery and inspecting the wiring leading to the engine and rear bumper. I didn't see any obvious problems though there are a couple of areas where I want to protect the wiring a little better. Everything seems to work as it should; all the lights, fans and pumps work as expected without any unusually high current draws. I'm not entirely sure of our alternator though - it seems like it might have an internal short in the excitation circuit..... Going to look a little deeper into that though I don't think that was the source of our previous electrical problems. Given the severity of the electrical issues we faced at the 2014 Baja 1000, I expected to find something obvious. There was a problem with the starter that could have been the source but I'll keep looking..... After sorting through and re-connecting the electrical system, it was time to do a "first run" of the engine. That required filling it with oil and adding power steering fluid to the reservoir, then temporarily installing the rear bumper (that's where the ignition coils are). As always, I pulled the spark plugs to turn the engine over until we had oil pressure before attempting the run. With good oil pressure and fuel in the tank, the run was uneventful with everything "in the green" and no leaks. I was relieved to find that the power steering pump and Char-Lynn seem to be fine; they ran dry for a few miles at the 2014 Baja 1000 and I was a bit concerned that they might have been damaged. Here's a little "first run" video (don't mind the rusty bumper, it's only installed temporarily - I'll clean it up before it's "final installed"): https://www.youtube.com/watch?v=Zpnl1JZo8Xk
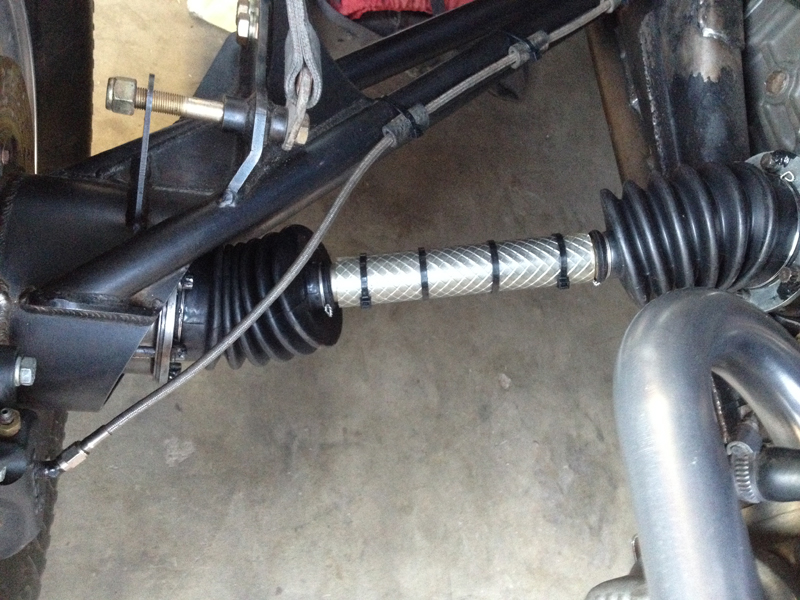
24 January, 2016 We had a good day at the shop today; Trevor and I assembled, greased and installed the CV/Axle assemblies. Following that, I installed the engine and began making all the oil/hydraulic/air/electrical connections. I couldn't finish up all the connections without installing the rear bumper (the ignition coils live there); it needs some serious cleanup before it's ready to go back on the car though. Maybe next time.
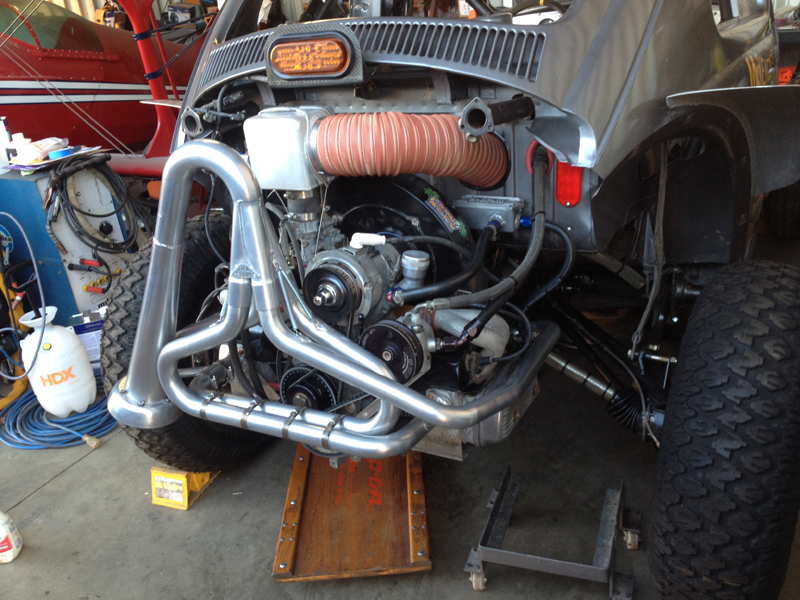
15 January, 2016 I spent the afternoon at the shop today, wrapping up the exhaust system polishing and inspection followed by installation on the engine. After that, I replaced both the power steering pump belt and the fan belt - they looked fine but it's cheap insurance. I'm a little worried about the power steering pump; it ran "dry" for a few miles at the end of the last race. I guess we'll know for sure if it's damaged when we run the engine again; it seems okay - it turns easily, has no "rough" spots and doesn't make any "expensive noises" when turned by hand. That may tell us exactly nothing though....... After sorting out those things, I moved on to the axles and CV's. They had all been inspected but not final prepped - it was time to move them to the next stage of readiness. First, I had to "round up" all the various parts for the axle/CV assemblies. Then, I polished and inspected everything so that I can begin the assembly/installation next time I'm at the shop. Once they're installed, it'll be time to "hang" the engine again!
10 January, 2016 Trevor and I spent the afternoon at the shop today; Trevor worked on his Golf "R" body kit and I worked on the race car exhaust system. Our exhaust system was new at the beginning of the 2014 Baja 1000 but by the end of the race it looked like it had seen 100,000 miles! The silt seems to bake on the headers like a ceramic coating..... I spent a couple of hours cleaning, inspecting and polishing; it's almost ready to go back on the engine. It was a dirty job but the other possible job today was greasing and installing the axles and CV's, much more mess....... Next time, I'll finish the polishing and install the exhaust back on the engine. Following that, I'll do the axles and CV's, then install the engine - that'll basically finish up the back end of the car. I've been taking my time and actually enjoying working on the car for a change - we don't have a particular race in mind so there's no pressure to "get it done"! Trevor is the editor of an on-line automotive magazine, "Turnology", one of the several "Power Automedia" (http://www.powerautomedia.com/) publications. Currently, he's writing about the modification of his daily driver (a 2013 VW Golf R) from stock to a WRC style "recce" or "pre-run" car. He plans an extensive re-work of the car but expects it to remain a well mannered daily driver when driven on-road; off-road, it'll show a completely different personality...... You can read about it here: http://www.turnology.com/features/project-gruppe-r-introducing-our-recce-golf-r/
08 January, 2016 I spent most of the day at the shop - nothing major in the way of progress but I got a couple of things done. I worked on the windshield "body work" and got it to the point that I was ready to shoot some primer. I did that, then moved on to installing the transaxle while waiting for the paint to dry. The trans. is now "final" installed and connected to the shifter, ready for engine installation. I spent a little time working on the electrical cables/connectors in that area - they needed a little clean up and in a couple of cases I just replaced the connectors. Everything looks good now and once I reinstall the exhaust system on the engine, I can bolt it back on the car and start re-connecting everything. Before I do that I'll reinstall the axles/CV's - it's much easier without the engine in the way. Not looking forward to the CV grease "mess" though........
02 January, 2016 Happy New Year! We're just home from Baja - we usually celebrate New Years' Eve and Day on the beach in Baja. It's always hard to pack up and come home, especially when the weather is perfect - as it has been for the last week! I hoping to spend some time working on the race car over the next couple of weeks. We have all the "long lead time" items back under our control so it's just a matter of finding time to put it all back together..... I have a few other projects demanding my attention but I plan to spend some time at the race shop.... |