|
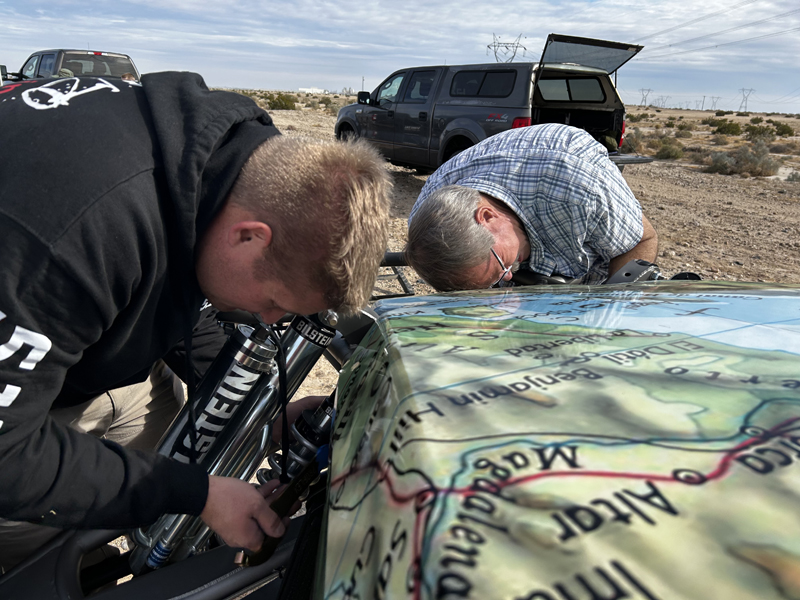
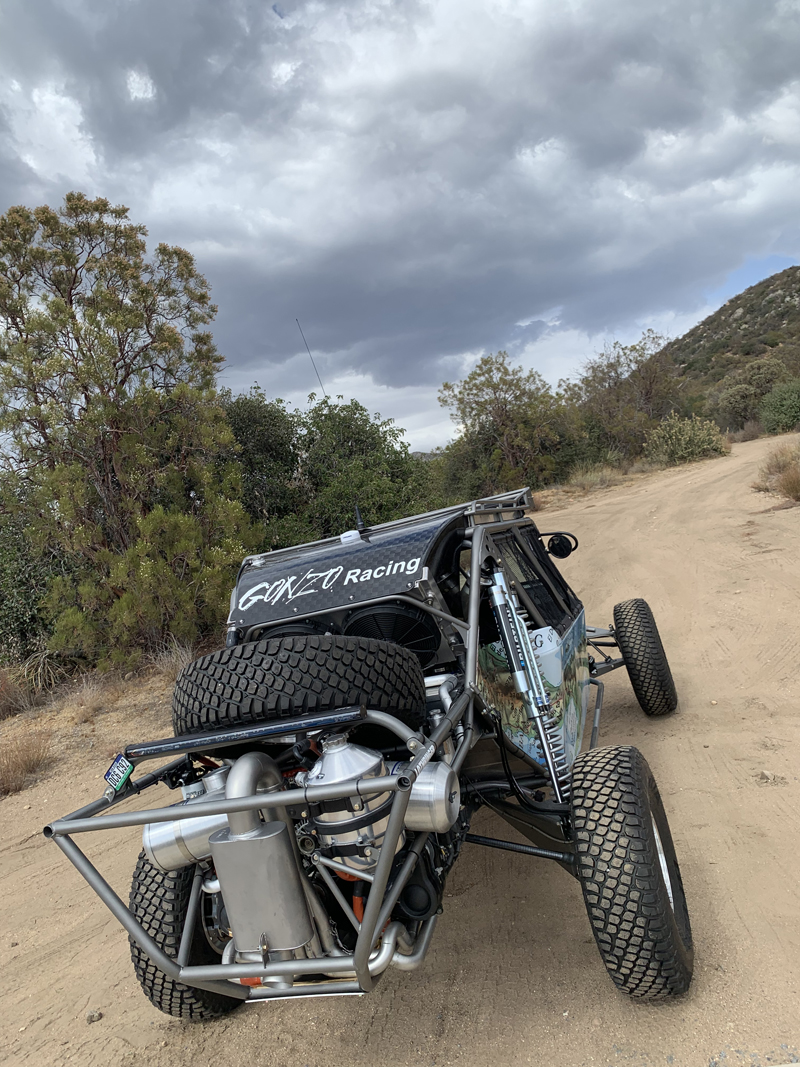
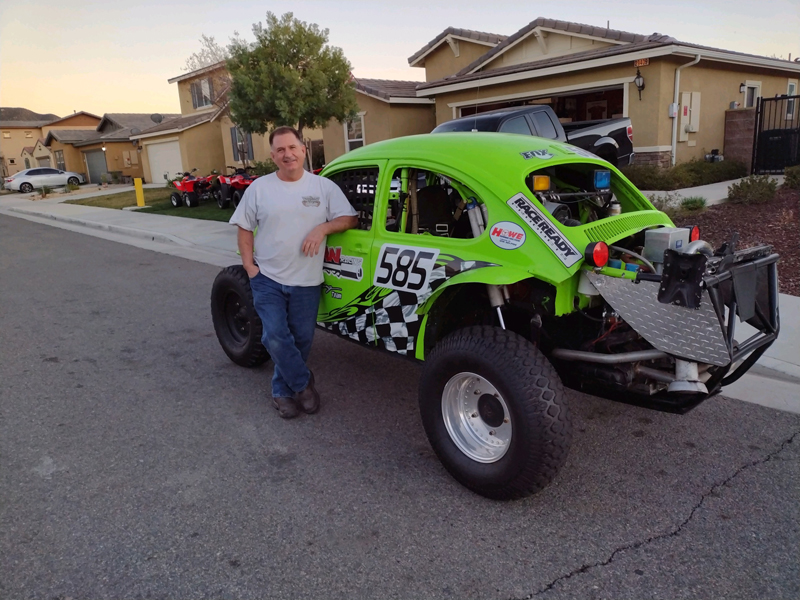
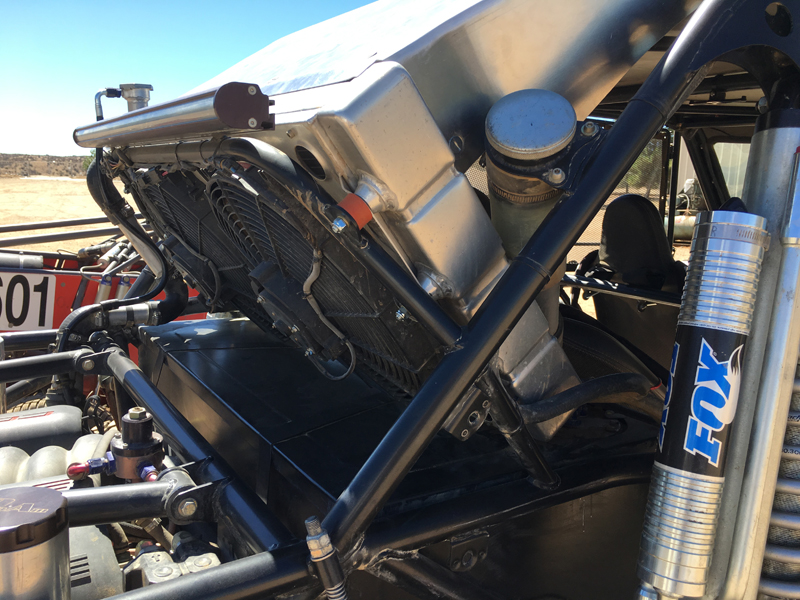
29 December, 2022 We had the pre-runner out to the desert for it's first test and tune session today. We're very happy with how the day went; no big problems and the car ran great! We were primarily interested in evaluating the systems and handling today with an emphasis on safety. We did drive the car hard though and it handles great! The engine runs well and sounds good - we have plenty of power on tap! We spent a little time tuning the shocks but it needs a bit more adjustment to get rid of some rear suspension "harshness". There were a couple of small issues that need to be addressed - the GPS isn't working and we want to adjust the oil pressure up a bit. A successful first outing!
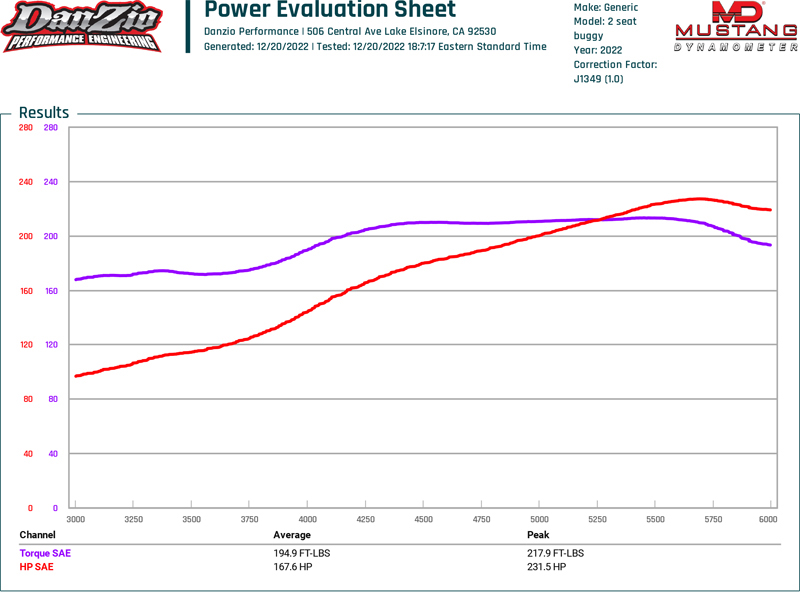
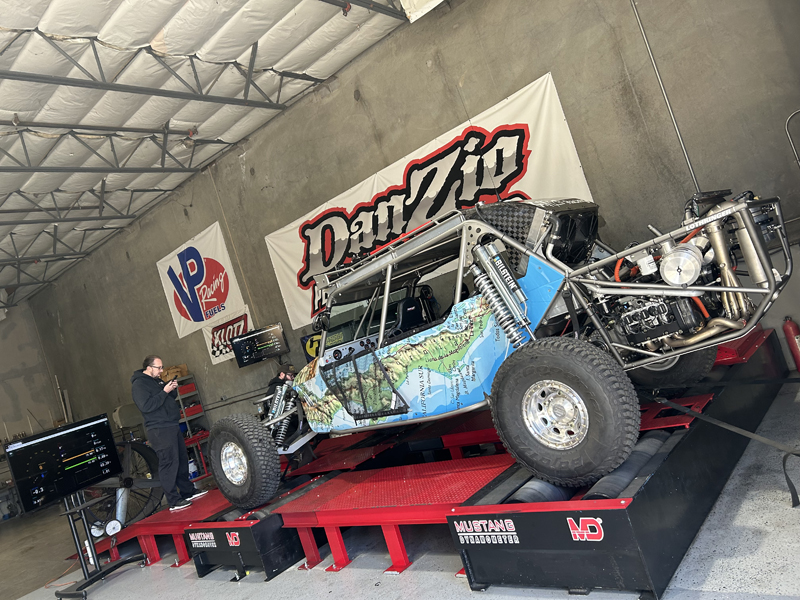
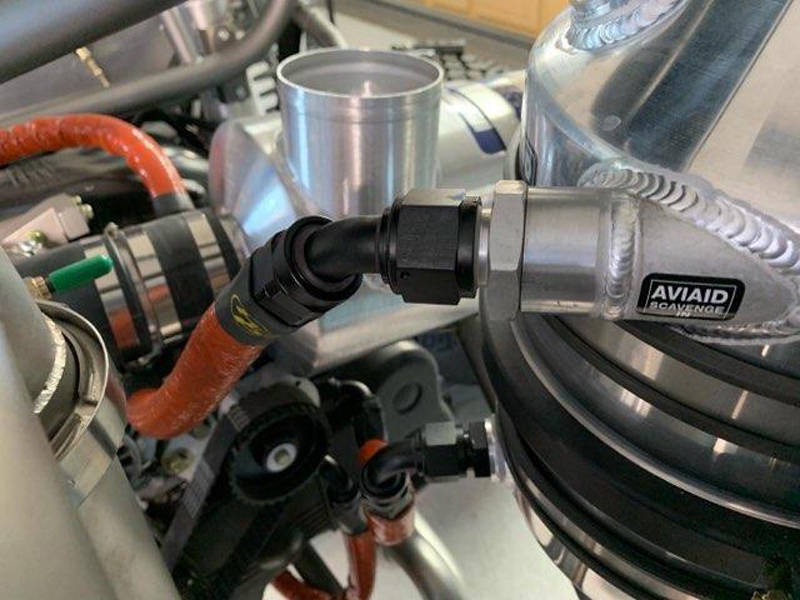
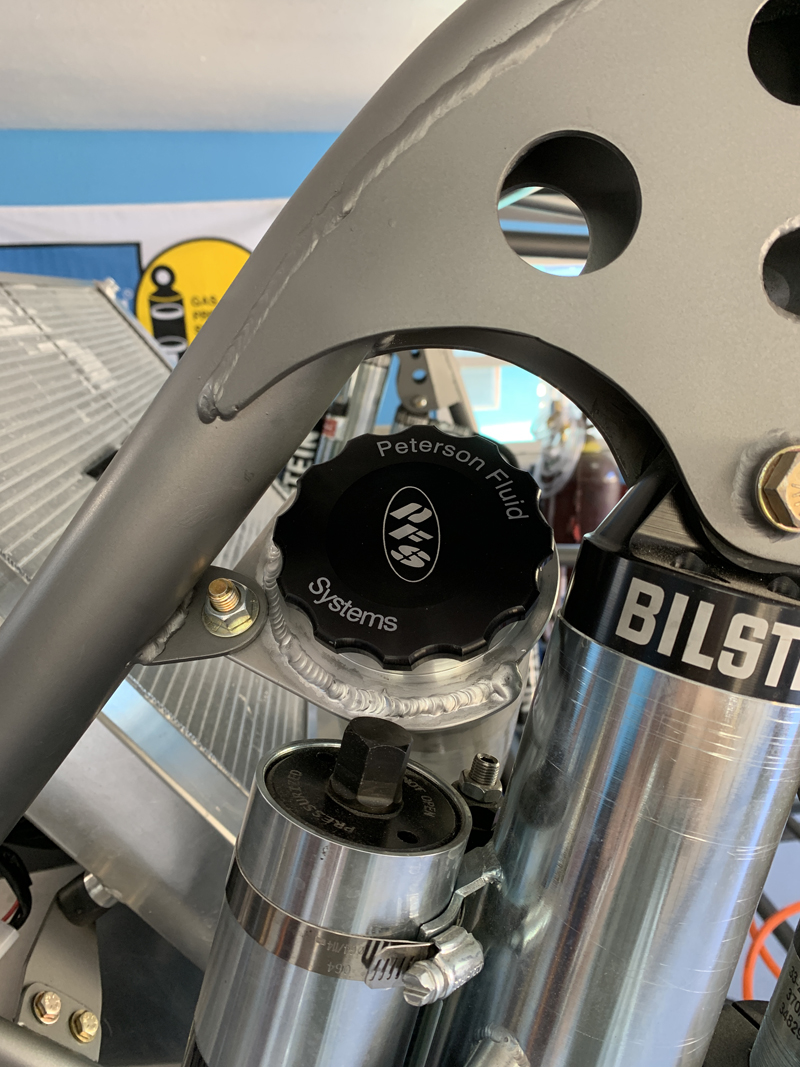
23 December, 2022 Trevor and I spent a few hours yesterday addressing the few "little" issues that remained after our tuning session on Tuesday. We're still not 100% happy with the fuel rail design but we have an interim solution in place. The "long term" solution is to fabricate and install new fuel rails. We reconfigured the oil tank vent line to eliminate the possibility of oil leakage in the event of a "roll-over" and re-sealed the oil pump "bypass adjustment screw" which had been dripping slightly. We also spent a little time checking and securing hoses, fittings and connectors in preparation for our first outing. Here's the "Power Evaluation Sheet" from DanZio:
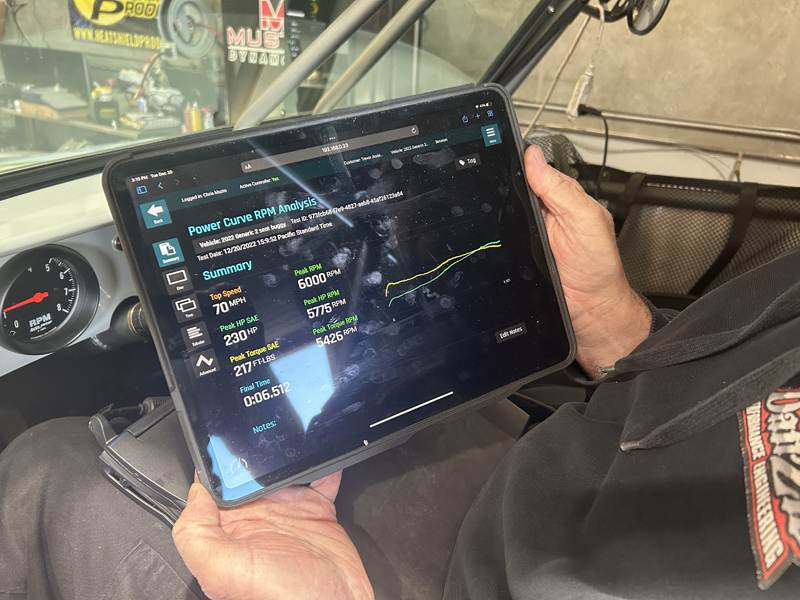
Our Power Evaluation Sheet shows peak "at the wheels" numbers of 231.5 horsepower and 217.9 ft-lbs of torque, both in the vicinity of 5600 RPM. That's right in the "ballpark" of what we expected from our "built" EG33 on 91 octane "pump gas". Chris at DanZio estimates about a 25% power loss between the flywheel and the rear wheels due to drive axle angles and other drive line losses. Assuming he's correct, that translates to about 309 horsepower "at the flywheel" - a 79 horsepower (34%) gain over stock while still running "pump gas". We could probably free up a few more horsepower if we ran "race gas" but that stuff is expensive and not available at regular gas stations - that'd limit our ability to do long range pre-runs..
Trevor recorded several "pulls" on the dynamometer yesterday - here's one:
20 December, 2022 Today was a big day; after weeks of waiting for parts and working on the pre-runner engine, Trevor spent the entire day at "DanZio Performance Engineering" overseeing our final "tuning session". We'd had the engine apart to replace the camshafts and lifters after the premature failure of the original parts. While it was apart, we also engineered and fabricated a solution to the "dry sump oil transfer" issue we had been experiencing previously. With those things accomplished, it was time for the "final tune". We're very happy with the results - a smooth running, powerful and reliable engine that runs on 91 octane "pump gas". It was a pleasure working with DanZio; they really performed for us and we highly recommend them! We have a couple of little things we want to address: we don't like how the fuel rails are machined and we have a small oil leak at the oil pump "bypass" screw. We also still need to mount our "VIN tag" to be "legal". I spent a little time today making spacers for mounting the ignition coils and air filters more securely. All "little things" that are easily accomplished.
With the final tuning complete and our oil transfer problem solved, it's time to go over the car one last time with an eye towards making sure everything is secure before heading out to the desert. We'll be double checking the security of all the nuts, bolts, hoses, wires and electrical connectors. We'll get our spares, tool and first aid packs loaded and secured, then head out for an initial test/tune. We'll start with a simple safety evaluation and progress to shock tuning as we gain confidence in the ability of the car to take some punishment. We're excited, happy and relieved to have finally brought this project to a successful conclusion. We've been building this pre-runner for several years; it's been a wonderful "family" project but I think we're all ready to move on to the "play with what we've created" phase!
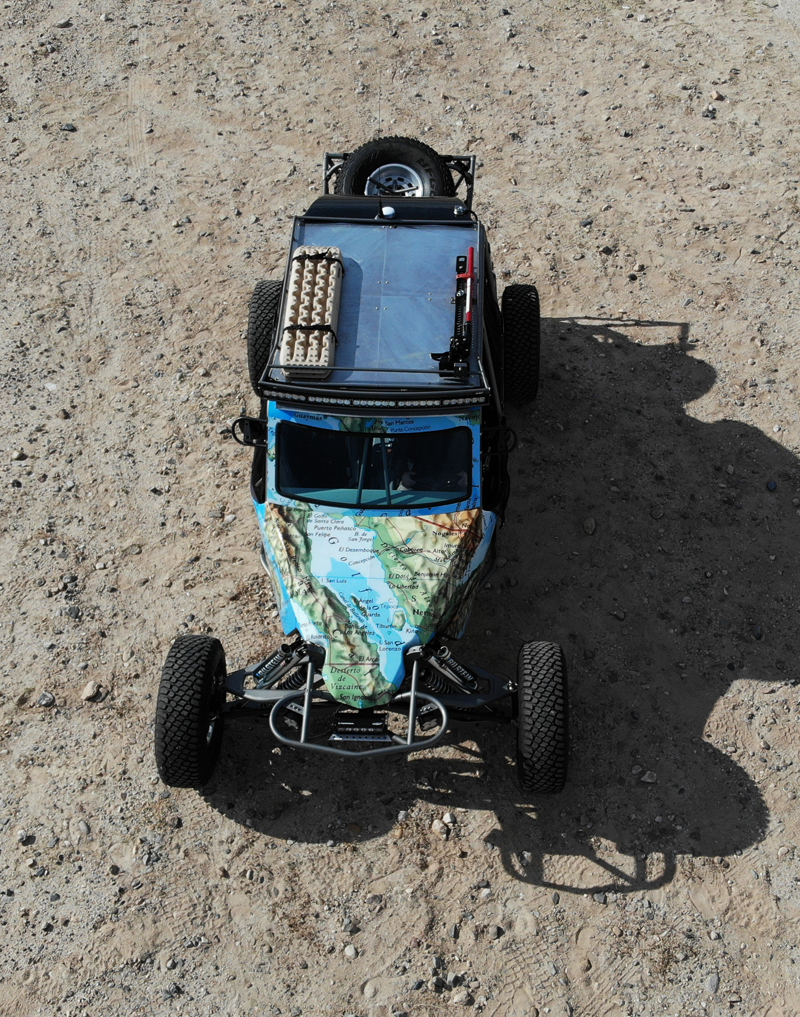
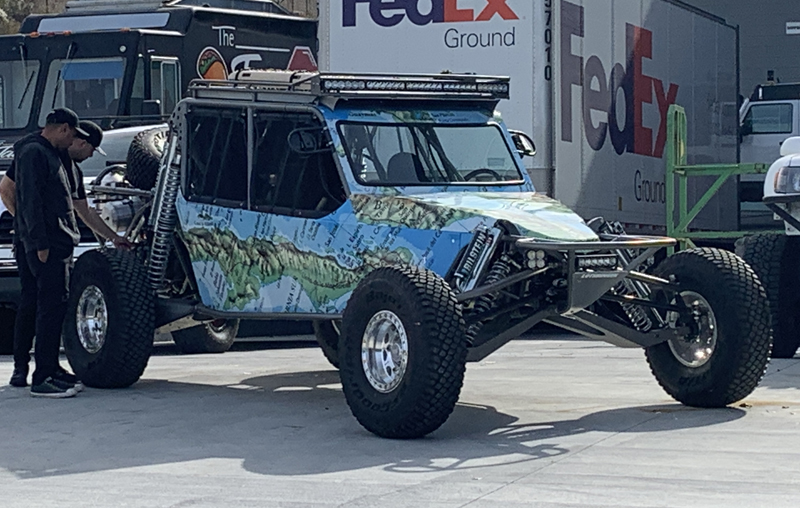
04 December, 2022 We had our pre-runner on display at the "Baja Designs 30th Anniversary Open House" yesterday. All of the lights on the car are Baja Designs products; it was a pleasure to show the car and their products at the open house. We had some great conversations with attendees and lots of positive feed-back on the car. Our engine choice and installation was well received; it's something different in a world of "V8" powered cars and trucks. The "Baja Map Wrap" seemed to be well received also. We were the only tube frame "buggy" in attendance (UTV's don't count in my opinion...) and it was a fun opportunity to show the car in person. We have the engine reassembled with new camshafts and lifters; we're on Danzio's schedule to finalize tuning later in the month.
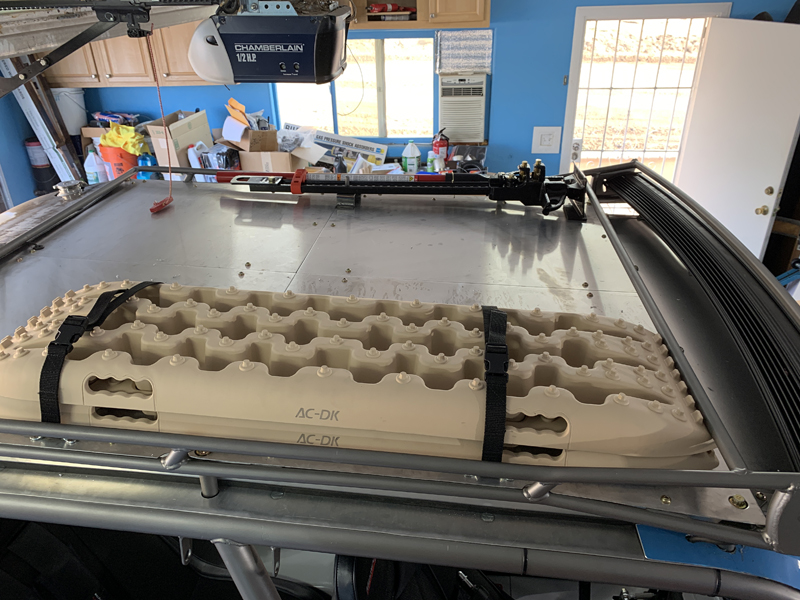
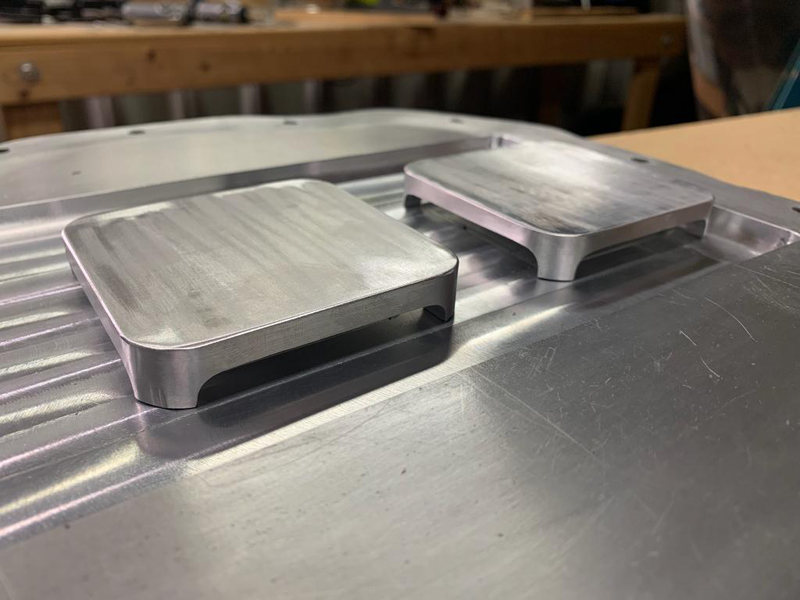
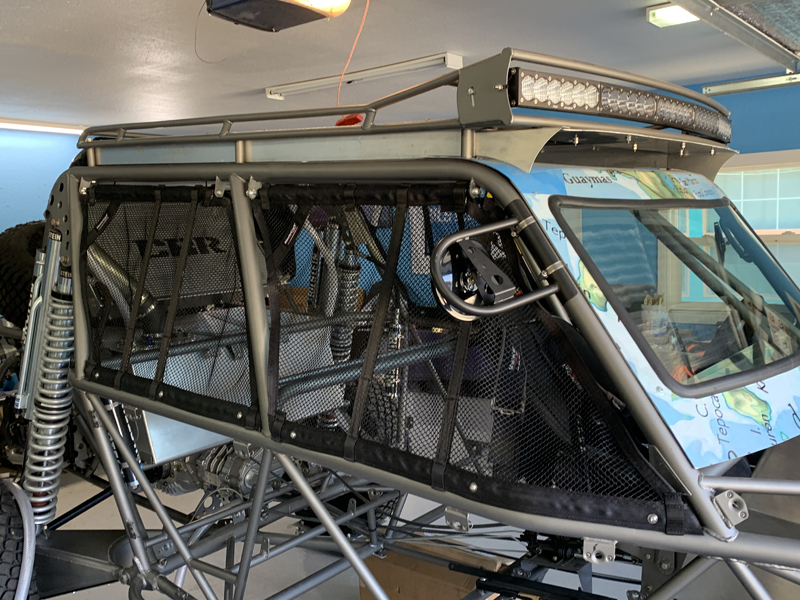
13 November, 2022 Trevor and I worked on the pre-runner today; we had hoped to install the new cams and lifters but discovered that we didn't have everything needed... The new camshafts require that we transfer the gears from the old cams; that's easy enough but for the fact that the new cams didn't come with the required "dowel pins" to keep the gears and cams in the correct relationship. We attempted to remove the pins from the old cams but found that they'd be unusable by the time we were able to get them out... We're unable to proceed with cam installation until we get new dowel pins. Since we couldn't work on the engine today, we decided to pursue mounting our "high-lift" jack and "recovery traction boards". We chose to mount both on the roof rack; that keeps them easily accessible but out of the way. We fabricated a mount for the jack that bolts to the roof rack and secures the jack with a post/pin arrangement. The recovery boards are fairly light and are simply secured with straps attached to the roof rack floor.
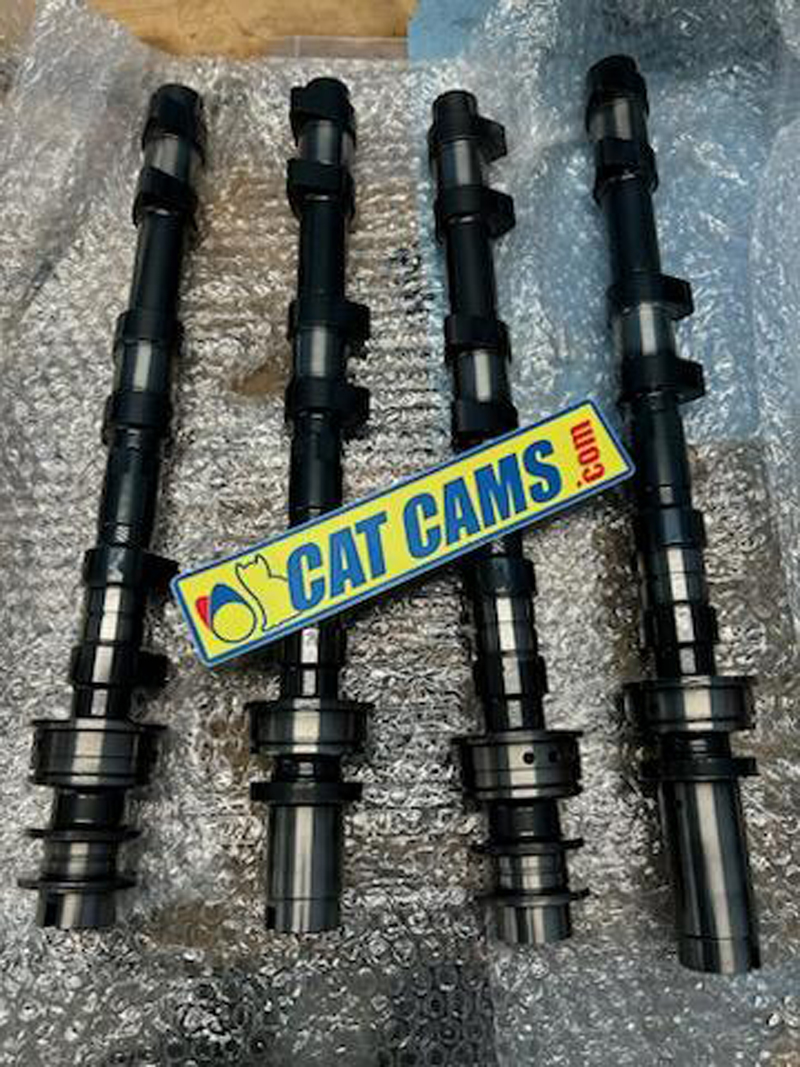
12 November, 2022 Our new cams arrived yesterday and along with new lifters, we're ready to begin reassembly of the pre-runner's EG-33 engine. Trevor has inspected and cleaned everything in preparation; hopefully everything will go back together without any issues. There will be some disassembly of the old cams required - the gears will need to be transferred to the new cams before we can install them on the engine. We're planning to get started tomorrow morning.
13 October, 2022 We worked on the pre-runner this afternoon; Trevor closing up the crankcase and I did a wheel alignment and safety wired the steering rack tie rod bolts. We then planned the routing of the new oil scavenge lines to the oil tank. With the addition of a second scavenge pump (the stock oil pump routed to the storage tank rather than the engine), we needed to re-arrange the hoses... Little things but we cleared a few items off our "do-list". We're out of things to do at this point until our new cams and lifters arrive.
06 October, 2022 Trevor has the camshafts removed from the pre-runner engine and notes that a few of the lifters were damaged along with the camshaft failures. We have new "performance" cams and lifters on order but it'll probably be November before we get them... We've decided not to use the stock cams and spare lifters we have on hand; we only want to tear the engine apart once... In the meantime, we have a few things we can "tidy up" elsewhere so the car is 100% ready to go once we get the engine squared away. Nothing big, just little things like doing a wheel alignment, fixing a sticking seat slider, mounting the high lift jack and securing the VIN tag.
01 October, 2022 Nothing significant to report this week; we've been talking to a vendor who sells new billet steel cams for our EG33 engine. We've decided to purchase a new set rather than using the stock set we have on hand - we want cams that are a bit more aggressive than stock. Meanwhile, Trevor has installed our custom "windage tray" in the engine and we're modifying the stock oil pump to become an additional "scavenge pump" to help with our oil transfer issue. That should be a fairly easy conversion that we hope will help solve our oil transfer issue. Basically, we need to install a custom made "oil pickup tube" on the pump inlet and connect the outlet to the oil tank's "scavenge in" port. Concurrently, Trevor is removing the damaged cams and inspecting for damage to the lifter bodies. We'll replace damaged lifters as necessary to protect the new cams.
25 September, 2022 We're still chasing our dry sump system oil transfer problem; our efforts have improved but not eliminated the problem... Our next step is to install a custom made "windage tray". When Trevor removed the oil pan to work on that, he noted that there was an alarming amount of ferrous material present on it. That can only come from a couple of places: the crankshaft or the camshafts... He removed the valve covers to examine the camshafts and found that several cam lobes were worn significantly after only a few hours of running. New camshafts are not readily available for the Subaru EG33 engine so we had sent these out to be re-ground during the overhaul. We were not pleased with the initial results and returned them to the vendor to be re-worked. The vendor did acknowledge our concerns and re-worked the parts but we were still not 100% happy with the results. Now, after an immediate failure like this, we're really not happy with the end product. For now, we'll be replacing the current cams with a "stock" set we have on hand. We're talking with another supplier who offers new billet steel versions rather than re-ground old parts for the future. Fortunately, the lifters appear to be in excellent condition so the cams seem to be the only casualties.
10 September, 2022 Trevor worked hard in the evenings last week to resolve our "oil transfer" issue with the pre-runner dry sump installation. He had everything back together last night and was able to run the engine at elevated RPM's to test the modifications - happy to report that the oil transfer issue appears to be resolved! He ran the engine for several minutes, ensuring the oil and coolant was at operating temperature, then increased the RPM while monitoring the oil level in the tank. He didn't note any oil transfer issues at up to 3000 RPM, the zone where the issue had previously become obvious. We'd like to run it up to higher RPM to test the fix but before doing that, we'll check with Danzio to ensure that there isn't a reason not to do so... Given that the issue seems to be resolved (at least below 3000 RPM), Trevor decided it was time to go for a "first drive"! He drove it around his property several times without any issues, wish I was there!
Engine oil system reassembled and working as expected, Trevor took the pre-runner out for it's first test drive. No issues noted, everything worked as expected. Since the engine hasn't yet been fully tuned, he kept the RPM's below about 3000. We'll be checking with Danzio this coming week to get back on their schedule for tuning the engine.
06 September, 2022 Trevor and I spent a little time at the machine shop today making "Vortex Breakers"; I made the aluminum blanks and Trevor milled the interior to shape. The idea is that these will cover the oil pickup hole locations to inhibit any vortex creation, enhancing the scavenge pump's ability to keep the crankcase relatively "dry"...
05 September, 2022 I heard the pre-runner engine run in person for the first time today - I think it sounds great! We're limited to about 3000 RPM as of now due to the dry sump scavenge issue I noted previously but it sounds good from idle to 3000 RPM! We believe that we'll generally be running between 3000 and 5000 RPM and expect that the engine will sound a bit more "angry" in that range; can't wait to find out! After the run, Trevor let the engine cool then removed the oil pan for modification. Essentially, what we think is happening is that at high flow rates (high RPM'S), the scavenge oil pickup is forming a "vortex" and allowing air to be entrained. That entrained air reduces the ability of the scavenge pump to keep the crankcase free of oil, leading to a transfer from the tank to the crankcase. This is the same as the swirling you see when you pull the plug on a sink full of water. After researching the issue, we believe that the solution is to install "vortex breakers" over the scavenge oil pickups - essentially cover plates with guide vanes that only allow the oil to be drawn from around their perimeter rather than from directly above. We'll be machining and welding them in place this week; hopefully, they'll solve the problem and let us get back to the dyno!
03 September, 2022 We'll be modifying our oil pan a bit to resolve a "dry sump oil scavenging" issue before we complete the engine tuning session. The system works fine below about 2500 RPM but it seems that we're creating a vortex in the oil above the pickup at high RPM's, limiting the ability of the scavenge pump to keep up with demand. That leads to oil transferring from the tank to the crankcase at high RPM, something to avoid... Trevor has been working on the problem and we hope to resolve the issue this week and get back to the dyno soon. Wish we had known when we fabricated the oil pan - it would have saved time and effort. Another example of "you don't know what you don't know". We did know that what we were doing was on the "experimental" side and that there might be problems to solve... Apologies for the delay in posting these short
videos; I've been focusing on other things for the last week and
then had to figure out how to imbed videos once again...
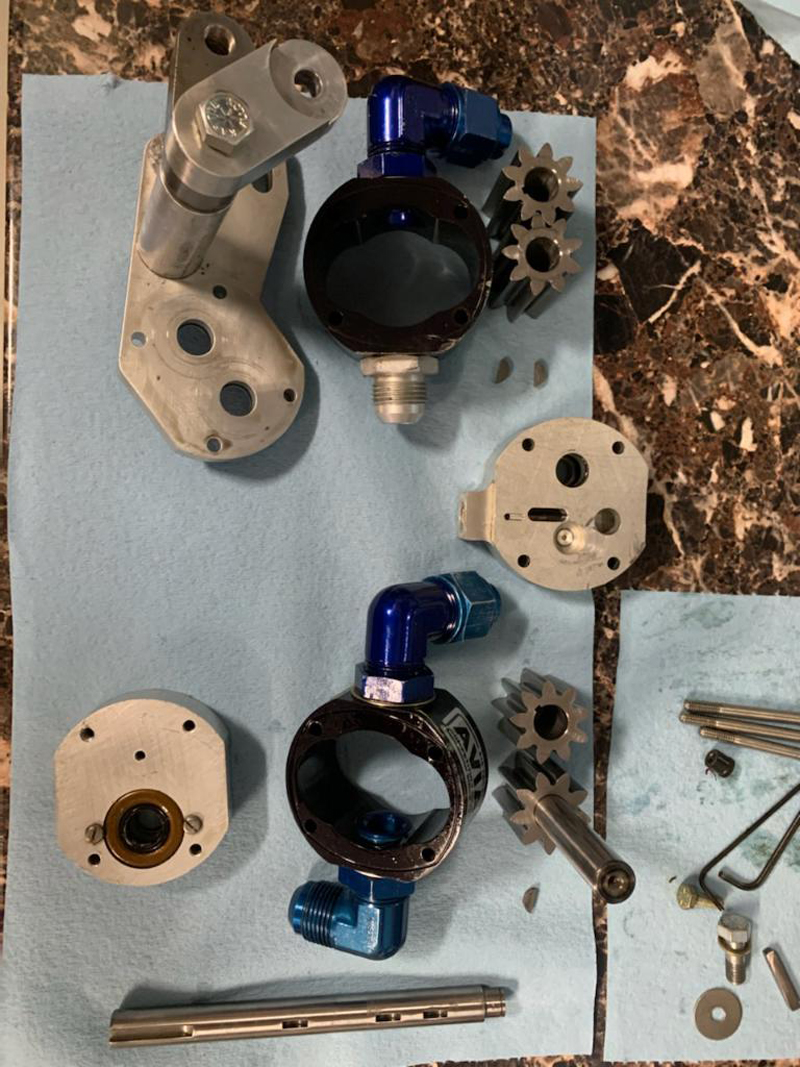
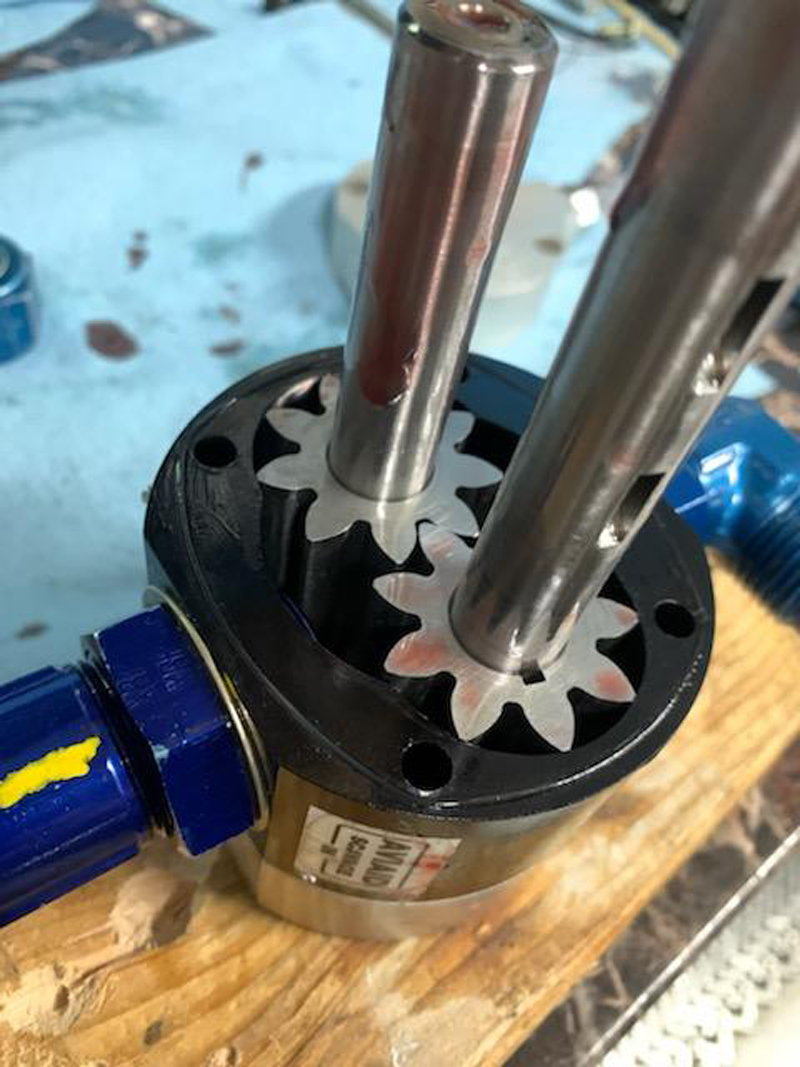
Trevor captured these during our visit to Danzio Performance on
August 24th..
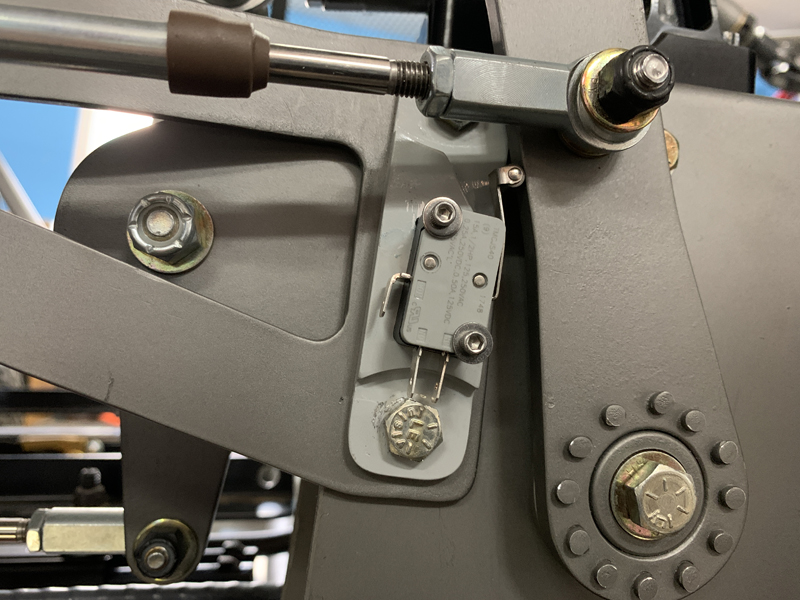
Exciting to finally hear it run! We spent a lot of time overhauling and improving the "core" engine - it was in pretty bad shape when we acquired it. We built it to "race" standards with all the best parts we could find (or fabricate). Hopefully, it'll serve us well in this application.
24 August, 2022
22 August, 2022 Our original "ECU programming/engine tuning" plan seems to be out the window due to the un-availability of the tuner we had chosen. Fortunately, another well known off-road shop (Danzio Performance) has time for us. Trevor is finalizing the exact timing but barring any unforeseen problems, we hope to have the car running and tuned by the weekend! We believe that we've resolved our "software version" issue and should be able to program the ECU ourselves now... Given enough time, we could probably get the engine running with a minimal tune but we'd still need someone with experience and a dyno to optimize it. I was in the middle of studying the "Initial Setup" portion of the MoTec M48 manual when Trevor called with the news; I was relieved to hear that I could put the manual back on the shelf... Danzio has the experience, equipment, a good reputation and time for us - we don't anticipate any insurmountable problems. The only concern is that this choice may "tie" us to Danzio for any future changes; we'll explore that issue with them when we bring them the car...
19 August, 2022 We're still waiting for our "tuner" to fit us into his schedule. It's frustrating to have the car ready in all respects - except for an engine that doesn't run... To some extent, this is a problem of our own making; we purchased an older MoTec ECU. It'll work fine once programmed but until then, it's an expensive "brick". We could probably get the engine running ourselves (though not "optimized" without a dyno) with a minimal tune. Unfortunately, before we can program the ECU, it requires that the software be updated. We would do that if it weren't for the fact that a MoTec "SUU" (software update unit) would be required and seems to no longer be available for purchase. Our tuner has the ability to update our ECU software but that doesn't help us at this point. We have calls out to other tuners; hopefully one will have time for us in the very near future.
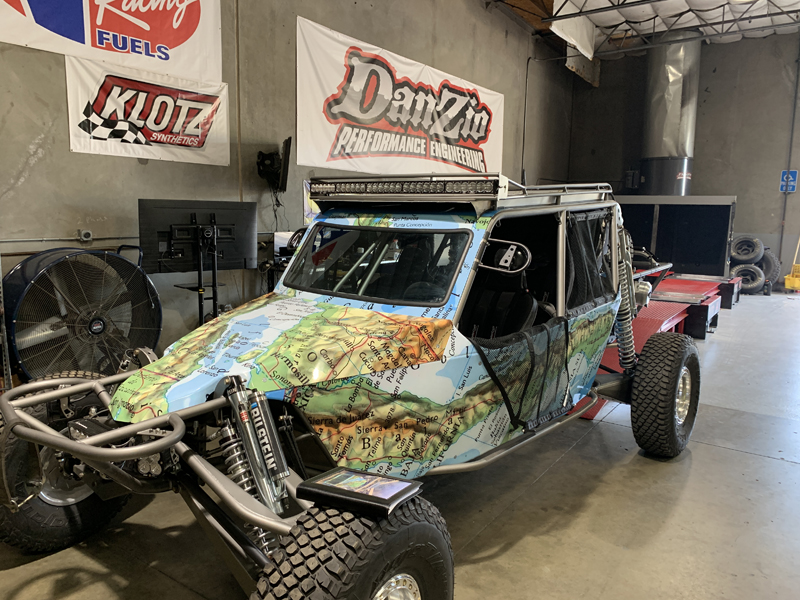
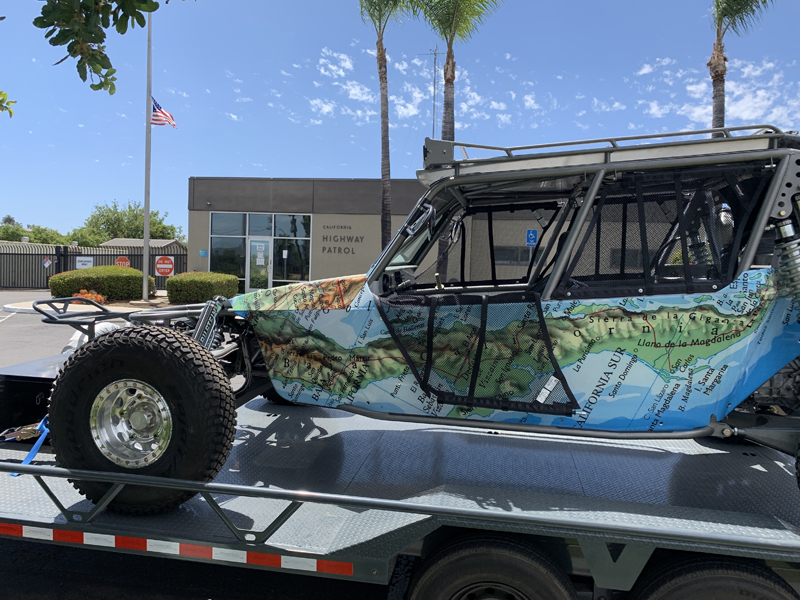
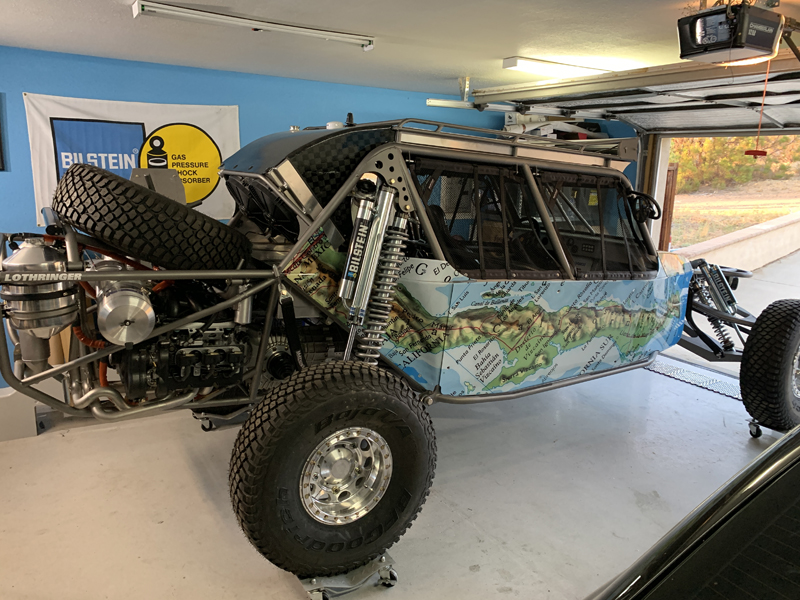
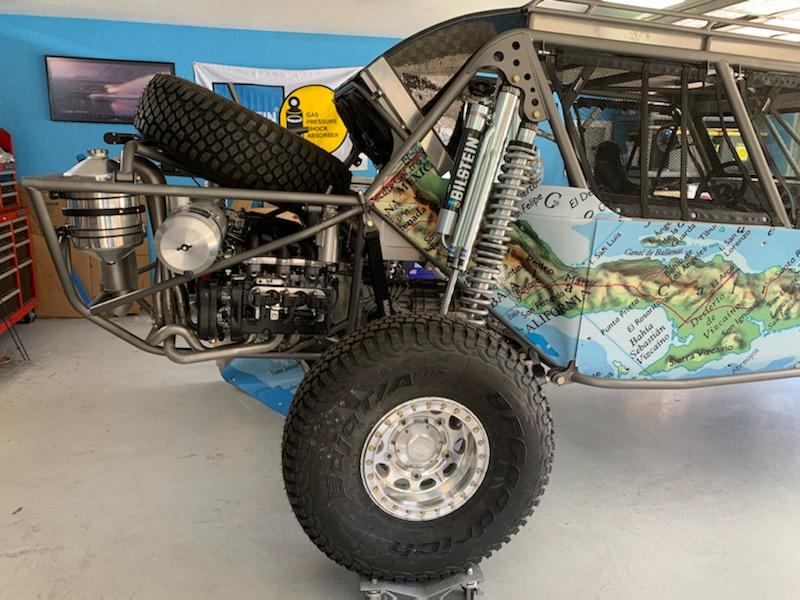
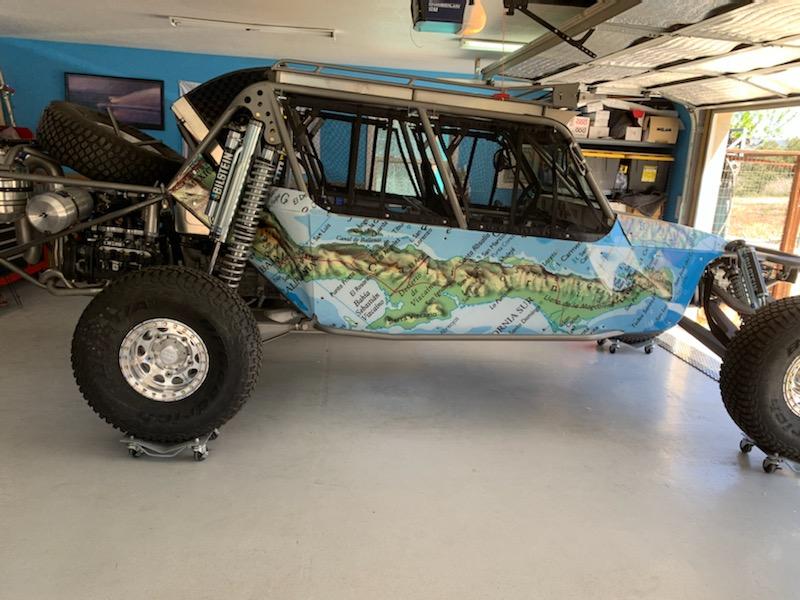
07 August, 2022 Trevor has all the body panels re-installed and decided it was time to take some photos outside the shop...
I've added a "Post-completion photos" page to the "Pre-Runner Build" section of the website - there are more photos there.
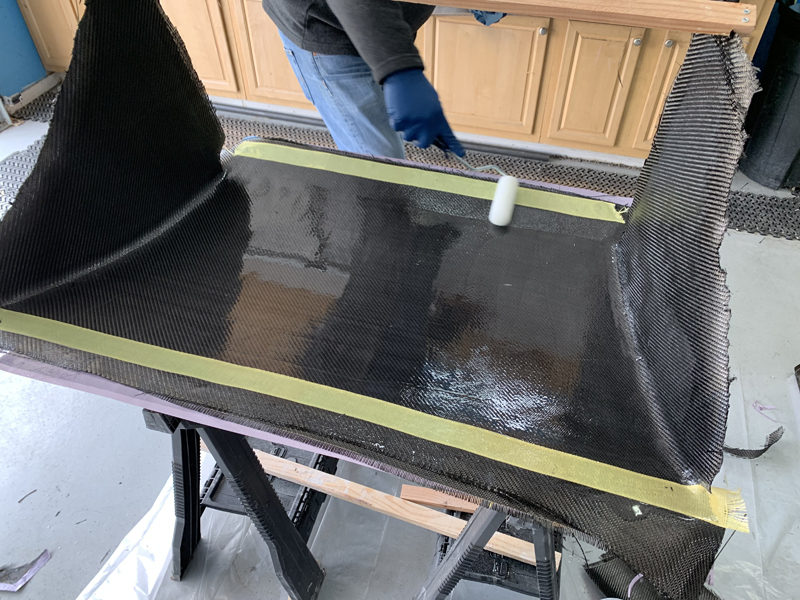
05 August, 2022 We're basically out of things to do on the pre-runner until our tuner can fit us into his schedule. Purging the power steering system was the last thing on our list of things needing to be done - Trevor crossed that off this afternoon. He loosened the hose fittings at the ram and purged the air out by having Kristen turn the power steering pump with a drill motor. Once the air bubbles stopped, he secured the fittings and continued operating the steering wheel left and right until the system operated smoothly. The reservoir was kept full during the process and required another quart along the way. He says the car steers easily - glad to have this done before starting the engine.
04 August, 2022 We're wrapping up the mechanical aspects of the pre-runner; Trevor securing the seats and harnesses and I completed a "systems manual" today. The manual will stay with the car and includes all the wiring and plumbing details along with installation manuals for the dry sump, cooling system, instruments and the Switch Pros unit. Our next, and hopefully final, stage of the project is to get the ECU programmed and the engine running/tuned. That's a bit beyond our comfort zone so we're having it done by an expert. We built the engine to "race" standards so we don't expect any major issues with it. There are, however, some "experimental" aspects to the build that could require some fine tuning... I went by our engine tuner today to get on his schedule; he's swamped at the moment so we don't have a date yet...
03 August, 2022 Worked on the pre-runner today; the tunnel is completely installed, the shifter, windshield and seats too. We're ready to get on the engine tuner's schedule!
30 July, 2022 We did a marathon work day on the pre-runner today; it's essentially done! The electrical system is complete and everything seems to work as expected; all the lights, radios, fans, fuel pumps, etc.. We also adjusted the oil pump bypass to set the pressure to an initial range - we can adjust further once the engine is running. The only things left to do are to final install the "tunnel" and seats, connect the horn buttons on the steering wheel, purge the power steering system, get the ECU programmed and the engine tuned.
29 July, 2022 Trevor and Kristen have been working evenings on the pre-runner electrical system this week. Hopefully, we'll be able to wrap it up this weekend and move on to the next phase - getting the engine running and "tuned"! We have the electrical system far enough along now that we can activate the fuel pump; that allowed us to test the system to look for leaks (yes; we had one at the pump that took a bit of modification to fix) and set the fuel pressure where our engine tuner wanted it (55psi). Once we have the instruments working, we'll be able to adjust the oil pump bypass to set a reasonable oil pressure (we've been turning it with a drill motor to pre-oil the engine). We have just a couple more things to take care of before we run the engine, nothing big or difficult. This weekend, we hope to complete the majority of the electrical system and reinstall the center tunnel for the last time. As soon as we verify that all the electrical systems work as expected, we'll close up the tunnel and console. Once that's done, we can "final install" the seats and harnesses then put the body panels on - it'll finally be completely assembled! It's been a long but enjoyable project - another epic "father/son" effort that has been rewarding in so many ways! We're excited to be approaching the "we finally get to drive the car" payoff!
23 July, 2022 Pre-Runner electrical work continued today; as far as we can tell, everything is routed as we wanted. Now, it's just a matter of connecting the wires to distribution buses, lights and instruments as required. We spent much of the day routing wires and trying to keep everything neat. We also mounted a micro switch to sense when the transaxle reverse lever is in the "reverse" position for back up lights and the gear position display.
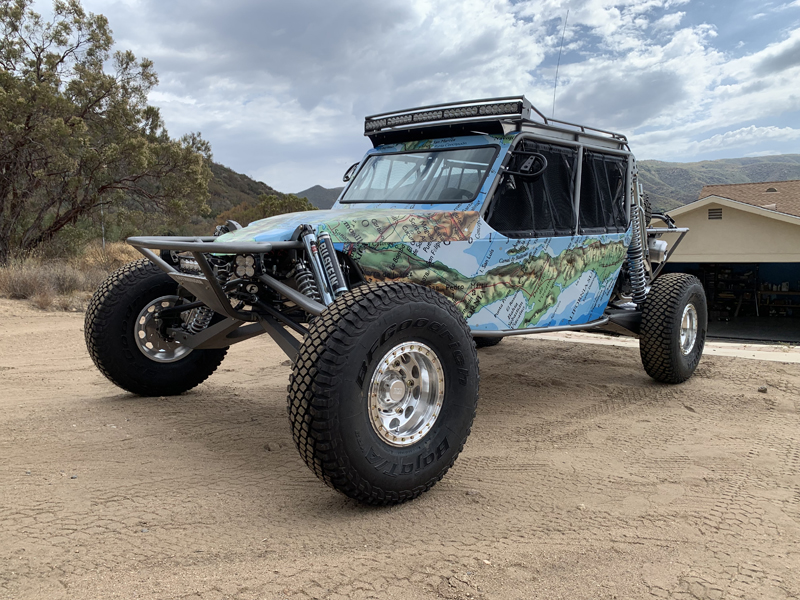
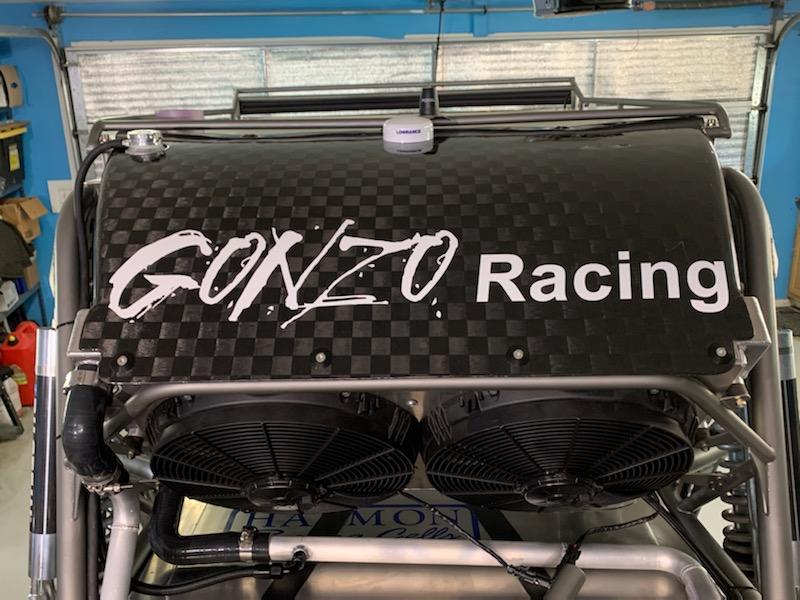
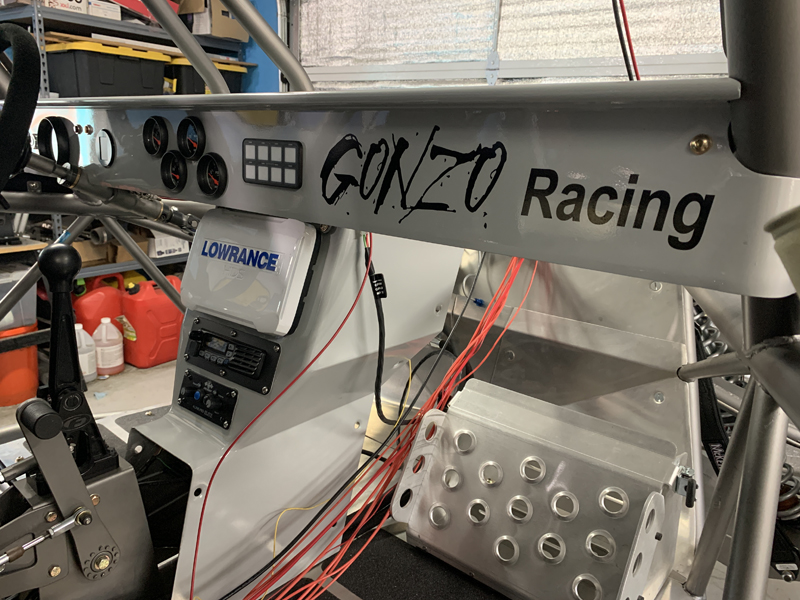
We had GONZO RACING stickers made for us by "CJ Norby Signs" in El Cajon, CA - we've been working with Carol for years and she always does a great job for us. She also did the Baja map "wrap" for us and we couldn't be happier with it! We applied the stickers today and are very pleased with the results.
21 July, 2022 Trevor and Kristen have been working on the pre-runner electrical system in the evenings this week. They've run all of the power wires from the Switch Pros unit to the front console where they'll connect to terminal blocks for distribution. They've also fabricated harnesses for the roof and bumper lights - we really just need to connect them together now... In addition to working on the electrical system, Trevor noticed that our 2-stage dry sump oil system pump was leaking... This pump came with the engine core and we assumed it was a new unit, ready to install; we didn't bother to overhaul it before installation because of that assumption. Assumptions can lead to bad decisions... Trevor removed the pump and immediately found that all the case bolts were just "finger tight". On disassembly he discovered that while the pump looks new internally, most of the "O-ring" seals were missing! We don't know why, but someone had obviously had taken it apart, then only partially reassembled it! Fortunately, the pump looked perfect otherwise and an overhaul kit with all the required seals was readily available and inexpensive. Trevor rebuilt and reinstalled the pump - it's leak free now. Glad we found the problem now rather than when attempting our first engine start!
16 July, 2022 We're continuing to make progress on the pre-runner electrical system. During the week, Trevor and Kristen made and installed several battery, lighting and ECU system cables. Today, we finalized the battery disconnect wiring and fabricated the ECU and "Switch Pros" power cables. We were able to verify that the Switch Pros unit worked as expected - it was fun to see the switch panel "come alive"; it's the first system up and running! We also connected the USB charger and began running the wiring from the rear of the car to the front, beginning with the "Baja Designs" RTL (rear tail light) assembly. For now, we're labeling and leaving the wires long so that we can arrange them neatly and cut them to fit. Some of the wires will have Weatherpack connectors installed to allow for easy maintenance. This is a bit of an evolutionary process; as we've moved forward, we've made some minor changes to the original plan. Those changes are primarily related to what we're powering with the ACC and RUN positions of the ignition switch. We want to have only a few systems active in the ACC position but everything in the RUN position. When the ignition key is in the "START" position, the ACC units are de-powered until returning the key to the RUN position - that's one reason why it's important to carefully consider what goes on ACC and what goes on RUN... I suppose we could just put everything on the RUN position but then we couldn't turn on the radio or GPS without also turning on the fuel pump, radiator fans, ECU, Ignition, etc.. At the same time, we want to "shed" all the unnecessary loads when starting the engine... Prior to working on the electrical system this morning, Trevor filled the engine cooling and oil systems for the first time then checked for leaks. There were a few clamps that needed tightening but otherwise everything looked "tight". We still need to fill and purge the power steering system - we're awaiting the arrival of our power steering fluid. Prior to any engine start attempts, we'll be careful to build oil pressure by turning the dry sump oil pump manually... I have a couple of machine shop projects to do during the week: making a bracket to mount our "backup light" micro switch and drilling and tapping an oil filter adapter plug for the pressure sender. We finished the day by making a list of things Trevor and Kristen can work on during the week without needing input from me... Unfortunately, there was nothing "photo-worthy" this week - we don't want to take photos of the electrical system until it's all organized and properly secured.
09 July, 2022 Over the last several days, we've created schematics for the electrical system. Rather than an "overall" system schematic, we've broken it down into individual systems. That helps keep it easy to follow while still allowing us to see how all the individual systems work together. Today was nearly a full day of working on the pre-runner electrical system. We began the day by fitting the windshield frame (with new glass installed) in place on the chassis to see what we need to change in order to eliminate any "pressure points". Trevor quickly addressed the issue without difficulty and we now believe that we shouldn't have an on-going problem with broken glass... Once the windshield was sorted out, we focused on the electrical system. Much of the hard work was already done for us - the "Sakata" ECU harness that came with the engine core handles everything "engine electrical" related (except instrumentation). All the sensor connectors were clearly labeled and easily attached to their respective sending units. Unfortunately, the harness didn't come with any documentation regarding how it connects the ECU to the fuel pump, ignition, and radiator fan relays - we had to figure them out. It's not a big problem; we just needed to know the details in order to ensure that everything worked as desired once we wired the car. We used a multi-meter to sort out the harness and are now confident that we understand how it all works (or at least how it's connected)... After sorting out the ECU harness, we moved on to making actual electrical system progress! We've begun with the "big wire" systems - the batteries, battery disconnect, grounds, starter and alternator. All the cabling for those components is now complete, aside from a few terminal ends that need to be installed (we didn't have terminals with the right "lug" size for the batteries and alternator). We were careful to select high quality wire in appropriate sizes for each - we expect that they'll be more than adequate for the loads they'll support. Next time, we'll begin wiring the ignition switch and the systems that it feeds. We have a "keyed" 4-position ignition switch with Off, Acc, Run and Start positions. Several systems, with multiple components each, will need to be powered in the Acc, Run and Start positions - we'll use terminal blocks to help control the tangle of wires that could otherwise ensue...
02 July, 2022 Great progress on the pre-runner today; all the cooling system plumbing fabrication is complete, the batteries are installed, the rear brake residual valves are installed and the brakes are fully functional with a firm pedal.
With the plumbing effort coming to a close, we're shifting focus to the electrical system. We're spending lots of time looking at how best to arrange things for a neat and reliable system in addition to grouping systems together for their power and grounding needs. The next thing we need to do is document how the "Sakata" ECU wiring harness (came with the engine without documentation and Sakata doesn't have records for it any longer) handles the Ignition, Fuel Pump and Fan relays (also the alternator connections). We know that the ECU controls each relay by supplying a "ground" when commanded ON; we don't yet know which relay is controlled by which ECU output... The alternator is also controlled by the ECU; we need to document those connections as well. Time to get out the multi-meter and start figuring that out!
01 July, 2022 We delivered our windshield frame to the original windshield supplier for replacement of the broken glass today. Hopefully, we'll have it back by the middle of next week. On our way home, we stopped in at Kartek to buy aluminum and silicone tubing for our cooling system fabrication. We also purchased a few electrical system supplies including our batteries. We believe that we now have everything we need to complete the cooling system and the majority of what we'll need for the electrical system installation... We're hoping that we can wrap up the plumbing effort this weekend with the completion of the radiator hoses/tubing. That'll require a fair bit of aluminum welding to create the "hard tube" portions; there'll be a bit of silicone tubing involved as well. Trevor will be doing all the welding; while he's involved with that, I'll be closing out some remaining "loose ends" and making some minor rear brake system changes. If there's enough time left over, we may begin the electrical system design and layout...
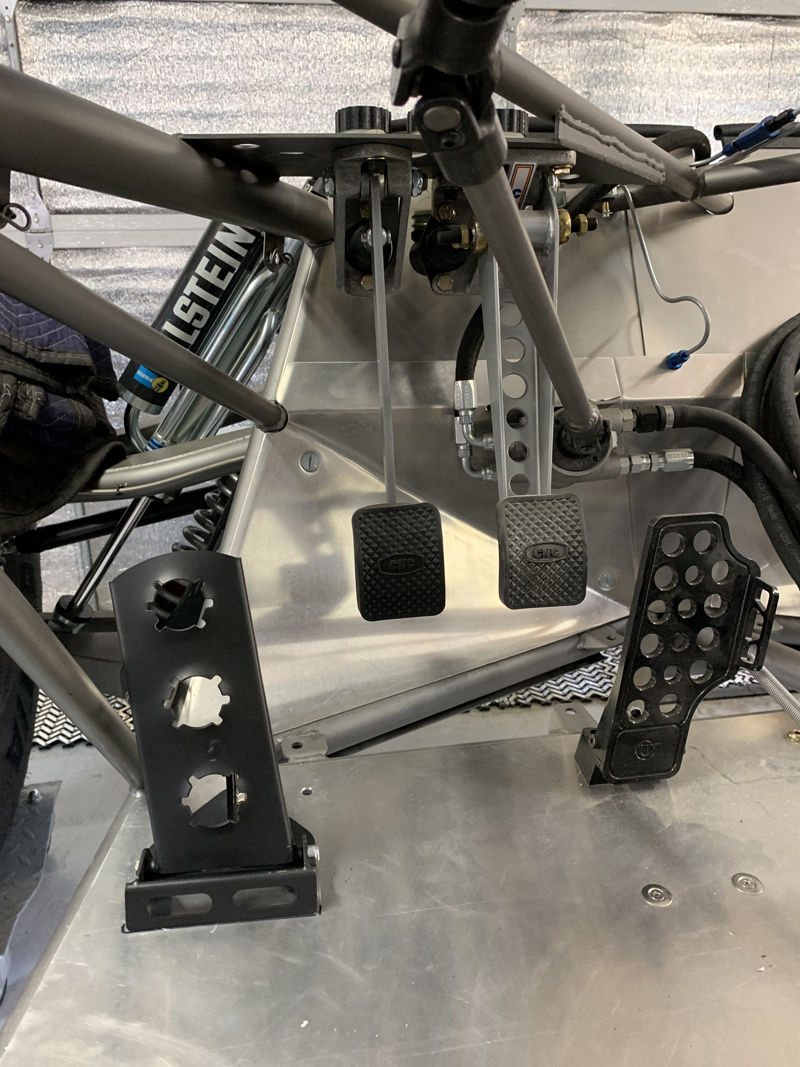
25 June, 2022 We had a full pre-runner work day today but there was nothing "photo worthy"... We're at that stage where all the "little details" need to get sorted out; they're all important but not really "visible". Details like finishing the power steering hoses, welding "grounding studs" to the chassis, plumbing the radiator surge and overflow tanks, mounting the "Switch Pros" power supply, etc.. We also changed out our clutch master cylinder for a slightly smaller bore version; the pedal had been quite heavy with an unusually short throw. The new master cylinder lightened the pedal by about 13% - it's still heavy but not so heavy that you wouldn't want to hold it at a stop light... While it reduced the required pedal pressure, a slightly longer pedal travel is needed to actuate the clutch; it's now a more "normal" feeling clutch pedal. We've arrived at the point where the only plumbing left to do is to fabricate the main radiator hoses. We're hoping to get all the silicone and aluminum tubing we need for that task next week. Following the radiator plumbing, we'll begin wiring the car. The task of actually making everything work isn't difficult - making it neat is the challenge. The "Switch Pros" unit should help with that; it replaces all the individual relays and fuses for up to eight circuits. We've begun purchasing the wire, connector and terminal components we'll need; there'll be more to buy as we progress though... Our windshield developed a crack during all the VIN assignment travel we've done over the last couple of weeks. We believe that it was the result of being in contact with a structural tube at the bottom center of the windshield glass... We don't want this to be an on-going problem so we've engineered a way to keep the glass from contacting that tube in the future. We'll be taking the windshield frame to the original supplier to have new glass installed next week.
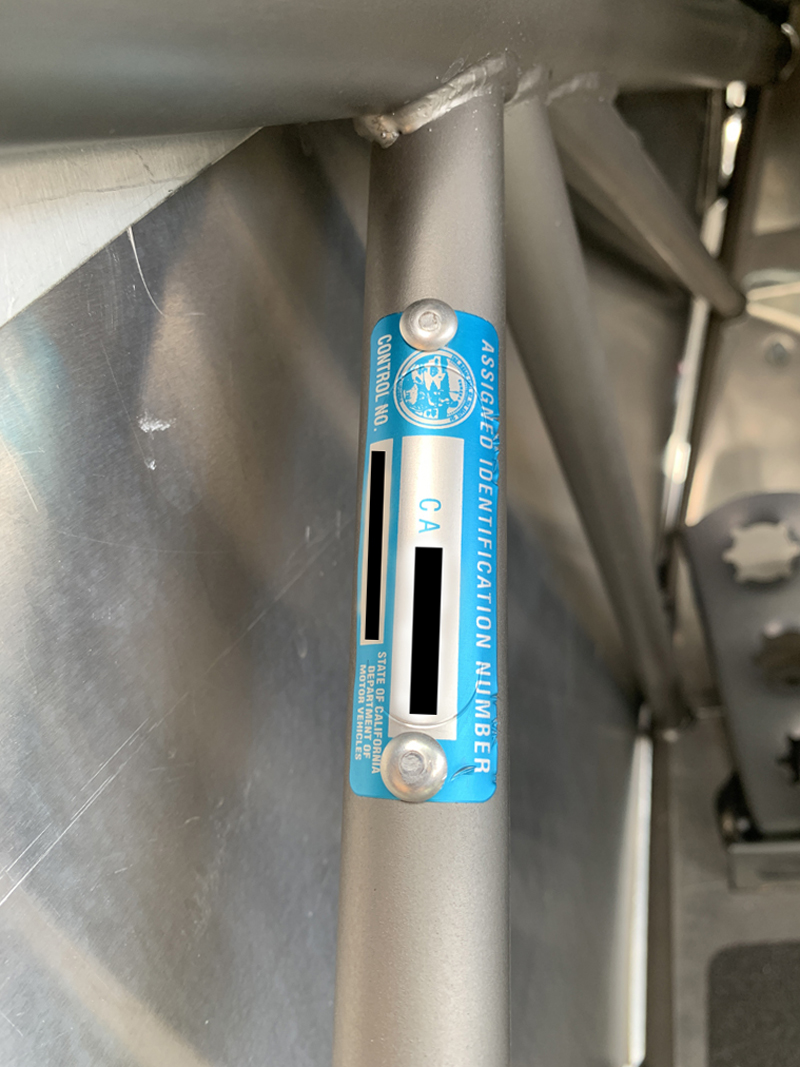
23 June, 2022 We finished up our "VIN/Registration" effort today with a visit to the local DMV office. Surprisingly, in almost exactly one hour after entering the office, we had a VIN, registration certificate and "Green Sticker"! The whole process was fairly straight forward once we understood what needed to be done - three separate visits but no real surprises. I had originally planned to spend tomorrow (Friday) morning at the DMV but we were passing by this afternoon and decided it was worth a try. Turns out that early afternoon at that particular office is pretty slow. Glad to have that settled!
21 June, 2022 Continuing the effort to get a VIN/AIN (Assigned Identification Number) and registration for the pre-runner, today we accomplished the second step of the process: the CHP inspection and issuance/installation of our VIN/AIN tag. With that done, we can return to the DMV for the Title, Registration and Green Sticker. Aside from waiting in line at the DMV, it should be an easy final step... I guess my Friday is spoken for...
16 June, 2022 We have family plans for Saturday so we spent part of today working on the pre-runner plumbing. We were able to finish fabricating all the fuel, oil, engine breather and power steering hose assemblies today (except for one end of the power steering pressure hose). All the fuel, oil and breather hoses were flushed and dried thoroughly then final installed. Then began some preliminary cooling system planning. In addition to a normal radiator, we also have a surge tank and overflow tank to integrate into the cooling system. The overflow tank is nothing difficult but the surge tank is a little more involved; it's job is to eliminate trapped air in the cooling system and will require a little welding in addition to the three hose connections it requires to the engine and radiator. Finishing up the day, we also checked the brake line pressure while applying reasonable pedal pressure - it's exactly as we wanted so we should have good brake authority... Finally, we put all the body panels on the car for our CHP appointment next week (getting a VIN number so we can get it titled and registered).
11 June, 2022 Today was a full day of plumbing; we fabricated all the main hose assemblies for the fuel and oil systems and began the engine breather and power steering plumbing. We didn't have all the necessary fittings to complete the breather and power steering assemblies but they're on order and should be on hand in the next couple of days. While Trevor was making hose assemblies, I continued working on finalizing hardware and closing out "loose ends". Yesterday was a full day also; we brought the pre-runner to our tuner for a "pre-tune" inspection. We had a few questions for him and wanted to get his opinion on how the engine and ECU installation looked. We were pleased to learn that he liked what he saw and nothing appears to need changing - we'll finish the plumbing and wiring then bring it to him for a final check before the tuning session. Following that visit, we headed to the local DMV office to begin the multi-step (DMV, CHP to make an appointment, CHP again on the appointment day for the actual inspection, then another visit to DMV to get the title, green tag and registration) process of getting a VIN and title for the pre-runner. We're planning to register it as an OHV though it'd be really nice to have it "street legal"; that requires much more work though. We understand that in California, once registered as an OHV, it can no longer be registered as "street legal"...
09 June, 2022 We ordered most of the fittings and hoses we needed for plumbing the car last week; it arrived on Tuesday and Trevor has begun the process of fabricating what we need. We're starting the plumbing phase with the fuel and oil systems then we'll move to the engine cooling system. We've already installed the radiator, surge and overflow tanks so it's just a matter of connecting everything together... We're bringing the car to our engine tuner tomorrow for a "pre - tune" review; we want to be clear about what we still need to do for him to be able to get it running and optimized. We also have a few questions that we'd like to clear up in terms of how much the ECU will do for us without us needing control individual systems through a switch/relay manually. Hopefully, we'll have a clear understanding of what remains to be done before we schedule the actual tuning session.
04 June, 2022 Trevor and I continued "wrapping up" all the little jobs remaining in the "fabrication" phase. Today we were able to get the front passenger foot rest mounted, the brakes bled and working correctly, most of the temporary hardware replaced with final hardware, the floor panels installed and the clutch pedal stop secured and adjusted. We also finished installing non-skid material in the rear passenger area. The only remaining fabrication we know of is the installation of a few "grounding studs" on the chassis for the electrical system. We'll be starting the "plumbing" phase next, followed by the "wiring" phase then finally the "tuning" phase to get the ECU programmed and the engine running.
28 May, 2022 Another pre-runner work day; nothing "photo worthy" today, just tying up a lot of mechanical "loose ends". The roof and roof rack are now "final installed", the oil filter adapter bracket is welded in place, the radio antenna bracket is installed, the front floor boards are installed and lots of temporary hardware was replaced with "final" hardware. We had the car off the dollies today so that we could roll it in order to verify correct transaxle shifting (it all works perfectly) and to design a clutch pedal stop. We needed to put the car in gear then push on the clutch pedal until we could roll the car freely. It's important to determine the amount of clutch pedal movement needed to disengage the engine from the transaxle and then install a "stop" to limit travel beyond that point - additional pedal travel beyond what's necessary will damage the pressure plate and cause long term problems. Knowing where that point is now, I can fabricate the stop next week when I'm at our machine shop. I think our next work sessions will focus on getting the brakes working (they're already "plumbed" but haven't been bled yet), welding some "ground" studs to the chassis (for the batteries in addition to the engine and electric/electronic loads), mounting the "back-up" camera, installing a front passenger foot rest and making a list of the fittings we need to plumb the fuel, oil and cooling systems. Once the "plumbing" is complete, we'll be on to wiring and then ECU programming/engine tuning!
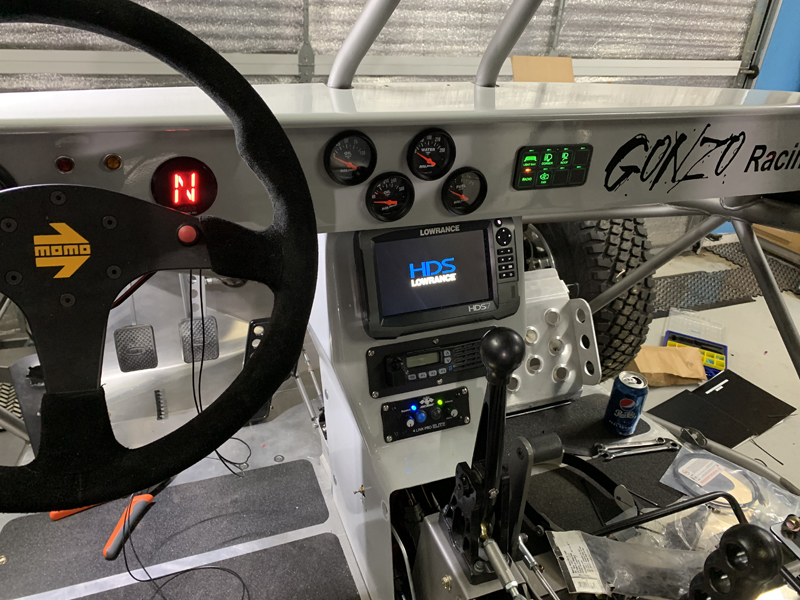
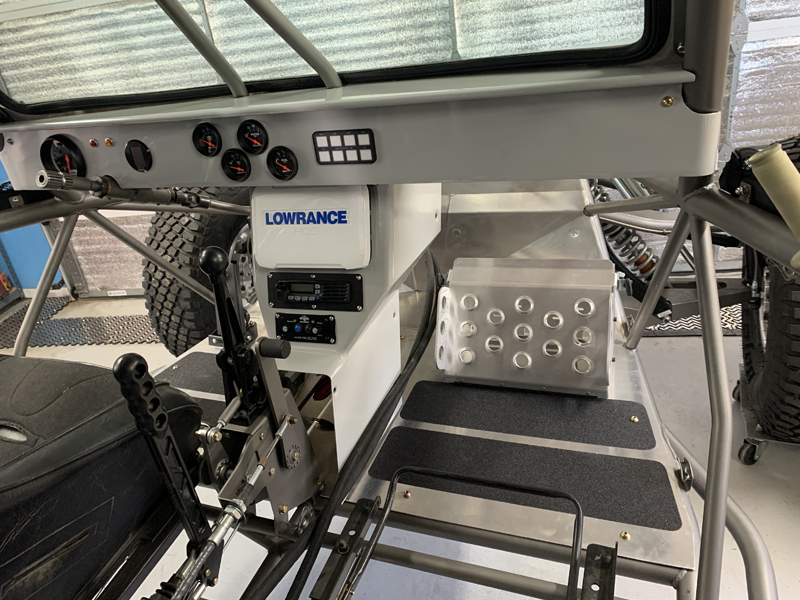
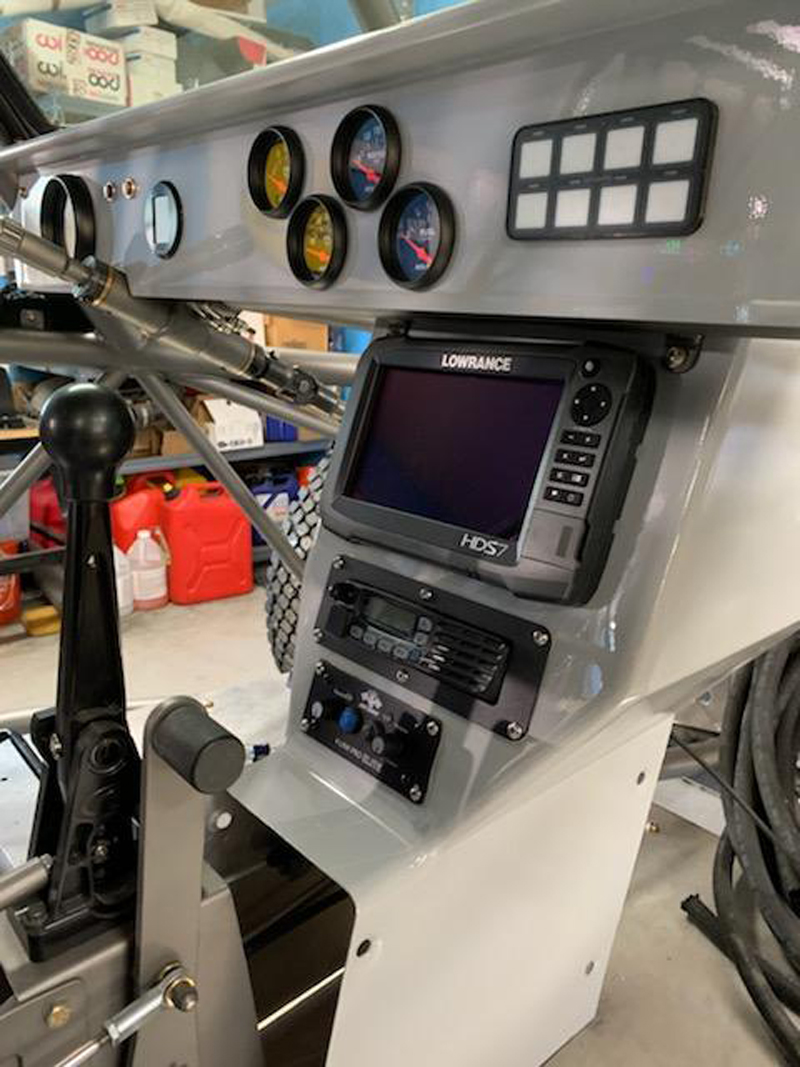
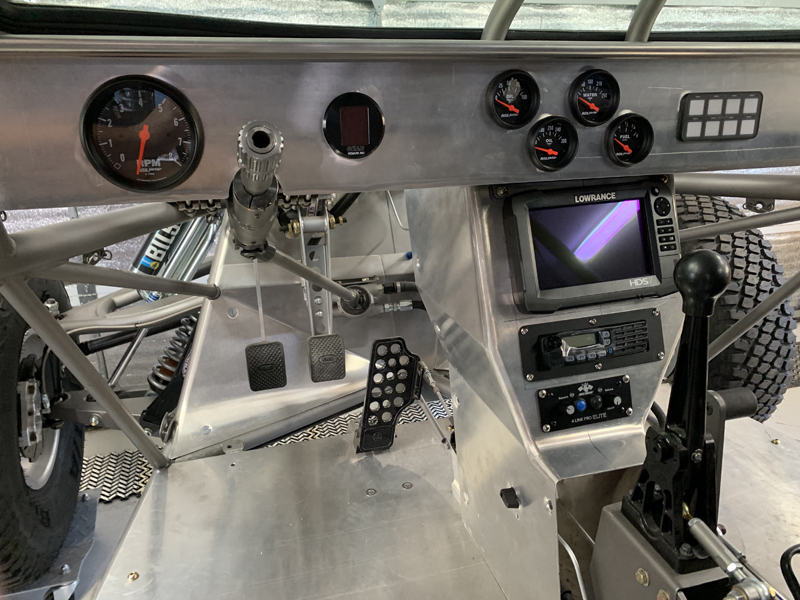
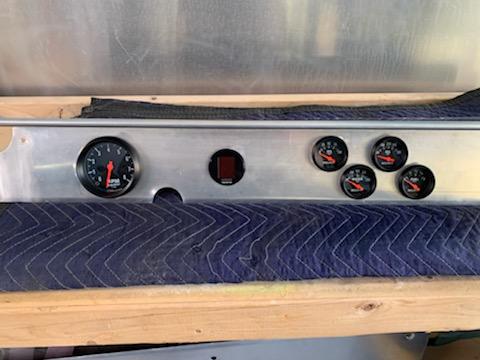
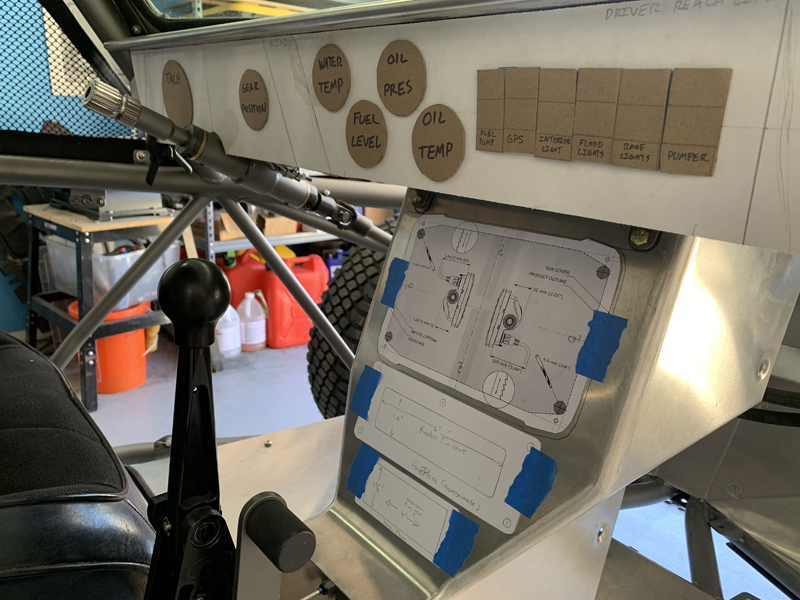
21 May, 2022 The pre-runner is nearing completion; we're working lots of little details to close out the fabrication phase of the build. Today, we mounted the GPS antenna, ECU, Ignition box and ECU relays. Trevor installed all the instruments, radio, GPS, intercom and battery disconnect into the newly painted panels; we think they all look great! I filled and bled the clutch master and slave; we now have a firm clutch pedal that works as it should. We need the clutch system to be functional in order to determine where our clutch "pedal stop" needs to be located to allow normal operation without the possibility of over-extending the pressure plate "fingers". We'll work on locating and fabricating the pedal stop another time now that the system works normally. Finally, we made templates for the radio antenna and oil filter adapter brackets so that I can fabricate them later in the week and install them next weekend.
14 May, 2022 Trevor and I worked most of the day on the pre-runner. We painted the dash, center console and tunnel sheet metal, mounted the driver's "dead pedal", located the mounting locations for the ECU and ignition boxes and fabricated and welded battery box supports under the driver side rear seat. Trevor also fabricated mount locations for our battery disconnect switch and a USB power outlet in the tunnel sheet metal prior to painting.
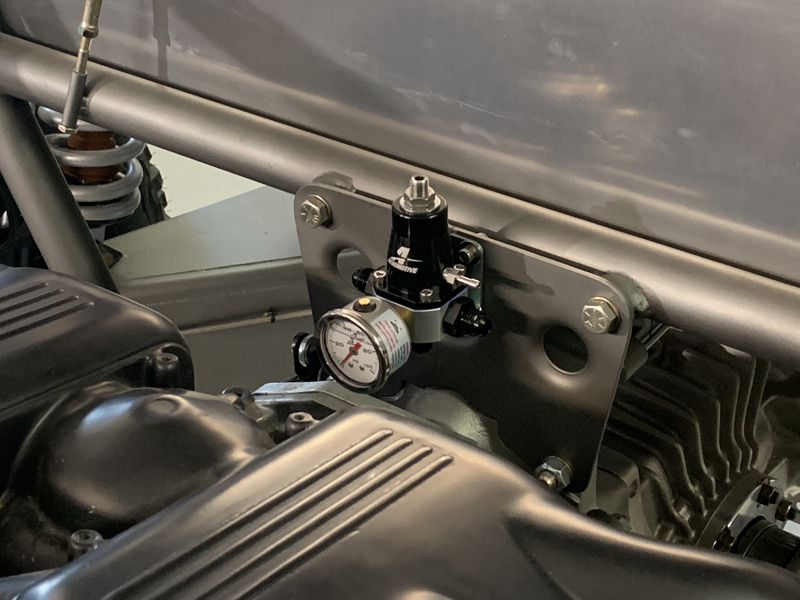
07 May, 2022 Trevor has been working on the pre-runner in my absence for the last couple of weeks - I was intentionally MIA in Baja last week... He's been working on a number of things including getting all the gages and switches installed in the dash panel, sorting out the ECU wiring, fabricating a front passenger "grab handle" and mounting the GPS, Radio and Intercom in the center console. Today we did some minor repairs to the ECU wiring harness then installed it on the engine, finished mounting the GPS, Radio and Intercom, mounted the fuel pressure regulator and began planning the mounting location for the ECU. There were a couple other things we talked about also; battery location and type, battery disconnect location and "Idiot Light" size and placement.
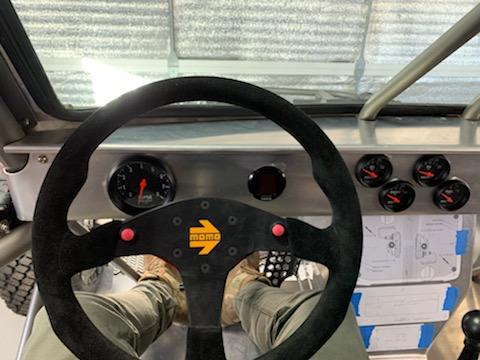
23 April, 2022 Trevor spent the day mounting the engine instruments in the Pre-Runner's dash. I like the layout he chose; it's neat, compact and easily visible to the driver. We have a few more things to mount in the dash - a "Switch-Pros" switch panel, a couple of "idiot lights" and a start switch. Next, we'll mount the GPS, Radio and Intercom in the center console.
16 April, 2022 Trevor spent a little time installing the body panels to get some "motivational" photos today. We've just about come to the end of the "fabrication" phase of the build; we'll be on to "plumbing" and "wiring" soon. Hopefully, we'll have the pre-runner out in the desert before the holidays!
15 April, 2022 Trevor had today off so we spent the entire day working on the pre-runner. Our goals were to get the fuel pump/filter assembly mounted, then move on to getting the dry sump oil tank mounted. Before starting those jobs, we laid out the GPS/Radio/Intercom mounting locations; we're happy to be able to get everything in the vertical "center console" between the front seats. Everything will be easily visible and operated from either front seat. Both of the primary goals required a bit of fabrication work but each was accomplished to our satisfaction. Following those jobs, we spent a little time evaluating mounting locations for the oil filter, batteries and ECU.
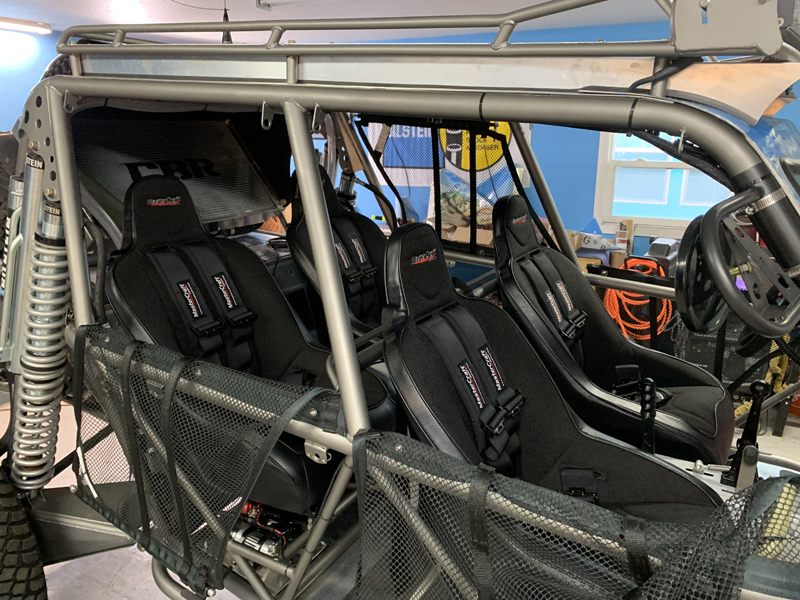
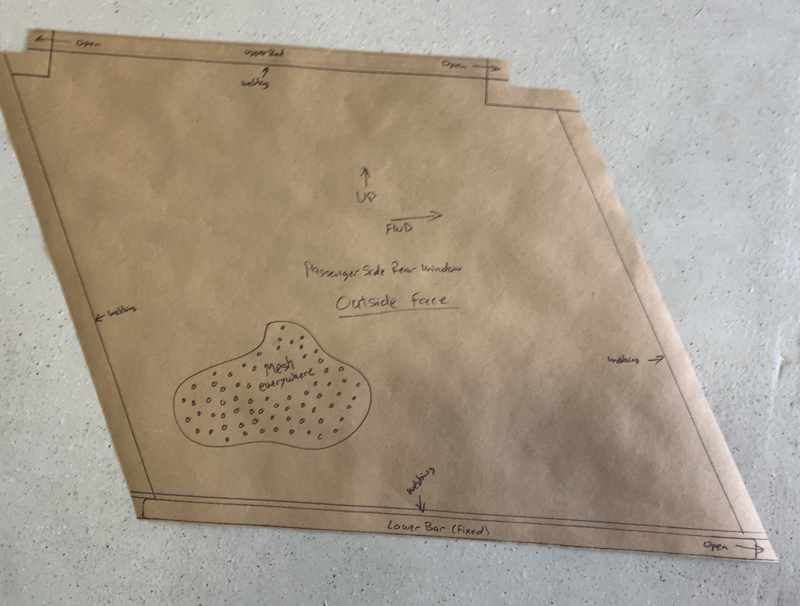
09 April, 2022 Trevor and I worked a full day on the pre-runner today. The window nets are now installed and we spent a little time figuring out how to mount the oil tank and fuel pump assemblies. The window nets were custom made for us by MasterCraft Safety - we provided patterns for each of the four windows and they made each individual net to fit. The installation went without any problems and we're happy with the result.
08 April, 2022 We haven't had a "pre-runner work day" for a couple of weeks; we've been waiting for parts to arrive and I went to Baja for a week... Finally, our window nets, fuel pump/filters and dry sump tank have arrived so we'll have a work day tomorrow and possibly a day during the upcoming week as well. We're planning to get the window nets installed tomorrow; there's a bit of fabrication involved so it may take most of the work day. If we have time left over, we'll look at mounting the fuel pump/filter assembly then the oil tank to follow. Aside from batteries and battery boxes, we think we're near closing out the purchases and mechanical "build" aspects of the project. Once we reach that milestone, we can begin the "wiring" and "plumbing" phase. The brake and clutch systems are done so we're left with fuel, cooling and oil system plumbing. We haven't begun any of the electrical stuff yet; that'll be a big job...
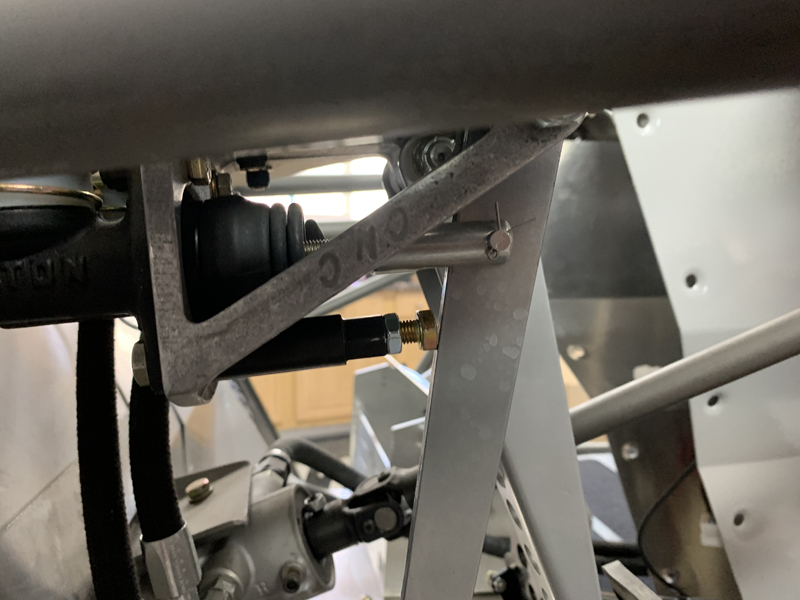
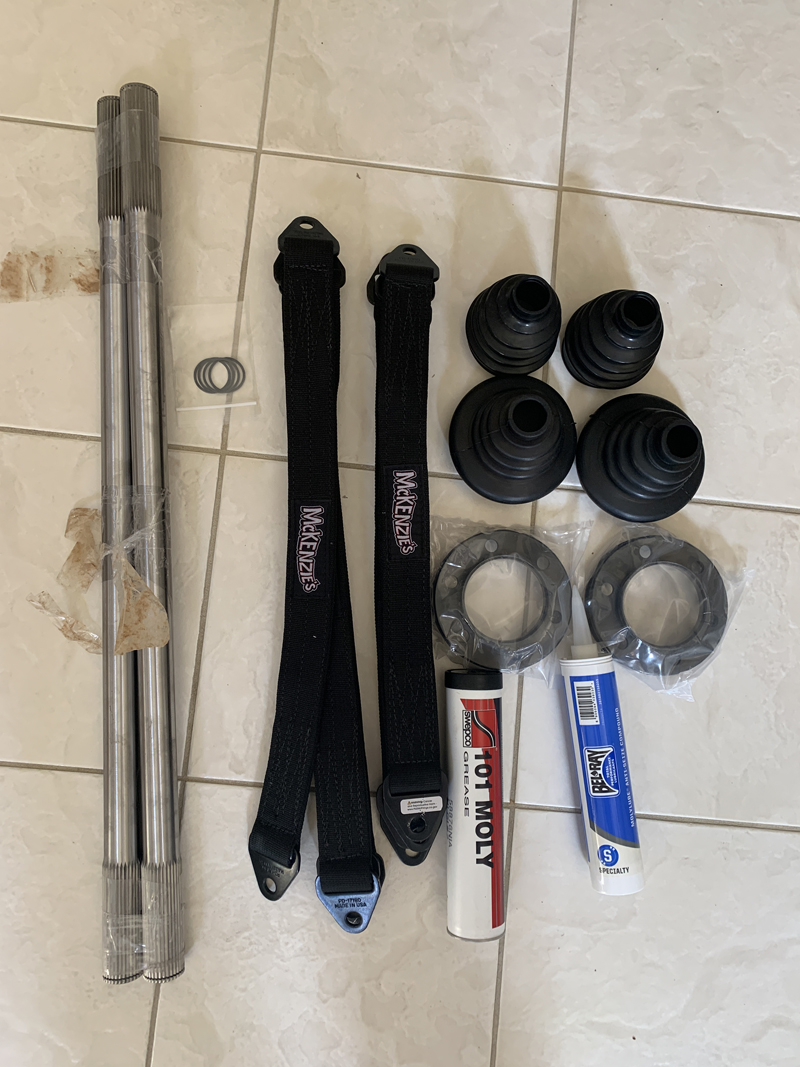
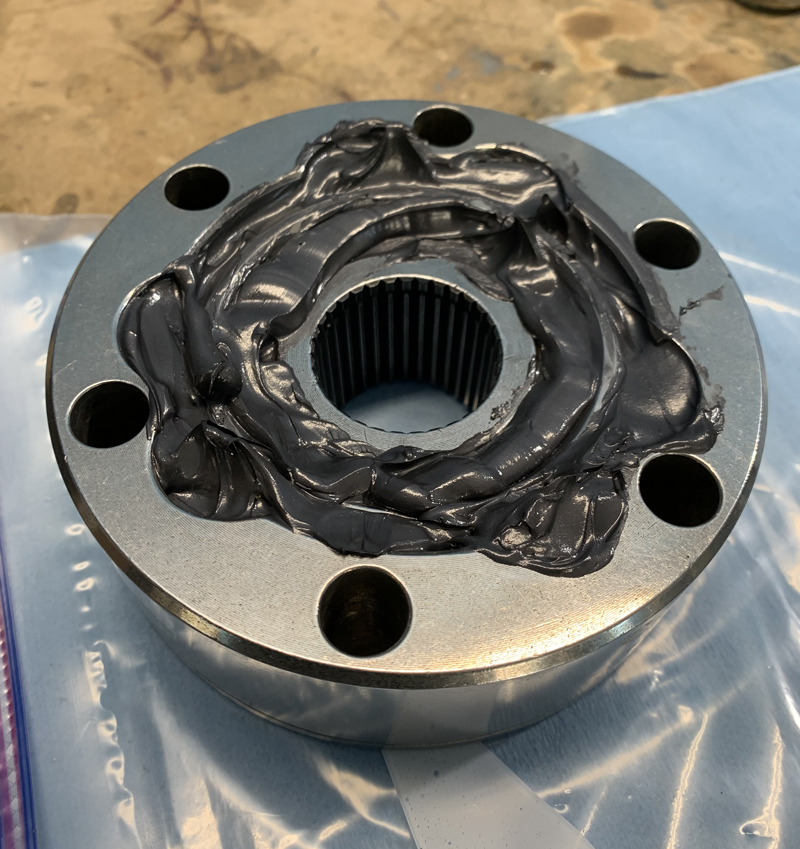
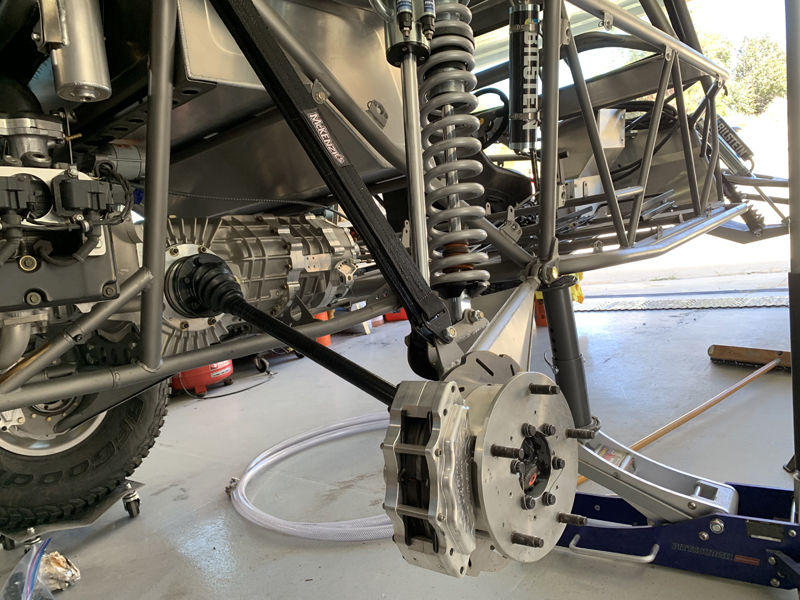
19 March, 2022 Our axles and associated hardware arrived this week; we spent today assembling the Axles/CV's and installing them on the car. This is a bit of a messy job; we want to ensure that the CV's are well lubricated and stay that way for many outings. We mix two types of grease then fully pack them before installing them on the car. The Mid-Board hubs have CV's somewhat buried in them so getting them fully greased is a little more involved. We're very pleased with the result; everything went together without problem, our measurements were correct and the assemblies rotate freely without any binding at maximum deflection. Race prepped 934 CV's are typically good up to about 25 degrees of deflection; we have our limit straps adjusted to allow no more than 24 degrees to protect them. We have the ability to compensate for limit strap "stretch" over time in addition to the ability to allow for a bit more suspension travel if we choose.
09 March, 2022 We've been wanting to get our axles and associated parts on order for some time; they're fairly expensive and we don't actually need them during the build so we've held off until now. To ensure that we order the correct length axles, we needed to measure several dimensions: minimum axle length at "full droop" and maximum axle length at "mid travel" (axles parallel to the ground). As the suspension "droops", the distance between the inner and outer CV's increases - the axles need to be long enough to allow the CV "stars" to "float" on the axle splines; if the axles are too short, they'll "pull" on the stars and bind the CV's. The axles also need to be short enough that at mid travel, they don't physically bind between the transaxle CV "cup" and the mid-board outer "cap". Ideally, you'd want there to be 1/4 to 3/8" free play. Another consideration is ensuring that the axle isn't so long that the CV "star" can come off the splined portion at the mid board end... We had previously measured and decided that we needed 33" end to end length axles. Given that they're expensive and we didn't want to get it wrong, we spent some of today re-measuring... The good news is that we came up with the same dimensions; we now have our axles and associated hardware on order. It'll be really nice to actually have the entire "drive train" complete! We're running out of fabrication projects on the pre-runner and are rapidly approaching the plumbing and wiring phase of construction. The remaining fabrication items include mounting our dry sump tank, mounting the Motec ECU, installing batteries, fuel pumps and filters, installing the radio, GPS, Intercom and the engine instruments in the dash.
05 March, 2022 Trevor and I spent today visiting a friend, Bill Wood, who recently purchased a "race ready" 5/1600 car. This is something he's wanted to do for many years and finally had the opportunity to purchase a car that has a race history. We spent several hours talking with him about racing 5/1600's and looking over his car. It was a pleasure to see that the builders of his car were careful to incorporate the very few modifications that the rules allow but didn't push beyond what's "legal" for the class. The car has room for improvement but looks to be a great starting point for him. It looks to us like he could actually run the car as-is and have fun but we think he's going to jump right in to bringing the car to the most competitive condition - probably a fair bit of money and time required...
26 February, 2022 Today was a light work day on the Pre-Runner. Trevor and I made patterns for all four window nets to send off to Master Craft for them to fabricate for us. There was a fair bit of thinking involved to ensure that we got the nets we wanted and that they'd all fit and function as expected. Trevor mounted the mirrors and horns also.
20 February, 2022 Trevor and I worked lots of little details today: mounting the fuel filler hose/cap, adding a 1/4" NPT boss to the radiator for the surge tank connection, measuring for suspension limit straps, planning the horn installation, and designing the window net shapes. We also took a little time to pull the car into the sun for some photos...
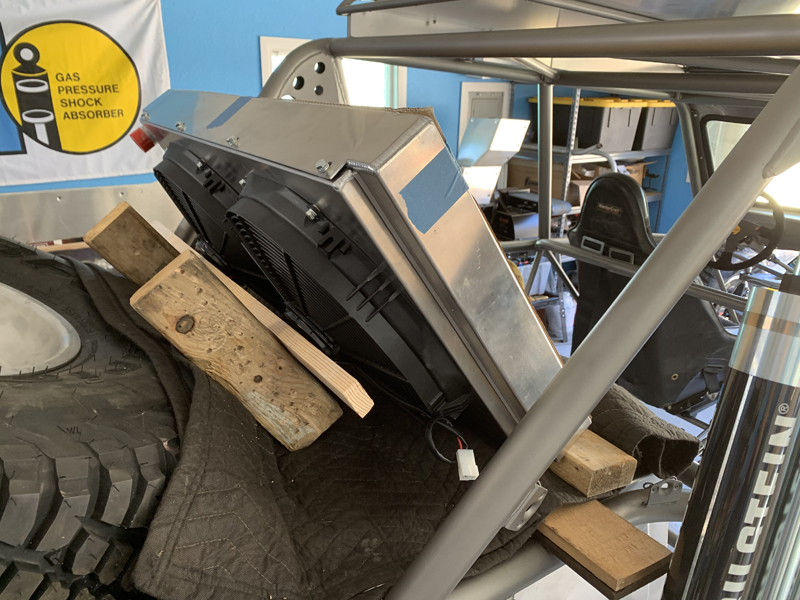
13 February, 2022 Trevor worked on the radiator duct today; he "wet sanded" the exterior surfaces and applied another coat of resin. I think we're done with the exterior of the radiator duct. Tomorrow, he'll do a little touch up on the inside surfaces to re-cover areas where he had done some sanding. I spent some time at our shop today fabricating a mount for the fuel cell fill cap assembly; some welding is required so next weekend Trevor will finish what I started.
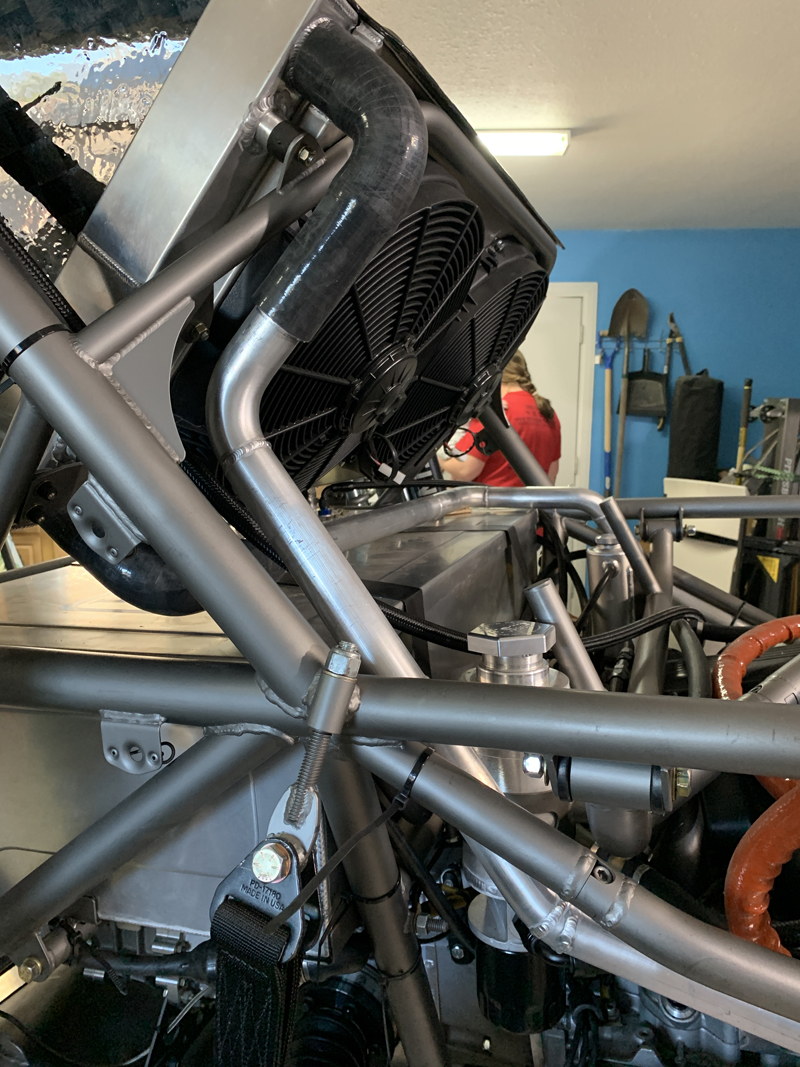
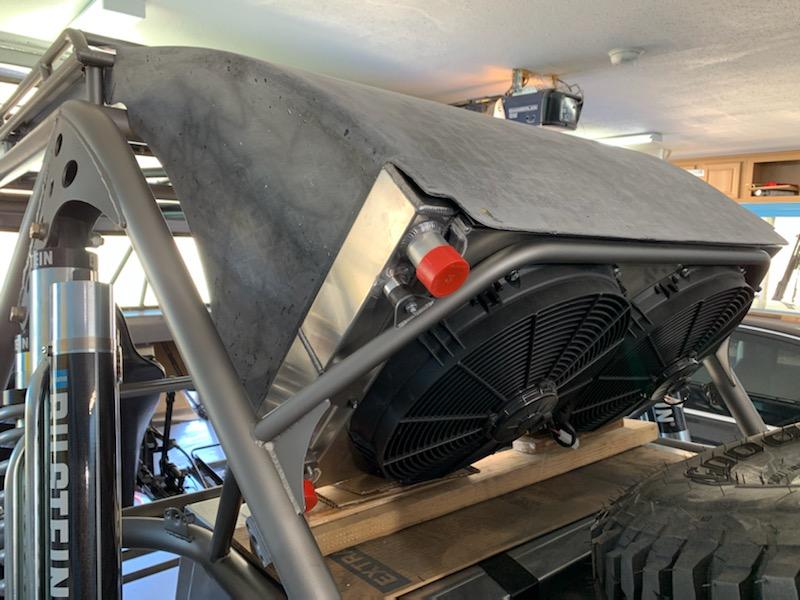
12 February, 2022 We had a full "pre-runner work day" today and accomplished all that we had planned. We began the day by adjusting the fit of the radiator duct a little; Trevor had it really close but there were a couple of potential "rub" areas I wanted to address. Once that was done, we fabricated and welded a couple of tabs to the radiator for securing the radiator duct "wings" (side supports). Following that, we decided on the location for our radiator "surge tank" and made provisions for it to protrude through the radiator duct for easy access (cut a hole in the duct for access to the cap). Once the duct was reinstalled, we aligned the surge tank in position and welded the mounting tabs to the chassis. We then removed the duct and applied the first "finish coat" of resin to the exterior and set it aside. It'll need to be wet sanded and then another coat of resin applied before we consider it "done". While the duct was curing, we fabricated and installed the power steering reservoir and radiator overflow tank mounts.
07 February, 2022 Trevor test fit the radiator duct on the chassis today; next, he'll drill the mounting bolt holes and fine tune the fit a little. Afterwards, he'll remove the duct and begin the final finishing phase.
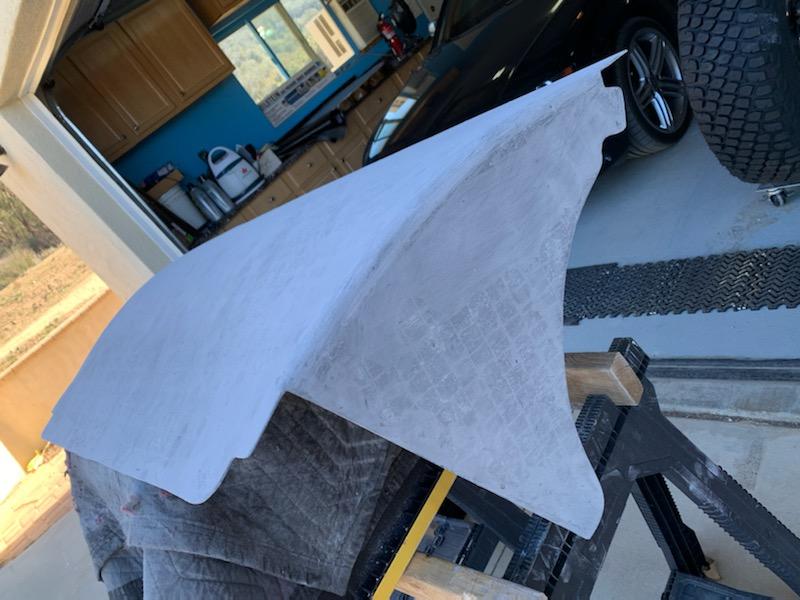
06 February, 2022 We didn't have a normal pre-runner work day this weekend but Trevor spent most of today sanding the radiator duct. Earlier in the week, he had re-coated the the outside surfaces with resin to fill the voids and pin holes; in preparation for the final "finish" coat, he carefully sanded the surfaces smooth and flat.
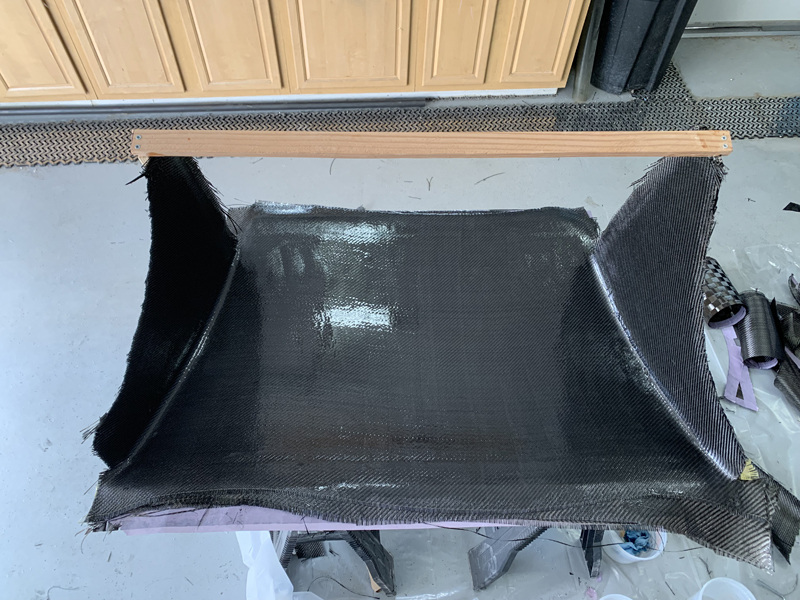
31 January, 2022 Trevor has the radiator duct out of the mold and has begun the finishing process - lots of pinhole filling and sanding...
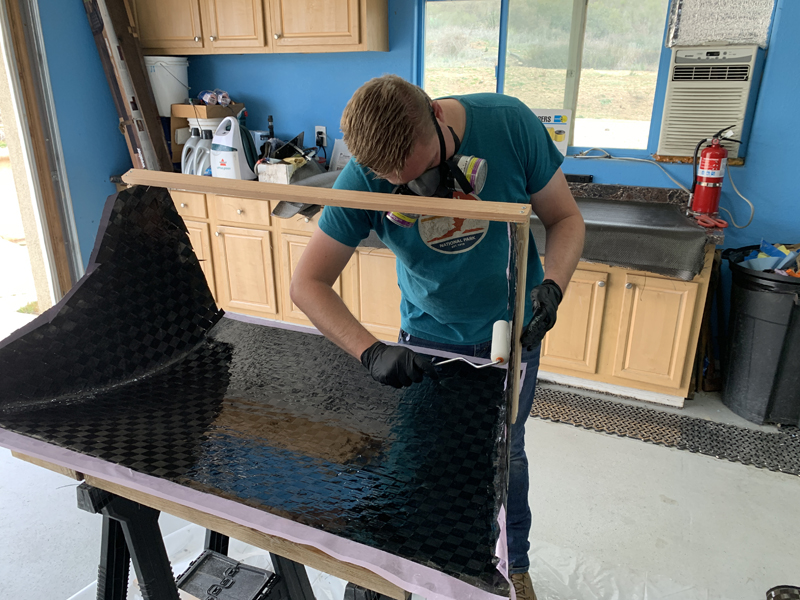
29 January, 2022 Trevor has been working to create the radiator duct mold and get it ready over the last week or so; the mold is built and waxed, the carbon fiber and resin are on hand so today is the day to lay up the duct! We wanted a specific weave pattern (25mm "spread tow") to show so it's the first layer to go down. We reinforced the 25mm tow with several 2X2 "twill" layers for strength and rigidity. We also used a little Kevlar tape along the edges that will secure the duct to the chassis and radiator for fastener "tear through" resistance.
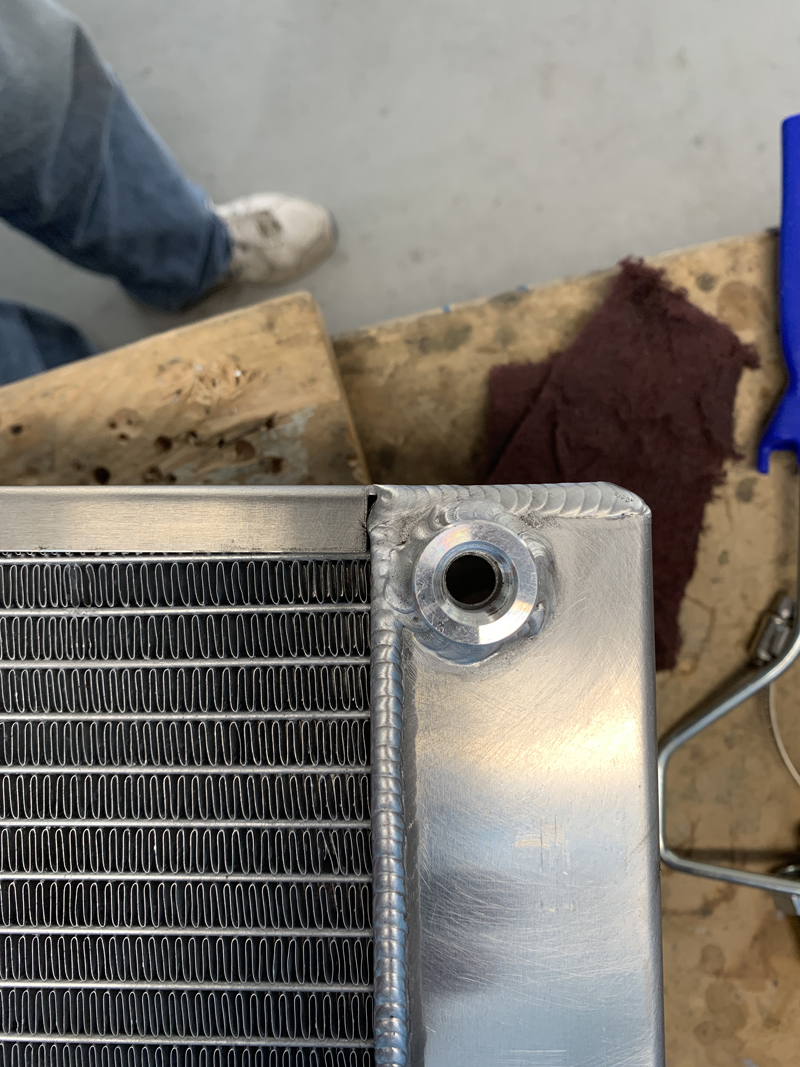
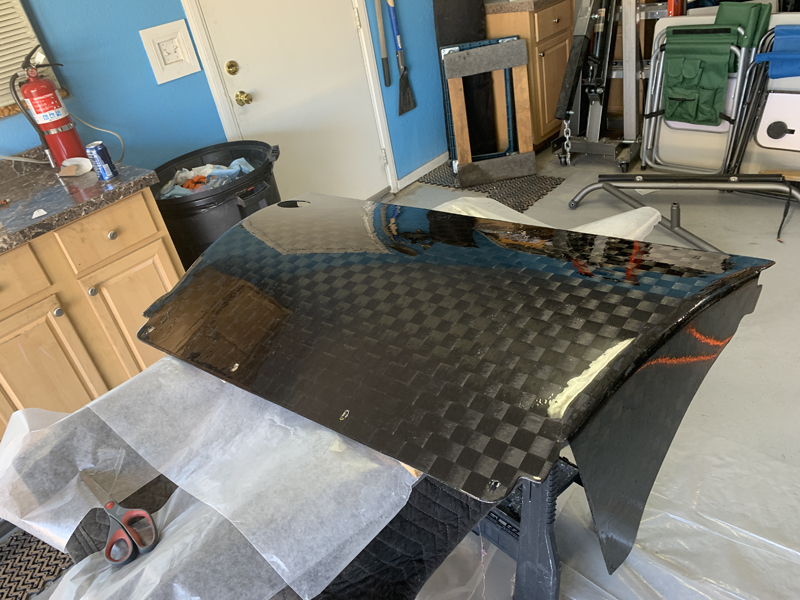
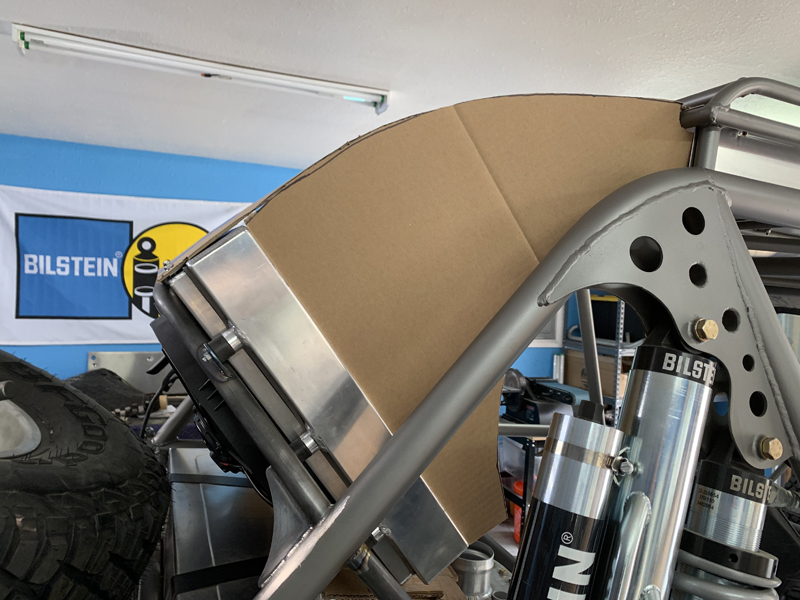
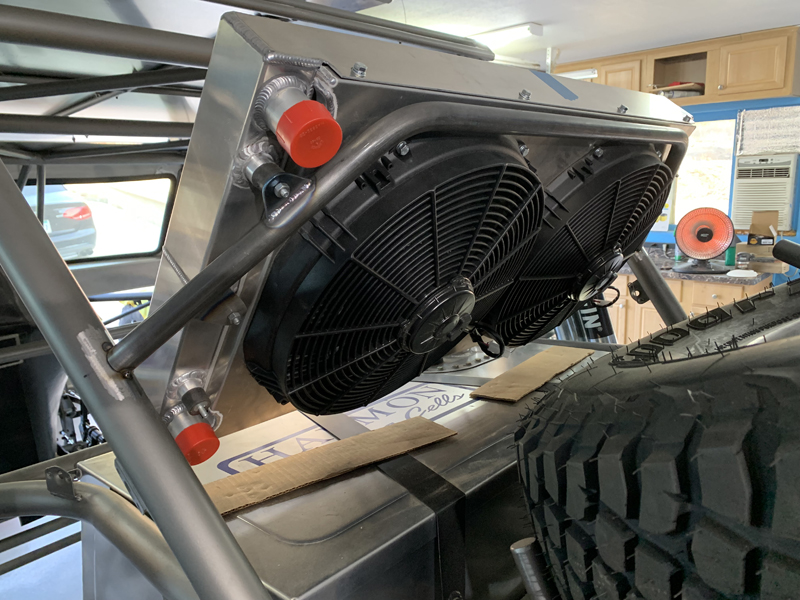
15 January, 2022 Another full day on the pre-runner. Trevor and I completed the physical mounting of the radiator. We had previously fabricated four of the six mounts; the remaining two required that we add a couple of support tubes to the chassis for the mount tabs to bolt to. Those two support tabs are removable from the chassis to facilitate removal of the fuel cell. That all required considerable cutting, fitting and welding to get the desired outcome. We're very happy with the results! Trevor does all the welding but while he waited for me to fit the tubes and tabs, he worked on making patterns for the radiator ducting mold. We're going to make a female mold and layup a one-piece carbon fiber duct to route cooling air from between the roof and "roof rack". This car has a windshield and experience has shown that at speed, the disrupted airflow isn't sufficient for proper cooling; this additional source of airflow eliminates the problem.
08 January, 2022 Trevor and I spent a full day working on the pre-runner today. Earlier in the week, I had fabricated the radiator support "hoop" and the weld-on radiator mount bosses so we had plenty to do. We were able to get all the radiator welding done along with fabricating the mount tabs and welding them to the support hoop. Finally, we welded the support hoop to the chassis and hung the radiator temporarily. We still need to add a couple of lower supports from the chassis to the radiator but the "fiddly" work is done for now.
02 January, 2022 We spent yesterday (New Year's Day) at Trevor's house visiting and working on the pre-runner a little. Now that Trevor's home is settling down a bit after the arrival of their new baby, it's time to start working again. Our current focus is to mount the radiator; we spent some time "mocking up" the radiator in the desired position so that we could measure for and design a suitable mounting arrangement. Fortunately, we have photos of other Lothringer pre-runners like ours so we were able to see how theirs were done. We chose to emulate that basic design; it's a simple matter of duplicating the location and manner of supporting the radiator with a structure tailored to our chassis.
After obtaining the necessary measurements, I designed the structure using "Bend-Tech" software - it makes all the necessary calculations for bending the tube to the correct size and shape. With the design completed, I'll fabricate the tube structure at the shop so that we can add it to the chassis on our next work day.
|